Introduction
A morning you can pick up and go.
These breakfast-friendly cookies are written about here from the vantage point of a tested home kitchen routine, aimed at busy mornings, laid-back brunches, and the kind of batch baking that makes weekday breakfasts feel effortless. As a longtime food blogger and recipe developer I love recipes that bridge the comfort of home baking with real-life schedules — this creation does exactly that. The approach is intentionally forgiving and versatile, so you can make a big tray without fuss and still end up with satisfying texture and gentle sweetness every time.
Whether you’re packing a snack for a commute, assembling a lunchbox for a child, or simply want a healthier grab-and-go that tastes indulgent, this bake delivers on convenience and flavor balance. The dough comes together quickly and the finished bakes keep well, making them ideal for a weekly prep session.
In this article you’ll find a clear ingredient list, step-by-step assembly and baking instructions, plus professional tips for perfect texture, sensible substitutions, and storage guidance that keeps the cookies tasting fresh. I’ll also share serving ideas that elevate a simple cookie into a more rounded breakfast experience. Read on to learn how to make reliable, portable morning bites that become a regular part of your meal rotation.
Why You’ll Love This Recipe
Built for real life, loved for real flavor.
This recipe is tailored to people who want a breakfast solution that feels homemade but doesn’t demand a long morning. It’s perfect for meal prep because the finished cookies are sturdy enough to transport and soft enough to enjoy at room temperature. The technique produces a texture that tucks the comforting chew of a grain base together with pockets of soft, juicy fruit, a touch of caramelized sweetness and a slightly tender crumb that never feels dry.
From the perspective of a recipe developer, I designed the method to be forgiving: minimal steps, no specialized equipment, and a forgiving dough that holds shape. That means new bakers can succeed on the first try, and seasoned cooks can tweak it — add a handful of crunchy mix-ins or a sprinkle of finishing salt — without breaking the formula.
Beyond convenience, the recipe scales well for batch baking. It’s the sort of thing you’ll find yourself making on a Sunday night to simplify the week ahead. The balance of texture and sweetness makes these cookies versatile — satisfying with a warm beverage, tucked into a lunch, or eaten straight from the container as a quick energy boost. Expect repeat requests from friends and family once you bring a tray to a gathering.
Flavor & Texture Profile
Comforting chew, bright pops, and a soft crumb.
This bake is designed to hit a few complementary sensory notes. The base offers a hearty chew and subtle grainy texture that gives the cookie body and satiety without being heavy. Interspersed throughout are bursts of juiciness that create delightful contrast with the more mellow, caramel-like sweetness that develops in the oven. A whisper of warm spice brings depth and helps round out the profile so that every bite feels familiar and balanced.
Texturally you’ll notice a tender interior with slightly firmer edges where the heat concentrates — that gentle edged chew is essential because it prevents the cookie from feeling uniformly soft. Small pockets of concentrated moisture create delightful contrast to the grain base, while optional crunchy add-ins introduce another pleasing layer. The combination of these textures is what keeps the cookie interesting: each mouthful alternates between yielding, chewy, and occasionally crisp.
As a developer, I pay attention to how mouthfeel changes after cooling and during storage. These cookies stay tender for several days when stored properly, and the interior retains moisture without becoming gummy. If you plan to freeze portions, a brief reheat restores the just-baked texture nicely. All of these sensory characteristics make the recipe satisfying for both adults and kids, and suitable for a wide range of morning routines.
Gathering Ingredients
A simple, pantry-friendly shopping list for one reliable bake.
Below is a clear, itemized ingredients list so you can assemble everything before you begin. Gathering your components ahead of time helps the process move quickly and removes decision friction when you’re ready to mix and bake. Use measuring tools and have an oven rack positioned in the center of your oven before you start.
- 3 ripe bananas, mashed
- 2 cups rolled oats (old-fashioned)
- 1 cup fresh or frozen blueberries
- 1/2 cup natural peanut butter or almond butter
- 1 large egg or flax egg (1 tbsp ground flax + 3 tbsp water)
- 2 tbsp honey or maple syrup
- 1 tsp vanilla extract
- 1 tsp ground cinnamon
- 1/2 tsp salt
- 1 tsp baking powder
- 1/4 cup chopped walnuts or chocolate chips (optional)
Tip: If you plan to use frozen fruit, keep it sealed until the final folding step to reduce bleeding. Arrange your optional mix-ins in small bowls if you like to make choices during assembly — it speeds the process and makes the final bake more consistent.
Image: realistic top-down flat-lay of all the raw, uncooked ingredients used in this recipe, arranged neatly and clearly visible on a neutral background. The photograph should include only the listed items and nothing extra, showing them in their uncooked state and free of packaging clutter.
Preparation Overview
A calm, stepwise approach for consistent results.
Think of the assembly as three distinct stages: wet mixing, dry incorporation, and gentle folding of delicate elements. Starting with a tidy mise en place reduces mistakes and keeps the process efficient; have measuring cups, mixing bowls, and your baking sheet ready. The wet stage brings together your soft components into a cohesive binder that will create structure without the need for complicated emulsification, while the dry stage adds bulk and texture. The final stage is where delicate components are introduced with minimal agitation to preserve their integrity and distribution.
A few technique notes from a pro kitchen perspective: use a bowl that leaves enough room for stirring without spillage; when combining wet and dry mixtures, work from the center out so the binder integrates evenly; when folding in fragile bits, use a gentle motion that scoops and turns rather than vigorous stirring to prevent excessive breakage or color bleeding.
The baking step is forgiving, but oven calibration matters. Aim for even spacing on the sheet and consistent sizing for even bake times. After the cookies come out, a short rest on the sheet allows structure to set before moving to a rack. These simple practices deliver a reliable texture and attractive appearance without extra fuss.
Cooking / Assembly Process
Clear, step-by-step instructions for mixing, portioning, and baking.
1. Preheat and prepare: Position an oven rack in the center and preheat to the temperature specified in the recipe. Line a baking sheet with parchment or a nonstick liner.
2. Prepare a flax option (if using): Combine the flax component and water in a small container and let it thicken until it reaches a gel-like consistency.
3. Mash the ripe fruit until mostly smooth, leaving a few small pieces for texture if you prefer. Transfer to a large mixing bowl and add the nut spread, sweetener, vanilla, and the chosen binder; whisk until homogeneous.
4. Add the grain base and the leavening component along with the warm spice and salt to the wet mixture. Stir until the mixture holds together and the dry elements are evenly hydrated.
5. Gently fold in the berries and any optional mix-ins, taking care to distribute them without overworking the dough; if frozen berries are used, fold them in quickly to minimize color bleed.
6. Portion the dough using a tablespoon or small scoop onto the prepared sheet, spacing evenly. Lightly flatten each mound with the back of a spoon — they will not spread dramatically during baking.
7. Bake until edges are lightly golden and cookies are set; allow them to rest briefly on the sheet before transferring to a cooling rack to finish setting. Let cool to avoid crumbly texture when stored.
These instructions are designed to be straightforward and reliable whether you’re baking a single batch or doubling the recipe for meal prep.
Serving Suggestions
Elevate a simple cookie into a satisfying breakfast moment.
These breakfast bites are intentionally portable, but with a little staging they become a more complete plate. For a quick at-home option, consider pairing a warmed cookie with a bowl of yogurt and a drizzle of something sweet for contrast; the temperature difference between a warm cookie and cool accompaniment is a delightful sensory pairing. For on-the-go mornings, wrap individual portions in parchment and tuck them into a lunchbox alongside fresh produce for a balanced carry-out meal.
If you’re serving for a casual brunch, present the cookies on a wooden board alongside small bowls of options so guests can personalize: a buttery spread, a cooling creamy element, or a crunchy topping create variety and make the tray feel thoughtful without adding complexity. For families, these cookies are often a hit with little ones when cut into smaller, bite-sized pieces — they’re easy to snack on and reduce plate mess.
Pro tip: a very brief reheat restores the just-baked aroma and soft interior. Heat for just a few seconds in a microwave or a short stint in a warm oven, watching closely to avoid drying. These simple serving touches transform a practical bake into a flexible breakfast solution that fits many routines.
Storage & Make-Ahead Tips
Keep them fresh, freeze for convenience, and reheat smartly.
Batch baking is most useful when you know how to store the results properly. For short-term storage, place cooled cookies in an airtight container and refrigerate to maintain freshness; a single layer with parchment between layers prevents sticking. If you plan to keep them for more than a few days, freezing individual cookies on a tray until firm before transferring to a sealed freezer bag protects their texture and makes it easy to pull single portions as needed.
When reheating from frozen, a short blast in a microwave or a brief time in a preheated oven restores tenderness and aroma without overcooking. Avoid prolonged reheating which can dry the interior. For transporting on warm days, pack in a cool bag or include an insulated lunch container to prevent heat-softening; this helps maintain the ideal chew and prevents any optional mix-ins from becoming overly melty.
If you enjoy variety, consider portioning half a batch with a crunchy inclusion and half without, so you can alternate textures midweek. Finally, if you need to adjust the recipe for dietary preferences, freeze a small test portion first to ensure the texture meets your expectations — slight formula changes can alter hydration and oven behavior, so testing saves waste and secures repeatable results.
Frequently Asked Questions
Answers to common questions from home bakers.
Q: Can I make the recipe without eggs?
A: Yes — an egg alternative can act as a binder. Use a ground-seed gel or another plant-based binder that mimics the viscous quality of an egg. Give it a few minutes to thicken before mixing it into the wet ingredients so it contributes structure rather than excess moisture.
Q: Will frozen fruit work in this bake?
A: Frozen fruit can be used, but fold it in at the last moment and avoid thawing fully to reduce color bleeding and preserve texture. Quick folding keeps the fruit pieces more intact and prevents the dough from becoming overly wet.
Q: How can I make these less sweet or more protein-forward?
A: Adjust the sweetener to taste and consider adding a complementary protein-rich inclusion for more heft. Balancing sweetness with a touch of acid or a contrasting element can keep the flavor lively without increasing sweetener quantities.
Q: What’s the best way to keep the cookies from becoming dry?
A: Don’t overbake and allow them a short rest on the sheet before transferring to a rack. Store them in an airtight container once fully cool to retain moisture. For longer storage, freezing individual portions maintains texture better than refrigeration alone.
If you have a question that isn’t covered here, drop a detailed note and I’ll share a tested solution. I aim to make recipes that fit your kitchen reality, so troubleshooting and tweaks are always welcome — happy baking!
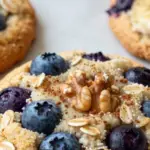
Banana Blueberry Oatmeal Breakfast Cookies
Ingredients
- 3 ripe bananas, mashed 🍌
- 2 cups rolled oats (old-fashioned) 🥣
- 1 cup fresh or frozen blueberries 🫐
- 1/2 cup natural peanut butter or almond butter 🥜
- 1 large egg (or flax egg: 1 tbsp ground flax + 3 tbsp water) 🥚🌱
- 2 tbsp honey or maple syrup 🍯
- 1 tsp vanilla extract 🍶
- 1 tsp ground cinnamon ✨
- 1/2 tsp salt 🧂
- 1 tsp baking powder 🧁
- 1/4 cup chopped walnuts or chocolate chips (optional) 🌰🍫
Instructions
- Preheat the oven to 350°F (175°C) and line a baking sheet with parchment paper.
- If using a flax egg, combine 1 tbsp ground flaxseed with 3 tbsp water, stir and let sit for 5 minutes to thicken.
- In a large bowl, mash the ripe bananas until mostly smooth with a few small chunks remaining.
- Stir in the peanut butter, honey (or maple syrup), vanilla extract and the egg or prepared flax egg until well combined.
- Add the rolled oats, baking powder, cinnamon and salt. Mix until the dry ingredients are incorporated and the mixture holds together.
- Gently fold in the blueberries and the optional walnuts or chocolate chips, being careful if using frozen berries to avoid too much bleeding.
- Scoop tablespoon-sized portions onto the prepared baking sheet (about 12 cookies). Flatten each slightly with the back of the spoon — these cookies won’t spread much.
- Bake for 12–15 minutes, or until edges are lightly golden and cookies are set. Let cool on the baking sheet for 5 minutes, then transfer to a wire rack to cool completely.
- Store in an airtight container in the fridge for up to 5 days, or freeze for longer storage. Reheat briefly before eating if desired.