Introduction
Welcome to the ultimate comfort-baking moment.
These blondie brownies are the kind of treat that makes a kitchen feel like home the moment the oven warms. As a professional recipe writer I lean on a few treasured techniques to coax out a tender, almost fudgelike center while still getting those caramelized, slightly crisp edges that everyone argues over. The narrative of these bars is simple: brown sugar depth meets melted butter silk, and chocolate chips add pops of bittersweet relief.
What I love about this style of bar is its versatility. You can dress it up for company, or keep it humble for a quiet afternoon with coffee. The method is forgiving, so even bakers with limited time or experience will get beautiful results. I will walk you through why these bars behave the way they do, how to set up for success before you ever plug in the oven, and what small finishes make the presentation feel intentional.
Tone and approach: expect clear, technique-forward prose that helps you troubleshoot and customize while preserving that signature gooey interior. The rest of the article dives into texture, ingredient choices, and precise assembly strategies that help these blondie brownies sing every time.
Why You’ll Love This Recipe
This recipe was built for comfort and consistency.
There are desserts that dazzle visually and others that win purely by taste and texture; these blondie brownies fall squarely into the latter camp. They reward a light fold, a gentle hand, and the tiny patience of letting the pan cool so the interior sets without turning cakey. If you crave desserts that are both approachable and indulgent, this is one to keep bookmarked.
Expect straightforward steps, minimal equipment, and a forgiving batter that tolerates small variations. That means you can prepare them for a last-minute gathering, wrap them for school lunches, or tuck squares into lunchboxes with confidence. They also adapt well to small swaps—think finishing salts, toasted nuts, or a ribbon of browned-butter caramel—without losing the essence of what makes them special.
In short: they are easy to make, crowd-pleasing, and have the kind of texture that invites second helpings. I’ll share practical tips to ensure you always hit that perfect balance between gooey center and subtly crisp top.
Flavor & Texture Profile
A quick sensory map before you bake.
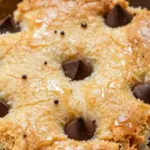
These blondie brownies live at the intersection of caramel-like brown sugar warmth and plush, buttery richness. The browned-sugar notes create a toffee-adjacent character, while melted butter ensures a dense, tender crumb rather than an airy cake. Chocolate chips act as intermittent flavor punctuation—bittersweet pockets that cut through the sweetness and add melty texture.
Texture is deliberately layered: the exterior should take on a faint golden crust that gives a satisfying snap at the edges. Beneath that, the interior is soft and slightly fudgy, with a chew that keeps the bar satisfying rather than crumbly. Good technique—minimal mixing and careful cooling—keeps the structure compact and moist.
Serving temperature matters: warm squares offer the most dramatic melt around chocolate pieces, while fully cooled bars slice cleaner and have a denser chew. Both are lovely; the choice depends on whether you want immediate gooeyness or tidy slices for sharing. This section will help you tune the finished texture to your preference without changing the core formula.
Gathering Ingredients
Assemble everything before you start—mise en place is your best friend.
Taking a moment to collect ingredients and tools sets you up to move confidently through the quick mixing and folding steps. Choose high-quality chocolate and fresh baking staples for the most vibrant results.
Ingredient list (explicit and structured):
- 1/2 cup unsalted butter, melted
- 1/2 cup packed light brown sugar
- 1/3 cup granulated sugar
- 1 large egg, room temperature
- 1 teaspoon vanilla extract
- 1 cup all-purpose flour
- 1/4 teaspoon salt
- 1 cup semi-sweet chocolate chips (divided)
- 8×8-inch square baking pan and parchment paper
Use this moment to preheat your oven and line your pan so you’re not rushing once the batter is ready. If you’re substituting ingredients—like swapping the salt level or trying a different sugar—do so deliberately, understanding how each change impacts texture and flavor.
Tip: room-temperature eggs incorporate more evenly, and measuring flour by spooning and leveling helps avoid a dry, dense outcome.
Preparation Overview
A measured, calm approach makes the difference.
This batter comes together quickly, so use the preparation time to set everything up: line the pan, measure ingredients, and choose a sturdy spatula for folding. When melted butter meets sugars, the glossy emulsion you create is the foundation of the blondies’ tender crumb—mix gently until the texture looks homogeneous.
The key textural control points are gentle incorporation of dry ingredients and conservative mixing once the flour is added. Overworking develops gluten, which leads to a tougher bar—so stir just until moistened and stop. Folding in chocolate chips should be done with care so chips remain distributed without deflating the batter.
Final pre-bake checks: scrape the bowl clean so no pockets of unmixed flour remain; smooth the batter evenly in the pan to promote uniform baking; and reserve some chocolate bits for the surface to create an attractive, melty top. Little attentions at this stage—clean edges, even batter depth, and well-distributed mix-ins—yield noticeably better finished squares.
Cooking / Assembly Process
Follow the steps with intention for consistent results.
Below is the explicitly structured assembly and baking process. Read through each step before starting so you understand the sequence and have everything within reach. The ordered steps include temperature and timing specifics where needed to reproduce the intended texture and doneness.
- Preheat the oven to 350°F (175°C). Brush an 8×8-inch square baking pan with a little melted butter and line it with parchment paper, leaving a 2-inch overhang on two sides.
- In a large bowl, whisk together the melted butter, light brown sugar and granulated sugar until smooth and glossy.
- Whisk in the egg and vanilla extract until fully incorporated and the mixture is slightly thickened.
- Add the all-purpose flour and salt, stirring just until the batter is moistened—avoid overmixing to keep the blondies tender.
- Fold in 1/2 cup of the semi-sweet chocolate chips, reserving the rest for the top.
- Transfer the batter to the prepared pan and smooth the top with a spatula. Sprinkle the remaining chocolate chips evenly over the surface.
- Bake for about 30 minutes, or until the top is golden brown and a toothpick inserted into the center comes out with a few moist crumbs (not wet batter).
- Set the pan on a wire rack and let the blondies cool completely. Use the parchment overhang to lift them from the pan and transfer to a cutting board.
- Cut into squares and serve. Optional: sprinkle with flaky sea salt for a sweet-salty finish.
Pro tip while baking: rotate the pan halfway through the bake if your oven heats unevenly, and trust the crumb test rather than strictly the clock—look for a few moist crumbs on a toothpick rather than raw batter.
Serving Suggestions
Elevate the simple square with a few thoughtful touches.
These bars are delicious straight from the pan, but with a little creativity they become an impressed dessert for guests. Serve warm with a scoop of vanilla ice cream for that classic hot-and-cold contrast. For a more refined platter, dust the tops lightly with powdered sugar and add a few flakes of finishing salt to bring out the brown sugar’s toffee notes.
Consider texture pairings: a crunchy nut brittle or toasted pecans add contrast to the fudgy center, while a drizzle of salted caramel amps up the sweet-salty interplay. For a more casual approach, stack squares with a smear of softened butter between layers for a picnic-style treat.
Plating ideas: serve smaller squares alongside espresso or strong tea as a midday pick-me-up, or present slightly larger squares with fruit compote to balance richness. If transporting, line a tin with parchment and stack layers separated by wax paper to keep edges from sticking. Small finishing touches go a long way toward making humble blondies feel special without complicating the recipe.
Storage & Make-Ahead Tips
Plan ahead so these bars stay fresh and easy to enjoy.
Once cooled completely, store the blondie brownies wrapped or in an airtight container to maintain chew and freshness. For short-term storage, keep them at room temperature in a cool, dry place. If you want to preserve them longer, consider freezing individual squares wrapped tightly to prevent freezer burn. Thaw gently at room temperature or warm briefly in a low oven to revive gooeyness around the chocolate.
If you need to make them ahead for an event, bake and cool completely, then freeze on a tray until firm before transferring to a sealed container; this prevents the pieces from sticking together and makes it easy to grab the exact number you need. When transporting, protect the top layer with parchment to avoid any toppings from smearing.
Reheating note: a very short burst in a microwave or a low-temperature oven will revive the melt of the chips without drying out the bar. Avoid prolonged high heat which can toughen the texture. These practical storage tips will help you keep the blondie brownies tasting close to freshly baked whenever you serve them.
Frequently Asked Questions
Answers to the most common questions bakers ask.
- Can I add nuts or other mix-ins?
Yes—chopped nuts, toffee bits, or a handful of oats can add great texture. Fold them in gently so they distribute without deflating the batter. - Why are my blondies cakey?
Overmixing after adding flour or using too much flour leads to a more cake-like result. Measure flour carefully and stir just until moistened to preserve chew. - How do I know when they’re done?
Look for a golden top and a toothpick with a few moist crumbs. The interior should feel set but still a bit soft beneath the surface; it will firm as it cools. - Can I use salted butter?
Salted butter will increase the saltiness; if you use it, consider reducing added salt slightly or omitting finishing flakes. - Can I make them in a different pan size?
Changing pan size affects thickness and bake time. If you use a larger or smaller pan, watch baking time closely and test earlier or later as needed.
Final FAQ paragraph:
If you’re still unsure about a swap or technique, try a small test batch first—this minimizes waste and helps you dial in changes quickly. Baking is part science and part intuition; once you understand the principles in this guide, you’ll be able to adapt confidently without losing the signature gooey texture that makes these blondie brownies irresistible.
Blondie Brownies
Ingredients
- 1/2 cup unsalted butter, melted 🧈
- 1/2 cup packed light brown sugar 🍯
- 1/3 cup granulated sugar 🍚
- 1 large egg, room temperature 🥚
- 1 teaspoon vanilla extract 🍦
- 1 cup all-purpose flour 🌾
- 1/4 teaspoon salt 🧂
- 1 cup semi-sweet chocolate chips (divided) 🍫
- 8×8-inch square baking pan and parchment paper 🧁
Instructions
- Preheat the oven to 350°F (175°C). Brush an 8×8-inch square baking pan with a little melted butter and line it with parchment paper, leaving a 2-inch overhang on two sides.
- In a large bowl, whisk together the melted butter, light brown sugar and granulated sugar until smooth and glossy.
- Whisk in the egg and vanilla extract until fully incorporated and the mixture is slightly thickened.
- Add the all-purpose flour and salt, stirring just until the batter is moistened—avoid overmixing to keep the blondies tender.
- Fold in 1/2 cup of the semi-sweet chocolate chips, reserving the rest for the top.
- Transfer the batter to the prepared pan and smooth the top with a spatula. Sprinkle the remaining chocolate chips evenly over the surface.
- Bake for about 30 minutes, or until the top is golden brown and a toothpick inserted into the center comes out with a few moist crumbs (not wet batter).
- Set the pan on a wire rack and let the blondies cool completely. Use the parchment overhang to lift them from the pan and transfer to a cutting board.
- Cut into squares and serve. Optional: sprinkle with flaky sea salt for a sweet-salty finish.