If you’re looking for a rich, indulgent dessert that’s guaranteed to impress, this Butterfinger Cake is the ultimate crowd-pleaser. It starts with a moist chocolate cake, gets soaked with sweetened condensed milk and caramel, then topped with fluffy whipped topping and crushed Butterfinger candy bars for the perfect crunchy finish.
This easy Butterfinger poke cake is ideal for birthdays, potlucks, holiday gatherings, or anytime you need a show-stopping dessert with minimal effort.
In this complete guide, you’ll find:
- Step-by-step instructions
- Ingredient breakdown
- Baking tips for ultra-moist cake
- Make-ahead instructions
- Storage and freezing tips
- Flavor variations
Let’s dive in.
What Is Butterfinger Cake?
Butterfinger Cake is a chocolate poke cake topped with caramel, sweetened condensed milk, whipped topping, and crushed Butterfinger candy bars.
The “poke cake” method allows the caramel mixture to soak into the cake, creating an incredibly moist, almost fudge-like texture with bursts of crunchy peanut-butter candy in every bite.
Why You’ll Love This Butterfinger Cake
1. Ultra Moist Texture
The caramel and condensed milk seep into the cake for unbeatable richness.
2. Sweet & Crunchy Contrast
The crushed candy bars add texture that balances the soft cake.
3. Simple Ingredients
You can start with a boxed cake mix to save time.
4. Perfect Make-Ahead Dessert
It tastes even better after chilling.
Ingredients for Butterfinger Cake
For the Cake:
- 1 box chocolate cake mix (plus ingredients listed on box)
For the Filling:
- 1 (14 oz) can sweetened condensed milk
- 1 jar caramel sauce (about 12 oz)
For the Topping:
- 8 oz whipped topping (such as Cool Whip), thawed
- 4–6 Butterfinger candy bars, crushed
Optional drizzle:
- Extra caramel sauce
- Chocolate syrup
How to Make Butterfinger Cake (Step-by-Step)
Step 1: Bake the Cake
Prepare chocolate cake according to package directions in a 9×13-inch pan.
Bake until a toothpick inserted in the center comes out clean.
Let cool for about 10–15 minutes.
Step 2: Poke the Cake
Using the handle of a wooden spoon, poke holes all over the cake, about 1 inch apart.
Make sure holes go deep so the filling soaks in.
Step 3: Add the Filling
In a bowl, mix:
- Sweetened condensed milk
- Caramel sauce
Pour evenly over the warm cake, allowing it to seep into the holes.
Let cake cool completely.
Step 4: Add Topping
Spread whipped topping evenly over cooled cake.
Sprinkle crushed Butterfinger bars generously on top.
Drizzle with extra caramel or chocolate sauce if desired.
Step 5: Chill
Refrigerate for at least 2 hours before serving.
This allows flavors to blend and texture to set.
Pro Tips for the Best Butterfinger Cake
Use Warm Cake for Soaking
The filling absorbs better while the cake is slightly warm.
Crush Candy Just Before Serving
To keep the topping crunchy, add some fresh crushed candy on top right before serving.
Don’t Skip the Chill Time
Chilling improves texture and flavor significantly.
Homemade Chocolate Cake Option
If you prefer from-scratch baking:
Use:
- 1 ¾ cups flour
- ¾ cup cocoa powder
- 2 cups sugar
- 2 eggs
- 1 cup milk
- ½ cup oil
- 1 cup hot coffee
Bake at 350°F for 30–35 minutes in 9×13 pan.
Flavor Variations
1. Peanut Butter Butterfinger Cake
Swirl ½ cup peanut butter into whipped topping before spreading.
2. Butterfinger Cheesecake Poke Cake
Mix 4 oz softened cream cheese into whipped topping.
3. Triple Chocolate Butterfinger Cake
Add mini chocolate chips between cake and topping layers.
4. Salted Caramel Version
Sprinkle flaky sea salt over caramel drizzle.
Make-Ahead & Storage Instructions
Refrigerate
Store covered in refrigerator up to 4 days.
Freeze
You can freeze the cake (without candy topping) for up to 2 months.
Add fresh candy after thawing.
Why Butterfinger Cake Is So Popular
The combination of:
- Moist chocolate cake
- Sweet caramel
- Creamy topping
- Crunchy peanut-butter candy
creates multiple textures and flavors in every bite.
It’s a nostalgic dessert that feels both indulgent and comforting.
Frequently Asked Questions
Can I use homemade caramel?
Yes. Just make sure it’s pourable so it can soak into the cake.
Can I use a different candy bar?
Absolutely. Try:
- Heath bars
- Snickers
- Reese’s
Does it need refrigeration?
Yes, because of the whipped topping and condensed milk.
Can I make it less sweet?
Use less caramel or reduce condensed milk slightly.
Expert Baking Notes
- For clean slices, chill at least 4 hours.
- Use a sharp knife wiped clean between cuts.
- Add extra candy just before serving for crunch contrast.
Final Thoughts
Butterfinger Cake is:
- Easy
- Rich
- Perfect for parties
- Make-ahead friendly
- Guaranteed to disappear fast
If you need a chocolate dessert that delivers bold flavor and impressive presentation without complicated steps, this is the one.
Print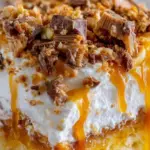
Butterfinger Cake (Easy Chocolate Poke Cake with Caramel & Candy)
Ingredients
For the cake:
- 1 (15.25 oz) box yellow cake mix
- ½ cup (1 stick / 115g) unsalted butter, softened
- ½ cup creamy peanut butter (not natural/oily)
- 3 large eggs
- 1 cup water or milk
- 1 tsp vanilla extract
For the frosting:
- ½ cup (1 stick) unsalted butter, softened
- ½ cup creamy peanut butter
- 3 cups powdered sugar
- 2–3 tbsp milk or heavy cream
- 1 tsp vanilla extract
- Pinch of salt
For assembly & topping:
- 6–8 Butterfinger candy bars, crushed (about 2 cups)
- Optional: ½ cup semi-sweet chocolate chips + 1 tbsp coconut oil (for drizzle)
Instructions
- Make cake: Preheat oven to 350°F (175°C). Grease and flour two 9″ round pans or a 9×13″ pan.
- Beat cake mix, butter, peanut butter, eggs, water/milk, and vanilla until smooth (~3 min).
- Pour into pan(s). Bake:
- Layers: 25–30 min
- Sheet: 30–35 min
- Cool completely.
- Make frosting: Beat butter and peanut butter until creamy. Gradually add powdered sugar, then milk/cream, vanilla, and salt until fluffy.
- Assemble:
- Layer cake: Spread frosting between layers, then over top and sides.
- Sheet cake: Spread frosting evenly over cooled cake.
- Decorate: Press crushed Butterfingers onto sides and top.
- Optional drizzle: Melt chocolate chips + coconut oil; drizzle over cake.
- Chill 30 minutes to set (optional but helps slices hold).
💡 Pro Tips:
– Use regular peanut butter (like Jif)—natural PB can make frosting oily.
– Crush Butterfingers in a zip-top bag with a rolling pin for easy cleanup.
– Store covered at room temp up to 3 days or refrigerate for longer freshness.
Prep Time & Nutrition (per slice, serves 12):
Servings: 12 | Calories: 380 | Net Carbs: 42g | Fats: 22g | Protein: 6g