If you’re looking for a quick, crowd-pleasing dessert that tastes like caramel apples and cheesecake combined, these Caramel Apple Dessert Cups are exactly what you need. They’re layered with creamy filling, cinnamon-spiced apples, buttery cookie crumbs, and rich caramel sauce — all served in individual cups for the perfect party treat.
These no-bake caramel apple cups are ideal for fall gatherings, Thanksgiving dessert tables, bake sales, or anytime you want a cozy apple dessert without turning on the oven.
In this complete guide, you’ll find:
- Step-by-step instructions
- Ingredient breakdown
- Make-ahead tips
- Healthy swap ideas (including maple syrup options)
- Storage instructions
- Flavor variations
Let’s get started.
Why You’ll Love These Caramel Apple Dessert Cups
1. No-Bake & Easy
No complicated baking steps. Just layer and chill.
2. Perfect for Parties
Individual cups mean easy serving and no mess.
3. Make-Ahead Friendly
Prepare them the day before your event.
4. Cozy Fall Flavor
Cinnamon apples + caramel + creamy filling = ultimate comfort dessert.
Ingredients for Caramel Apple Dessert Cups
For the Apple Layer:
- 3 medium apples, peeled and diced
- 2 tablespoons butter (or coconut oil for a lighter option)
- 2 tablespoons brown sugar (or maple syrup)
- ½ teaspoon cinnamon
- 1 teaspoon lemon juice
For the Creamy Layer:
- 8 oz cream cheese, softened
- ½ cup powdered sugar
- 1 teaspoon vanilla extract
- 1 cup whipped topping (like Cool Whip), thawed
For the Crumb Layer:
- 1 ½ cups crushed graham crackers or vanilla cookies
- 4 tablespoons melted butter
For Topping:
- ½ cup caramel sauce
- Extra whipped topping (optional)
- Crushed nuts (optional)
Best Apples to Use
For the best flavor and texture, choose firm apples that hold their shape when cooked:
- Granny Smith – Tart and firm
- Honeycrisp – Sweet and crisp
- Fuji – Naturally sweet
A mix of tart and sweet apples gives the best balance.
How to Make Caramel Apple Dessert Cups
Step 1: Cook the Apples
In a skillet over medium heat:
- Melt butter (or coconut oil).
- Add diced apples, brown sugar (or maple syrup), cinnamon, and lemon juice.
- Cook for 5–7 minutes until softened but not mushy.
Let cool completely before assembling.
Step 2: Prepare the Cream Layer
In a mixing bowl:
- Beat softened cream cheese until smooth.
- Add powdered sugar and vanilla. Mix well.
- Fold in whipped topping gently until light and fluffy.
Refrigerate while preparing crumbs.
Step 3: Make the Crumb Layer
Mix crushed graham crackers with melted butter until evenly coated.
Step 4: Assemble the Dessert Cups
In small clear cups, layer:
- Cookie crumbs
- Creamy filling
- Cinnamon apples
- Drizzle caramel sauce
Repeat layers if cups are tall enough.
Top with whipped cream and a final caramel drizzle.
Chill at least 30 minutes before serving.
Healthy Swap Version (Maple-Sweetened Option)
Since you prefer healthier alternatives using maple syrup and coconut oil, here’s how to adjust:
- Replace brown sugar with pure maple syrup
- Use coconut oil instead of butter
- Swap powdered sugar with 2–3 tablespoons maple syrup (reduce whipped topping slightly to balance moisture)
- Use Greek yogurt instead of part of the cream cheese for added protein
The texture will be slightly lighter but still delicious.
Make-Ahead Tips
- Assemble up to 24 hours in advance
- Store covered in refrigerator
- Add caramel drizzle just before serving for best presentation
These are excellent for holiday dessert prep because they hold their structure well.
Storage Instructions
- Refrigerate in airtight container up to 3 days
- Do not freeze (texture may become watery)
- Stir apple layer gently if liquid separates
Flavor Variations
1. Salted Caramel Apple Cups
Sprinkle flaky sea salt over caramel drizzle.
2. Apple Cheesecake Cups
Add an extra 4 oz cream cheese for thicker cheesecake-style filling.
3. Apple Pie Dessert Cups
Add ¼ teaspoon nutmeg and a pinch of cloves to apple mixture.
4. Pecan Caramel Apple Cups
Add chopped toasted pecans between layers for crunch.
How to Serve Caramel Apple Dessert Cups
These are perfect for:
- Thanksgiving dessert tables
- Fall birthday parties
- Potlucks
- Bake sales
- Holiday dessert boards
Serve in:
- 5–9 oz clear plastic cups
- Mini mason jars
- Small trifle cups
Clear cups show off the beautiful layers.
Why Caramel Apple Desserts Are So Popular
Caramel apples are a nostalgic fall favorite. These dessert cups capture that classic flavor but in a creamy, spoonable version that’s easier to serve and eat.
The combination of:
- Sweet caramel
- Warm cinnamon apples
- Creamy cheesecake layer
- Buttery crumbs
creates a balanced dessert with multiple textures in every bite.
Frequently Asked Questions
Can I use canned apple pie filling?
Yes, but homemade apples taste fresher and less sweet.
How far in advance can I make these?
Up to 24 hours ahead for best results.
Can I make this gluten-free?
Yes. Use gluten-free graham crackers or cookies.
Can I use store-bought caramel?
Absolutely. High-quality jarred caramel works perfectly.
Expert Tips for Perfect Texture
- Cool apples completely before layering
- Don’t overcook apples — they should be tender, not mushy
- Beat cream cheese until completely smooth before adding other ingredients
- Chill before serving to firm layers
Final Thoughts
These Caramel Apple Dessert Cups are:
- Easy
- No-bake
- Perfect for fall
- Party-friendly
- Customizable
- Make-ahead approved
They deliver all the cozy flavor of caramel apples in a simple, elegant layered dessert that looks impressive but takes minimal effort.
Print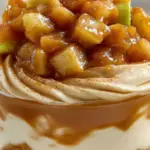
Caramel Apple Dessert Cups (Easy No-Bake Fall Treat)
Ingredients
For the apple layer:
- 2 medium apples (Granny Smith or Honeycrisp), peeled and finely diced
- 1 tbsp lemon juice
- 1 tbsp brown sugar
- ½ tsp cinnamon
- Pinch of nutmeg
- 1 tsp butter (optional, for sautéing)
For the crust layer:
- 1 cup graham cracker crumbs (or gluten-free cookie crumbs)
- 2 tbsp melted butter
For the cheesecake layer:
- 8 oz (225g) cream cheese, softened
- ¼ cup powdered sugar
- ½ tsp vanilla extract
- 1 (8 oz) tub whipped topping (e.g., Cool Whip), thawed
For assembly:
- ½ cup caramel sauce (store-bought or homemade)
- Optional toppings: chopped pecans, extra cinnamon, sea salt flakes
Instructions
- Prep apples:
- No-cook option: Toss diced apples with lemon juice, brown sugar, cinnamon, and nutmeg. Let sit 10 minutes to soften slightly.
- Sautéed option: Melt butter in a skillet. Add apples and spices; cook 4–5 minutes until tender. Cool completely.
- Make crust: Mix graham crumbs and melted butter. Set aside.
- Make filling: Beat cream cheese, powdered sugar, and vanilla until smooth. Fold in whipped topping.
- Assemble cups: In glasses or jars (6–8 oz size), layer in this order:
- Bottom: 1–2 tbsp graham crumb mixture
- Middle: 2–3 tbsp cheesecake filling
- Top: 2–3 tbsp spiced apples
- Drizzle with caramel sauce and optional toppings.
- Chill at least 30 minutes before serving (or up to 2 days).
💡 Pro Tips:
– Use mason jars or clear dessert cups for a beautiful presentation.
– For dairy-free: Use dairy-free cream cheese, whipped topping, and butter.
– Make ahead: Assemble without caramel; add just before serving to keep layers crisp.
Prep Time & Nutrition (per cup, makes 6):
Servings: 6 | Calories: 260 | Net Carbs: 24g | Fats: 18g | Protein: 4g