Introduction
Chocolate Banana Bread is the kind of loaf that greets you with warm nostalgia and a little modern indulgence.
As a professional recipe creator, I love how this bake bridges pantry basics with a luxurious cocoa lift — it’s the loaf you reach for when you want something comforting but a little dramatic. In the oven the kitchen fills with a deep chocolate aroma balanced by the sweet, honeyed scent of very ripe bananas. The finished loaf reads like a cross between a classic quick bread and a tender chocolate cake, but its charm lies in being unfussy and approachable.
I write this recipe with home bakers in mind: clear techniques, forgiving methods and a delicious glaze that makes each slice feel special. While it bakes, the crumb develops pockets of melted chips that create delightful surprise bites, and the glaze adds a glossy, slightly sweet finish that draws a knife through every slice with ease.
Below you’ll find practical guidance and my favorite tips for getting the most decadent texture and the richest chocolate flavor from a humble loaf pan. If you love warm flavors, textured crumbs and a snack that pairs beautifully with coffee or tea, this loaf will become a repeat request at your table.
Why You’ll Love This Recipe
There are a handful of reasons this loaf becomes a favorite fast:
- It balances deep cocoa with natural banana sweetness for a layered flavor profile that’s never one-note.
- The texture is forgiving: tender crumb with pockets of melty chocolate chips that feel indulgent without being heavy.
- It’s versatile—perfect for breakfast, afternoon snacks, or a portable dessert.
As a food blogger I prioritize recipes that are repeatable in busy kitchens. This loaf uses straightforward steps and common ingredients, and gives consistent results whether you’re an experienced baker or trying something new. You’ll appreciate the way small techniques change the loaf’s personality: gentle mixing for a tender crumb, room-temperature ingredients for even incorporation, and a glossy chocolate drizzle to finish.
Beyond the sensory pleasures, there’s something joyfully modest about the loaf: it celebrates ripe bananas at their peak, turning fruit that might otherwise be destined for the compost into something delicious and shareable. If you value easy decadence and crave a reliable, crowd-pleasing bake, this recipe fits perfectly into your repertoire.
Flavor & Texture Profile
Understanding the loaf’s flavor and texture helps you adapt and appreciate each slice.
Flavor-wise, the cocoa base provides an earthy, slightly bitter backbone that contrasts beautifully with the fruit-forward, floral sweetness of very ripe bananas. The milk chocolate chips introduce pockets of creamy sweetness that soften the cocoa’s edge, while the final glaze adds a glossy finish and a refined sweetness that makes each bite sing.
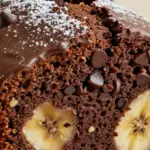
Texture is where this loaf truly shines: aim for a crumb that is moist, tender and slightly dense—enough structure to hold slices cleanly but soft enough to feel supple in the mouth. The inclusion of a dairy element contributes to moisture and a subtle tang that brightens the chocolate and banana pairing. Pockets of melted chocolate create decadent, fudgy notes that contrast with the loaf’s aerated crumb.
When evaluating doneness and mouthfeel, look for a loaf that springs back gently to the touch and yields a fine, even crumb with discernible pockets from chocolate chips. The glaze provides a thin shell of sweetness without overwhelming the loaf, enhancing both the look and the first bite. Pay attention to texture cues rather than timings alone, and you’ll end up with a loaf that’s balanced, comforting and richly flavored.
Gathering Ingredients
Assemble the ingredients before you begin baking — it streamlines the process and reduces the chance of missing something mid-mix.
Use the exact items listed so each component plays its intended role: the flour provides structure, the cocoa brings chocolate depth, the butter and sour cream deliver moisture and richness, and the chocolate chips offer molten pockets of sweetness. Having everything measured and within reach keeps the rhythm smooth and helps preserve the tender crumb this loaf is known for.
- 1 1/4 cups all-purpose flour, leveled
- 1/4 cup unsweetened cocoa powder
- 1 teaspoon baking soda
- 1/4 teaspoon salt
- 1 stick (113g) salted butter, room temperature
- 1/2 cup granulated sugar
- 1/2 cup light brown sugar
- 2 large eggs
- 1 1/4 cups mashed very ripe bananas (about 4 bananas)
- 1/2 cup sour cream
- 1 teaspoon vanilla extract
- 1/2 cup milk chocolate chips
- For the topping: 1/3 cup milk chocolate chips
- For the topping: 2 tablespoons whole milk
- For the topping: 3 tablespoons powdered sugar
Lining up bowls for your dry mix, your creamed mixture, and your add-ins will make the assembly fluid. When your ingredients are prepped and visible, it’s easier to notice substitutions or tweaks you might prefer in future bakes.
Preparation Overview
Before you mix anything, orient yourself around technique rather than steps.
Good baking is as much about feel as it is about measurements: achieve a tender crumb by limiting how much you work the batter once the dry ingredients meet the wet. When creaming fats and sugars, you’re building air into the structure — aim for a light, pale texture but avoid overbeating to the point where the batter becomes too airy. With moist add-ins like mashed bananas and a cultured dairy, focus on even distribution rather than speed; scraping the bowl periodically ensures pockets of ingredient don’t remain isolated.
Folding is a skill worth practicing: use a gentle, deliberate motion to incorporate chocolate chips and dry ingredients, leaving a slightly streaked batter rather than aggressively beating until overdeveloping gluten. This restraint preserves tenderness. Consider pan preparation and placement in the oven — a well-greased pan and centered positioning help promote even rise. Finally, cooling is part of the bake: a brief rest in the pan stabilizes the crumb so the loaf stays intact when you remove it. These technique-focused considerations will make the steps easier to execute and improve consistency across bakes.
Cooking / Assembly Process
Follow these structured steps for reliable results — each numbered instruction reflects the tested process.
- Preheat oven to 350°F (175°C). Grease a 9×5-inch loaf pan with cooking spray or butter.
- In a medium bowl, whisk together the flour, cocoa powder, baking soda and salt until evenly combined.
- In a large bowl, beat the room-temperature butter, granulated sugar and light brown sugar with a hand mixer on high for 2 minutes until creamy.
- Add the eggs one at a time, beating after each addition until fully incorporated.
- Stir in the mashed bananas, sour cream and vanilla. Beat on medium for 1–2 minutes until smooth and there are no lumps of sour cream, scraping the bowl as needed.
- With the mixer on low, add the dry ingredients to the wet ingredients and mix just until no flour streaks remain. Do not overmix.
- Fold in 1/2 cup milk chocolate chips with a rubber spatula until evenly distributed.
- Pour the batter into the prepared loaf pan and smooth the top with a spatula.
- Bake for 55–60 minutes, or until a toothpick inserted into the center comes out clean or with a few moist crumbs.
- Let the bread cool in the pan for 15 minutes, then run a knife around the edges and turn out onto a wire rack to cool completely.
- While the loaf cools, make the chocolate topping: place 1/3 cup chocolate chips and 2 tablespoons milk in a small microwave-safe bowl. Microwave for 15–20 seconds, then stir until smooth.
- Whisk in the powdered sugar until glossy. Let the glaze cool slightly until the bread is completely cooled.
- Drizzle the chocolate topping over the cooled banana bread, slice and serve.
These instructions are presented step-by-step so you can reference the exact order and combine ingredients thoughtfully — the numbered list preserves the tested flow that yields a tender, chocolate-studded loaf with a glossy finish.
Serving Suggestions
Small choices make serving feel thoughtful and intentional.
Slice the loaf with a sharp serrated knife to preserve clean edges and present on a simple wooden board for a rustic aesthetic. A warm slice pairs beautifully with a cup of coffee, a latte or a robust black tea; the loaf’s chocolate notes harmonize with both bright and deep brews. For a more indulgent approach, serve slightly warmed slices with a dollop of whipped cream or a scoop of vanilla ice cream. If you prefer a lighter accompaniment, a smear of nut butter or a drizzle of honey complements the banana’s fruitiness without competing with the chocolate.
For gatherings, plate thin slices on a long tray and garnish sparingly with a few extra chocolate chips or a dusting of powdered sugar for visual contrast. The glaze already lends a glossy finish, so restraint often yields the most elegant look. Consider serving alongside citrusy components—think candied orange peel or a small bowl of mandarin segments—to brighten the plate and cut through the loaf’s richness. These small accents upgrade a humble slice into a memorable moment for guests or family.
Storage & Make-Ahead Tips
Plan ahead so your loaf stays moist and delicious over time.
Once the loaf has cooled completely, store it well-wrapped to protect the crumb and prevent drying. A tight cover keeps air exposure to a minimum, preserving the tender texture and the integrity of the glaze. If you want to prepare ahead for gatherings, you can bake the loaf and store it, then apply the glaze right before serving so it looks freshly finished. When packing slices for a picnic or to-go snack, wrap individually to maintain freshness and simplify portioning.
If freezing, wrap the whole loaf or individual slices securely in plastic wrap, then place into an airtight container or freezer bag. Thaw wrapped at room temperature or gently rewarm slices in a low oven or toaster oven until just warmed through; this restores the soft crumb and melts the chocolate pockets back into a lovely texture. Avoid prolonged refrigeration without protection, as cold air tends to dry quick breads. With these straightforward storage practices, you can enjoy the loaf across several days without compromising texture or flavor, and make it an easy candidate for advance baking when you want a stress-free treat ready for guests.
Frequently Asked Questions
Can I substitute ingredients?
Swaps are possible but will change texture and flavor. For example, using a different fat will alter tenderness; alternative sugars shift moisture and caramel notes. If you want to experiment, change one ingredient at a time and note the result.
How ripe should the bananas be?
The loaf benefits from bananas that are very ripe — dark freckled skins and a soft interior give the best natural sweetness and flavor concentration.
Can I use dark chocolate instead of milk chocolate chips?
Yes. Dark chocolate will deepen the chocolate profile and reduce overall sweetness, creating a more intense balance with the bananas.
Is there a way to make this grain-free or gluten-free?
Gluten-free blends can work but require attention to structure; a blend designed for quick breads usually gives the best results. Expect slight differences in crumb and density.
How can I prevent the loaf from collapsing?
Gentle mixing and accurate leavening will help maintain structure. Avoid overmixing after adding dry ingredients, and ensure your baking soda is fresh for stable rise.
Final note: these FAQs are designed to address common adjustments and troubleshooting points from a baker’s perspective. If you have a specific dietary need or an unusual oven characteristic, test small changes and keep notes — small tweaks often yield big improvements over multiple bakes.
Chocolate Banana Bread
Ingredients
- 1 1/4 cups all-purpose flour, leveled 🌾
- 1/4 cup unsweetened cocoa powder 🍫
- 1 teaspoon baking soda 🥄
- 1/4 teaspoon salt 🧂
- 1 stick (113g) salted butter, room temperature 🧈
- 1/2 cup granulated sugar 🍚
- 1/2 cup light brown sugar 🍯
- 2 large eggs 🥚
- 1 1/4 cups mashed very ripe bananas (about 4 bananas) 🍌
- 1/2 cup sour cream 🥛
- 1 teaspoon vanilla extract 🍦
- 1/2 cup milk chocolate chips 🍫
- For the topping: 1/3 cup milk chocolate chips 🍫
- For the topping: 2 tablespoons whole milk 🥛
- For the topping: 3 tablespoons powdered sugar 🍚
Instructions
- Preheat oven to 350°F (175°C). Grease a 9×5-inch loaf pan with cooking spray or butter.
- In a medium bowl, whisk together the flour, cocoa powder, baking soda and salt until evenly combined.
- In a large bowl, beat the room-temperature butter, granulated sugar and light brown sugar with a hand mixer on high for 2 minutes until creamy.
- Add the eggs one at a time, beating after each addition until fully incorporated.
- Stir in the mashed bananas, sour cream and vanilla. Beat on medium for 1–2 minutes until smooth and there are no lumps of sour cream, scraping the bowl as needed.
- With the mixer on low, add the dry ingredients to the wet ingredients and mix just until no flour streaks remain. Do not overmix.
- Fold in 1/2 cup milk chocolate chips with a rubber spatula until evenly distributed.
- Pour the batter into the prepared loaf pan and smooth the top with a spatula.
- Bake for 55–60 minutes, or until a toothpick inserted into the center comes out clean or with a few moist crumbs.
- Let the bread cool in the pan for 15 minutes, then run a knife around the edges and turn out onto a wire rack to cool completely.
- While the loaf cools, make the chocolate topping: place 1/3 cup chocolate chips and 2 tablespoons milk in a small microwave-safe bowl. Microwave for 15–20 seconds, then stir until smooth.
- Whisk in the powdered sugar until glossy. Let the glaze cool slightly until the bread is completely cooled.
- Drizzle the chocolate topping over the cooled banana bread, slice and serve. Enjoy!