Introduction
Chocolate Brownie Banana Bread is the kind of recipe that quietly transforms ripe bananas into something indulgent yet wholesome.
As a professional food writer I adore recipes that bridge the gap between comfort baking and mindful ingredients — and this loaf does exactly that.
The batter smells like cocoa and caramelized banana the moment it hits the oven, and that aroma alone makes mornings feel celebratory.
- It’s naturally sweet from fruit and maple, so the chocolate flavors sing without overwhelming.
- The crumb has a tender, slightly dense profile reminiscent of a fudgy brownie rather than a dry loaf.
From a content creator’s perspective, this loaf photographs beautifully: rich, deep-brown crumb, scattered chocolate gems, and the rustic swirls of mashed banana. In recipe development I always test for balance — texture, sweetness, and visual appeal — and this formula reliably delivers a glossy batter that bakes into a moist, sliceable bread. If you love gluten-free baking that doesn’t sacrifice decadence, this is a go-to. The writing and imagery that accompany a bake like this should highlight the sensory moments: the glossy batter sheen, the warm chocolate pockets as they melt, and the satisfying density of each bite. That’s what I aim to capture when I write and shoot this loaf: honest, approachable decadence made from simple pantry staples.
Why You’ll Love This Recipe
This loaf is built to please both cravings and clean-eating goals.
I always pitch recipes to readers by answering a simple question: what makes this worth baking? For this chocolate banana bread there are a few clear wins.
- Texture that impresses: It delivers a brownie-like fudginess that comes from the interplay of mashed fruit, eggs, and almond flour.
- Clean ingredients: Naturally sweetened and free from gluten, the loaf sits comfortably in paleo and grain-free rotations without feeling like a compromise.
- Versatility: Serve it as a breakfast slice smeared with nut butter, or as an after-dinner treat with a steaming cup of coffee.
- Reliable results: The batter is forgiving — it tolerates slight variations in banana ripeness and still yields a tender loaf.
As a baker and content creator, I find readers appreciate recipes that are flexible and forgiving. This one performs in different kitchens, and that confidence is worth sharing. I also emphasize that the loaf’s chocolate pockets and nutty notes are what make it feel indulgent while still fitting into a health-conscious routine. Those are the story beats I lean into when recommending this recipe to busy home bakers.
Flavor & Texture Profile
Think deep cocoa, ripened banana sweetness, and a toasty nutty backbone.
The cocoa brings an earthy bitterness that harmonizes with the banana’s natural sugars; the result is not cloyingly sweet but satisfyingly chocolate-forward. Almond flour contributes a warm, slightly granular nuttiness that carries the structure, while a touch of coconut flour adds absorbency and a faint coconut aroma that plays well with the tropical hint from coconut oil.
- Top notes: aromatic banana and vanilla that lift each bite.
- Mid palate: bittersweet cocoa and melty chocolate pockets that punctuate the loaf.
- Finish: a clean almond aftertaste with a subtle crunch if you include nuts.
Texture-wise, this loaf sits between cake and brownie: dense enough to feel rich, yet tender and moist rather than dry. Chocolate chips create molten beads within the crumb, and if nuts are used they provide an intermittent crunch. The crust forms a thin, slightly crackled top that contrasts with the softer interior. When writing about dishes like this I focus on these contrasts — glossy pockets of melted chocolate against a plush crumb, and a thin, slightly toothsome crust that gives each slice definition. This balance is what keeps every bite interesting and prevents the loaf from feeling one-note.
Gathering Ingredients
Assemble everything before you start — mise en place makes gluten-free and paleo baking run smoothly, especially because some alternative flours behave differently than wheat. Lay out your bowls and measuring tools, and have the chocolate and optional nuts ready if you plan to use them.
- 3 ripe bananas, mashed
- 3 large eggs
- 1/3 cup coconut oil, melted
- 1/3 cup maple syrup
- 2 tsp vanilla extract
- 1 cup almond flour
- 1/4 cup coconut flour
- 1/2 cup unsweetened cocoa powder
- 1 tsp baking soda
- 1/4 tsp sea salt
- 1/2 cup dark chocolate chips or chopped dark chocolate
- Optional: 1/4 cup chopped walnuts or pecans
Practical tips for sourcing and swaps are worth noting in your prep: choose almond flour that’s finely ground for a silkier crumb; pick a dark chocolate with a cocoa percentage you enjoy for the most satisfying pockets of melty flavor; and ripe bananas with brown speckles on their skins yield the richest banana flavor. If you’re including nuts, toast them briefly in a dry skillet to amplify their aroma before chopping. I recommend having a spatula, mixing bowl, and loaf pan within arm’s reach so you can move through the steps without pausing. These little workflow optimizations matter when you’re working with a thick batter that sets quickly once mixed.
Preparation Overview
Plan your steps so texture and moisture are optimal.
Start by preparing your wet and dry components separately so you avoid overworking the almond-based batter. When working with almond and coconut flours, the mixing method is more influential than aggressive whisking — gentle folding preserves tenderness while distributing the cocoa and leavening evenly. Let the coconut oil be warm enough to pour but not so hot that it cooks the eggs when combined.
- Wet vs dry: Combine banana, eggs, and liquid sweetener first to form a cohesive base.
- Folding technique: Use a flexible spatula to fold dry ingredients in with a few deliberate strokes until just combined — avoid a smooth, cake-like batter.
- Chocolate distribution: Reserve a handful of chips for the top to create an attractive finish and melty surface pockets.
If you choose to include nuts, fold them in at the end to prevent them from pulverizing into the batter. Greasing or lining your pan ensures easy removal, and a parchment overhang makes lifting the loaf effortless. I always advise checking batter consistency by scooping a small amount with a spoon — it should be thick and hold its shape rather than runny. That consistency translates to a dense, fudgy crumb after baking. These are the kinds of tactile cues I describe to readers so they can diagnose and adjust based on how their batter looks and feels.
Cooking / Assembly Process
Follow the steps below for consistent results.
- Preheat the oven to 175°C (350°F). Line a 9×5 inch loaf pan with parchment paper or grease it well.
- In a large bowl, mash the ripe bananas until mostly smooth.
- Whisk in the eggs, melted coconut oil, maple syrup and vanilla extract until well combined.
- In a separate bowl, sift together the almond flour, coconut flour, cocoa powder, baking soda and sea salt.
- Fold the dry ingredients into the wet mixture until just combined. Do not overmix — the batter will be thick.
- Stir in the dark chocolate chips and nuts (if using), reserving a few chips to sprinkle on top.
- Transfer the batter to the prepared loaf pan and smooth the top. Sprinkle remaining chocolate chips on the surface.
- Bake for 45–55 minutes, or until a toothpick inserted into the center comes out with a few moist crumbs (not wet batter). If the top browns too quickly, tent with foil.
- Allow the bread to cool in the pan for 10–15 minutes, then lift out using the parchment and cool completely on a wire rack before slicing.
- Serve slightly warm or at room temperature.
These steps keep the process clear for home bakers while preserving the technical cues that matter: how the batter should look before it goes into the pan, why gentle folding prevents a gummy crumb, and when to tent with foil if the top is coloring too quickly. Small timing and temperature details are included in the instructions so bakers can reproduce the exact texture and doneness that make this loaf taste like a chocolate brownie in bread form.
Serving Suggestions
Simple pairings elevate each slice.
This loaf thrives with contrasts — creamy, nutty, or tart accompaniments complement its dense chocolate-banana core. For a breakfast approach, a smear of almond or cashew butter adds richness and a silky mouthfeel. If serving as a dessert, pair with a dollop of lightly sweetened coconut cream or a few fresh berries to introduce brightness and acidity.
- Breakfast: Thick slice with a smear of nut butter and a sprinkle of flaky sea salt.
- Snack: Warm slice alongside a cup of strong coffee or a latte — the roast cuts through the chocolate.
- Dessert: A scoop of coconut or dairy-free vanilla ice cream and a scattering of toasted nuts for texture.
For presentation, slice with a serrated knife in a single straight motion to prevent crumbling. If you’ve reserved chocolate chips for the top, the gleam of melted chocolate makes an attractive focal point; a light dusting of cocoa or a few toasted nut pieces adds contrast. When photographing or plating, use natural light to reveal the glossy pockets of chocolate and the moist crumb; a simple linen backdrop keeps the loaf feeling homey and approachable. These service ideas are meant to highlight balances — creamy versus crunchy, warm versus cool — that make each bite more memorable.
Storage & Make-Ahead Tips
Make ahead and store smartly so you preserve moisture and flavor.
If you plan to bake in advance, allow the loaf to cool completely before wrapping; this prevents trapped steam from creating a soggy surface. For short-term keeping and travel, wrap slices individually to make grab-and-go snacks. Freezing is an excellent option for long-term storage because the loaf freezes well and thaws without losing its fudgy character.
- Room temperature: Store in an airtight container for up to a couple of days; keep away from direct heat or sunlight.
- Refrigeration: Place in a sealed container to maintain moisture for several days.
- Freezing: Slice and individually wrap pieces in plastic-free parchment or freezer-safe wrap, then place in a resealable bag; thaw at room temperature or briefly warm to revive that just-baked sensation.
When reheating frozen or refrigerated slices, use gentle heat — a low oven or a quick toast cycle is ideal — to re-melt chocolate pockets without drying the crumb. If you plan to gift loaves, wrap them with parchment and tie with kitchen twine; include a small note recommending gentle reheating for best enjoyment. These storage practices ensure the loaf remains moist and flavorful, and they help readers integrate the recipe into weekly meal prep or pantry rotation without sacrificing quality.
Frequently Asked Questions
Common questions and practical clarifications from home bakers.
- Can I swap nut flours?
Almond flour is central to the texture here due to its oil content and crumb structure; other nut flours may alter moisture and density, so swap with caution and expect textural differences. - What chocolate should I use?
Choose a dark chocolate you enjoy eating; higher cocoa percentages yield a more bittersweet profile while milkier options make the loaf sweeter and creamier. - How do I avoid a sunken center?
Avoid overmixing and be mindful of oven temperature accuracy; if your oven runs hot, the loaf can rise quickly and then collapse. - Are there egg-free alternatives?
Eggs contribute structure and lift; egg-free swaps often require additional binders and changes to texture — try tested flax or chia egg substitutes but expect a denser crumb.
If you have another question not covered here — about ingredient swaps, altitude adjustments, or how to adapt the loaf for different dietary needs — I welcome you to ask. I regularly refine recipes based on real-world kitchen feedback, and answering those troubleshooting queries is one of my favorite parts of food writing.
Print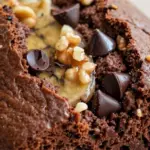
Chocolate Brownie Banana Bread (gluten-free & paleo)
Ingredients
- 3 ripe bananas, mashed 🍌
- 3 large eggs 🥚
- 1/3 cup coconut oil, melted 🥥
- 1/3 cup maple syrup 🍁
- 2 tsp vanilla extract 🌿
- 1 cup almond flour 🌰
- 1/4 cup coconut flour 🥥
- 1/2 cup unsweetened cocoa powder 🍫
- 1 tsp baking soda 🧂
- 1/4 tsp sea salt 🧂
- 1/2 cup dark chocolate chips or chopped dark chocolate 🍫
- Optional: 1/4 cup chopped walnuts or pecans 🌰
Instructions
- Preheat the oven to 175°C (350°F). Line a 9×5 inch loaf pan with parchment paper or grease it well.
- In a large bowl, mash the ripe bananas until mostly smooth.
- Whisk in the eggs, melted coconut oil, maple syrup and vanilla extract until well combined.
- In a separate bowl, sift together the almond flour, coconut flour, cocoa powder, baking soda and sea salt.
- Fold the dry ingredients into the wet mixture until just combined. Do not overmix — the batter will be thick.
- Stir in the dark chocolate chips and nuts (if using), reserving a few chips to sprinkle on top.
- Transfer the batter to the prepared loaf pan and smooth the top. Sprinkle remaining chocolate chips on the surface.
- Bake for 45–55 minutes, or until a toothpick inserted into the center comes out with a few moist crumbs (not wet batter). If the top browns too quickly, tent with foil.
- Allow the bread to cool in the pan for 10–15 minutes, then lift out using the parchment and cool completely on a wire rack before slicing.
- Serve slightly warm or at room temperature. Store leftovers in an airtight container at room temperature for 2 days or refrigerated for up to 5 days.