Introduction
A nostalgia-forward crowd-pleaser
This layered dessert arrives with the comfort of familiar flavors and the satisfaction of a composed, chilled bar. Bright memories of lunchbox cookies and classic pudding mix meet a richer, more sophisticated assembly when crumbs, pudding, and a pillowy peanut butter cream come together.
What to expect from this write-up
I walk you through the sensorial cues to watch for as you build the bars, share subtle technique notes that make assembly effortless, and highlight easy swaps for texture or sweetness if you prefer.
- Tips for a firm yet tender crust
- How to balance peanut butter richness with chocolate depth
- Simple tricks to make slicing clean, neat bars
I write as a recipe developer who prizes both approachability and results, so you’ll find small pivots to suit your pantry and large-picture guidance that preserves the essence of the dessert. Expect an indulgent, chill-required sweet that’s exceptional for potlucks, dessert tables, or a weekend baking session with friends.
Why You’ll Love This Recipe
Comfort meets party-ready
This layered dessert ticks many boxes: it’s texturally dynamic, visually appealing when sliced into neat squares, and easily scaled for gatherings. The assembly avoids complex techniques, which makes it appealing whether you’re feeding family after dinner or prepping for a celebration.
Effort vs. reward
A modest time investment up front gives you hands-off chilling later. The recipe rewards patience with clean layers that hold together without crumbling apart, delivering distinct bites of cookie crunch, smooth chocolate, and a decadent peanut butter cream.
- Make-ahead friendly — assemble, chill, and serve when ready
- Kid-approved flavors that still feel grown-up
- Customizable topping options for texture or added decadence
I also love that the ingredients are accessible: no tempering, no specialty tools, just common pantry items elevated by layering technique. If you enjoy desserts with contrast and a retro-modern vibe, this will become a reliable favourite in your repertoire.
Flavor & Texture Profile
How the components speak to each other
The experience begins with a butter-moistened cookie crust that provides a crisp, sandy bite and a toasty, peanut-butter-cookie backbone. Above that, the chocolate pudding contributes a glossy, cool, and silky mid-layer with mellow cocoa notes that temper the salinity and nuttiness beneath. The peanut butter cream brings sweet, savory, and tangy interplay thanks to the cream cheese lift — it’s dense but airy enough to contrast with the pudding.
Textural choreography
Each forkful is a mini-journey: the crust’s initial crunch, the pudding’s smooth glide, and the creamy, slightly whipped peanut butter top layer. The final scattered chips and cookie crumbs add pops of chew and occasional nutty crunch.
- Sweetness: Balanced by cream cheese and dark-ish chocolate notes
- Mouthfeel: Crunch → silk → creamy → crunchy finish
- Temperature: Best served chilled for clean layering and firm slices
If you favor contrasts—soft vs. crisp, sweet vs. slightly salty—this dessert is intentionally layered to deliver those moments in every square.
Gathering Ingredients
Complete ingredient checklist
Below is a clear, pantry-ready list so you can collect everything before you start. Lay items out to streamline assembly and chilling steps.
- Peanut butter sandwich cookies, crushed — 16 oz (reserve 8–9 cookies for topping)
- Unsalted butter, melted — 8 tbsp (½ cup)
- Milk — 1½ cups
- Instant chocolate pudding mix — 3.9 oz
- Cream cheese, softened — 4 oz
- Powdered sugar — ½ cup
- Creamy peanut butter — ½ cup (plus extra for drizzling)
- Whipped topping (Cool Whip) — 8 oz
- Milk chocolate chips — ½ cup
- Peanut butter chips or chopped peanuts — ½ cup
- Reserved crushed peanut butter sandwich cookies — for sprinkling
Gather the tools too: an 8×8 pan, offset spatula or regular spatula, mixing bowls, whisk or electric mixer, measuring cups, and a microwave-safe bowl for melting butter or peanut butter for drizzling. When everything is within reach, assembly is smooth and portable—from countertop to fridge with minimal fuss.
Preparation Overview
Set yourself up for smooth assembly
Start by chilling your pan and clearing workspace. The sequence of tasks matters: you want the crust baked and fully cooled before pouring pudding to prevent any textural bleed. While the crust bakes and cools, whisk the pudding to its full set and whip the peanut butter-cream layer to a consistently smooth, spreadable texture.
Pacing tips
- Bake and cool the crust first, then make pudding so it can set while you work on the peanut butter layer
- Soften cream cheese to room temperature for a lump-free cream
- Keep the whipped topping chilled until final assembly to maintain loft
Use shallow bowls for pudding and cream to speed cooling. If you’re short on time, an ice bath for the pudding bowl can accelerate setting before the spread step. Keep tools nearby — offset spatula, rubber spatula, and measuring spoons — and have a chilled tray or rack ready for the pan. Treat the process as assembly-line layering; the result is clean edges and crisp layers when you finally slice.
Cooking / Assembly Process
Step-by-step instructions
- Preheat the oven and prepare an 8×8 pan by lightly spraying or lining if preferred.
- Combine crushed peanut butter sandwich cookies with melted butter until evenly moistened; press into the bottom of the prepared pan in an even layer.
- Bake the crust briefly, then remove and allow it to cool completely so subsequent layers don’t become runny.
- Whisk the instant chocolate pudding with cold milk until thickened and glossy, then spread this set pudding evenly over the cooled crust and refrigerate to firm.
- Beat the softened cream cheese until smooth, add creamy peanut butter, then lower mixer speed and gradually incorporate powdered sugar until fully combined and silky.
- Spread the peanut butter cream cheese mixture evenly over the chilled chocolate pudding layer with an offset spatula for clean edges.
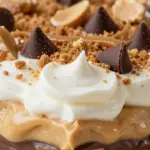
- Gently spread whipped topping over the peanut butter layer to create a light, even cap for the toppings.
- Scatter milk chocolate chips and peanut butter chips (or chopped peanuts) over the top, then sprinkle reserved crushed cookies and optionally drizzle extra melted peanut butter for shine and contrast.
- Chill the assembled lasagna until fully set, then slice into squares and serve chilled.
These directions keep layers distinct and ensure easy slicing. Mind the chilling times for each layer: patience produces the sharp, attractive lines we all love in a layered dessert. For slicing, use a sharp knife warmed under hot water and wiped dry between cuts to preserve clean edges and minimize smearing.
Serving Suggestions
Presentation that enhances flavor
Serve chilled squares on a simple dessert plate to let the layers shine. A small dollop of lightly whipped cream or a tiny sprinkle of flaky sea salt on each square can heighten the peanut butter and chocolate interplay without overpowering it. For gatherings, arrange bars in rows on a tray with parchment to keep slices neat and easy for guests to pick up.
Pairings
- Beverages: Strong coffee, cold milk, or a mild black tea complements the richness
- Accents: Fresh berries or a few toasted salted peanuts on the side add brightness and crunch
- Occasion styling: Mini flags, small dessert forks, or doilies make these feel party-ready
Keep slices chilled until service for best texture. If you display at room temperature, do so for short periods; the whipped topping is light and can soften if left too long. When serving to a crowd, pre-slice and plate to maintain a smooth flow at the table and avoid a messy cutting station.
Storage & Make-Ahead Tips
Make-ahead advantages
This dessert is ideal for preparing in advance: assemble fully, chill, then cover tightly and refrigerate until needed. The chilling time allows layers to bond and flavors to meld, making slices cleaner and the texture more harmonious.
Storage guidelines
- Refrigerate covered for up to several days to maintain texture and freshness
- Freeze individual squares wrapped well for longer storage; thaw in the refrigerator before serving
- If toppings soften over time, refresh by adding a sprinkle of reserved crushed cookies or a light drizzle of melted peanut butter just before serving
To keep edges tidy, use parchment to lift the whole slab from the pan before slicing; this makes transferring slices or storing them more convenient. When thawing from frozen, keep in the refrigerator to avoid condensation that can make the crust lose crispness. With a bit of planning, these bars are a low-stress option for parties and can be a weekday treat when assembled the night before.
Frequently Asked Questions
Common questions answered
Below are practical answers to typical queries that come up when making a layered chilled dessert like this one. These details help avoid common pitfalls and give you room to adapt the recipe to your pantry and timeline.
- Can I make substitutions? Yes. Swap cookie types or chocolate chips to suit flavor preferences, but consider texture—some cookies absorb liquid differently, which can affect the crust’s firmness.
- How do I ensure clean slices? Chill thoroughly and use a sharp knife warmed under hot water and wiped dry between cuts to achieve neat edges.
- What if my pudding doesn’t set quickly? Whisk it vigorously and give it extra time in the refrigerator; an ice bath can speed up the process without affecting texture.
- Can this be frozen? Yes—wrap individual squares tightly and thaw in the refrigerator to minimize moisture on the crust.
Final note
If you’re ever unsure about a swap or a technique, small tests—like whipping up a smaller portion to assess texture—are an excellent way to adapt confidently. Enjoy the process of layering and the smile it brings when you share the finished bars.
Chocolate Peanut Butter Lasagna
Ingredients
- Peanut butter sandwich cookies, crushed — 16 oz (reserve 8–9 cookies for topping) 🍪
- Unsalted butter, melted — 8 tbsp (½ cup) 🧈
- Milk — 1½ cups 🥛
- Instant chocolate pudding mix — 3.9 oz 🍫
- Cream cheese, softened — 4 oz 🧀
- Powdered sugar — ½ cup 🍚
- Creamy peanut butter — ½ cup (plus extra for drizzling) 🥜
- Whipped topping (Cool Whip) — 8 oz 🍦
- Milk chocolate chips — ½ cup 🍫
- Peanut butter chips or chopped peanuts — ½ cup 🥜
- Reserved crushed peanut butter sandwich cookies for sprinkling — as needed 🍪
Instructions
- Preheat oven to 350°F (175°C) and lightly spray an 8×8-inch pan.
- Combine 16 oz crushed peanut butter sandwich cookies with melted butter until crumbs are moistened.
- Press crumbs firmly into bottom of prepared pan in an even layer.
- Bake crust for 10 minutes then remove and let cool completely.
- Whisk instant chocolate pudding mix with 1½ cups cold milk until thickened (about 2 minutes).
- Spread set chocolate pudding evenly over cooled crust and refrigerate while preparing next layer.
- Beat softened cream cheese until smooth, then add ½ cup creamy peanut butter and mix until combined.
- Lower mixer speed and gradually add powdered sugar, mixing until smooth and fully incorporated.
- Spread peanut butter cream cheese mixture evenly over the chocolate pudding layer.
- Spread whipped topping evenly over the peanut butter layer.
- Sprinkle milk chocolate chips and peanut butter chips (or chopped peanuts) evenly over the top.
- Sprinkle reserved crushed sandwich cookies over the toppings and optionally drizzle extra melted peanut butter.
- Chill lasagna in the refrigerator for at least 120 minutes to set.
- Cut into 2” x 2” squares (about 16 bars), serve chilled and enjoy.