There’s something deeply comforting about a freshly baked classic homemade apple pie. The soft, warm, spiced apple filling bubbling under a golden, flaky crust evokes cozy kitchens, family gatherings, and the simple pleasure of dessert done right. This apple pie isn’t just a dessert—it’s a tradition, an aroma-filled memory in the making, and a treat that deserves its place at the table.
In this comprehensive guide, we’ll explore the history, ingredients, step-by-step method, expert tips, serving suggestions, and storage advice to help you bake a perfect classic apple pie. Whether you’re baking for a holiday or a quiet weekend afternoon, this recipe is built to deliver.
🌍 A Brief History of Apple Pie
The apple pie you know and love has deeper roots than you might think. While it’s often considered a quintessential American dessert, its origins trace back to medieval Europe.
- Recipes for apple pies appear in England as early as the 14th century. Wikipedia+2What’s Cooking America+2
- Early versions in England were quite different — often made with pastry shells (called “coffyns”) that were more container than edible crust. Tasting History+1
- Dutch and German immigrant influences brought the flaky bottom + top crust we now associate with the modern apple pie. Back Then History+1
- In America, apple pie became a symbol of home, comfort, and national identity, with the phrase “as American as apple pie” emerging in the early 20th century. Smithsonian Magazine+1
So when you bake a classic apple pie, you’re joining a long, rich culinary tradition. And getting it right is like making a little piece of history in your kitchen.
🧂 Ingredients You’ll Need
For the Flaky Pie Crust
- 2 ½ cups all-purpose flour
- 1 tsp sugar
- 1 tsp salt
- 1 cup (2 sticks) unsalted butter, cold and cubed
- 6–8 tbsp ice-cold water
For the Apple Filling
- 6–7 cups peeled and sliced apples (about 6 large apples) — choose a mix of firm varieties like Granny Smith + Honeycrisp for sweet + tart balance
- ¾ cup granulated sugar
- ¼ cup packed brown sugar
- 2 tbsp all-purpose flour (for thickening)
- 1 tsp ground cinnamon
- ¼ tsp ground nutmeg
- ¼ tsp salt
- 2 tsp lemon juice
- 1 tsp vanilla extract
For Finishing
- 1 egg, beaten (for egg wash)
- 1 tbsp sugar (optional, for sprinkling on top crust)
These ingredients create a balanced pie: a buttery crust, a flavorful filling, and a tender finish that’s neither too soft nor too runny.
👩🍳 How to Make Classic Homemade Apple Pie
Here’s a detailed step-by-step guide to baking your apple pie from scratch.
Step 1: Make the Crust
- In a large mixing bowl, whisk together flour, sugar, and salt.
- Add the cold, cubed butter. Using a pastry cutter or two forks (or a food processor), cut the butter into the flour until you get pea- and oat-sized bits.
- Gradually add ice-cold water, one tablespoon at a time, stirring until the dough just comes together. Don’t over-mix—it should be slightly crumbly but cohesive.
- Divide the dough into two discs, wrap each in plastic wrap, and chill for at least 1 hour (or up to 2 days). Chilling helps relax gluten and keeps the butter cold, leading to a flakier crust.
Step 2: Prepare the Apple Filling
- Meanwhile, peel, core, and slice the apples into roughly ⅓- to ½-inch thick slices.
- In a large mixing bowl, combine the sliced apples with granulated sugar, brown sugar, flour, cinnamon, nutmeg, salt, lemon juice, and vanilla. Toss gently until evenly coated.
Step 3: Assemble the Pie
- Preheat your oven to 400 °F (200 °C).
- On a floured surface, roll out one of the dough discs to about a 12-inch circle. Transfer it to a 9-inch pie dish, letting the dough hang over the edges.
- Add the apple filling, spreading it out evenly and mounding slightly in the center.
- Roll out the second dough disc to a similar size. Place it over the apples. Trim the excess dough so about a ½-inch overhang remains. Tuck the overhang under the bottom crust and crimp or flute the edges as desired.
- Cut a few slits in the top crust (if using a solid top) to allow steam to escape. Alternatively, you can create a lattice crust for a decorative finish.
Step 4: Bake the Pie
- Brush the top crust with the beaten egg and optionally sprinkle with sugar for sparkle.
- Bake for 20 minutes at 400 °F, then reduce the oven temperature to 350 °F (175 °C) and bake for an additional 35–40 minutes, or until the crust is golden and the filling is bubbling. Place a baking sheet under the pie to catch any drips and keep your oven clean.
- Once baked, remove from the oven and allow the pie to cool for at least 2 hours before slicing. Cooling helps the filling set and makes clean slices easier.
💡 Expert Tips for Perfect Apple Pie
- Choose the right apples: Combining tart and sweet varieties (e.g., Granny Smith + Honeycrisp) gives depth of flavor and ensures the apples hold their shape.
- Keep ingredients cold: Especially the butter in the crust—this helps create a flaky, layered texture.
- Let the pie rest: Cooling allows the juices to thicken and prevents slicing from becoming a mess.
- Don’t skip the egg wash: It gives the crust a golden sheen and some crispness.
- Add a touch of citrus: The lemon juice in the filling prevents apple slices from browning and adds brightness.
- Use a second baking sheet: Place one beneath the pie in the oven to catch any bubbling juices and avoid oven mess.
- Make ahead: You can assemble the pie, cover it tightly, and chill it in the fridge for up to 8 hours before baking.
🍽️ Serving Suggestions & Variations
Serving Ideas
- Serve warm, ideally with a scoop of vanilla ice cream (known as “apple pie à la mode”). Wikipedia
- Drizzle with caramel sauce or top with a dollop of whipped cream for extra indulgence.
- Pair with a hot cup of coffee, mulled cider, or even a chilled glass of milk for comfort on a crisp day.
Delicious Variations
- Streusel Top Apple Pie: Replace the top crust with a brown sugar-oat streusel topping for crunchy contrast.
- Caramel Apple Pie: Add ¼ cup caramel sauce layered with the apples for extra gooey sweetness.
- Dutch Apple Pie: Use only a bottom crust and add a crumb topping made of flour, oats, butter, and brown sugar.
- Cheddar Crust Apple Pie: For a savory-sweet twist, grate sharp cheddar into the crust or serve a slice with a piece of solid cheddar cheese on the side (a tradition in New England). Wikipedia
🧊 Storage & Leftover Tips
- Room Temperature: Cover the cooled pie loosely with foil or a pie dome and store at room temperature for up to 2 days.
- Refrigerator: After 2 days, store slices in an airtight container in the fridge for up to 4–5 days.
- Freezing: You can freeze the unbaked pie (wrapped tightly in foil and plastic wrap) for up to 2 months. To bake from frozen, add about 10–15 minutes to the bake time.
- Reheating: Warm individual slices in a 350 °F oven for about 10 minutes, or microwave for 30 seconds to recapture that fresh-out-of-the-oven feel.
📝 Troubleshooting Common Pie Problems
| Problem | Solution |
|---|---|
| Soggy bottom crust | Use a pre-heated baking sheet or bake on lower rack to promote crust browning. |
| Runny filling | Ensure you’ve used enough thickener (flour) and allow pie to rest before slicing. |
| Shrinking crust | Chill the dough before baking and avoid rolling it too thin. |
| Burnt top crust | If edges brown too quickly, cover loosely with foil during final baking minutes. |
| Apples too soft | Choose firmer varieties and avoid over-slicing; aim for uniform thickness. |
🧡 Why This Pie Will Become a Favorite
There’s a reason this recipe is labeled classic — it’s simple, dependable, and delicious. The buttery crust, richly spiced apple filling, and warm aroma fill your home with a sense of hospitality and tradition. Whether you’re baking it for a holiday, a family meal, or just because, this pie offers comfort in every slice.
When you serve it, watch the smile on someone’s face as they take that first bite of golden crust and cinnamon-apple goodness. That moment makes all the effort worth it.
🍰 Final Thoughts
This classic homemade apple pie takes the timeless flavors beloved across generations and delivers them in a recipe you can master at home. With its flaky crust, apple-cinnamon filling, and cozy appeal, it’s the kind of dessert that brings people together.
So roll up your sleeves, preheat that oven, and get ready to bake a pie that will become a staple in your recipe repertoire. After all, there’s nothing quite like the smell of an apple pie baking in the oven—and the taste of tradition on your plate. 🥧✨
Print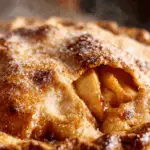
Classic Homemade Apple Pie – A Timeless Treat Worth Baking
Ingredients
For the crust (double):
• 2 ½ cups all-purpose flour (plus more for dusting)
• 1 tsp salt
• 1 tbsp granulated sugar (optional, for slight sweetness)
• 1 cup (2 sticks) cold unsalted butter, cubed
• 6–8 tbsp ice water
For the filling:
• 6 cups peeled and thinly sliced apples (mix of Granny Smith & Honeycrisp)
• ¾ cup granulated sugar
• ¼ cup brown sugar
• 2 tbsp all-purpose flour (or cornstarch for GF)
• 1 tsp cinnamon
• ¼ tsp nutmeg
• ¼ tsp salt
• 1 tbsp lemon juice
• 1 tsp vanilla extract
• 2 tbsp cold butter (for dotting)
Instructions
- Make the crust: In a food processor or bowl, mix flour, salt, and sugar. Cut in cold butter until mixture resembles coarse crumbs. Gradually add ice water, 1 tbsp at a time, mixing just until dough comes together. Divide into two discs, wrap in plastic, and chill 1 hour.
- Make the filling: In a large bowl, toss apple slices with sugars, flour, cinnamon, nutmeg, salt, lemon juice, and vanilla. Let sit 15 minutes to release juices.
- Preheat oven to 375°F (190°C).
- Roll out one disc on a floured surface into a 12-inch circle. Fit into a 9-inch pie dish. Trim edges.
- Pour in apple filling. Dot with 2 tbsp cold butter.
- Roll out second disc. Place over filling. Crimp edges with a fork or your fingers. Cut slits in the top to vent steam.
- Optional: Brush top with egg wash (1 egg + 1 tbsp water) and sprinkle with sugar.
- Bake 50–60 minutes, until crust is golden and filling bubbles. Cover edges with foil if browning too fast.
- Cool at least 2 hours before slicing—this lets the filling set.
✨ Serve warm with vanilla ice cream or whipped cream!
💡 Pro tip: Use a lattice top for extra flair and even baking!
PREP TIME & NUTRITION :
Prep Time : 45 mins + 1 hr chill , Cook Time : 55 mins , Total Time : 2 hrs 40 mins , Servings : 8 slices , Calories : 320 , Net Carbs: 42g , Fats: 15g , Protein: 3g