Introduction
Welcome to my kitchen.
I write about recipes that feel both nostalgic and accessible, and these oatmeal cookies are exactly that: a comfort-bite from childhood matured by technique. In this article I’ll walk you through the reasons this recipe becomes reliably chewy, how to treat the dough for even bake and texture, and small choices that alter the final cookie in delicious ways.
As a professional recipe creator I’m obsessive about texture and timing, but I also love the little moments of improvisation that make baking feel personal. These cookies are perfect for those afternoons when you want something warm from the oven without fuss. I’ll talk about ingredient quality, mixing order, and how to read the cookies as they bake so you never overbake.
Throughout the piece you’ll find practical notes and creative serving ideas. Expect a mix of tried-and-true technique and the kind of small, savable tips I share with friends: think sensible swaps, quick fixes for sticky dough, and ways to stretch the batch while keeping chew and flavor intact. Whether you bake every weekend or this is your first cookie attempt, these notes are written to be reassuring and precise, with an encouraging, friendly voice.
Let’s get started and make sure your next batch comes out irresistibly chewy and full of cozy oats and warm spice.
Why You’ll Love This Recipe
This recipe is built for comfort and reliability.
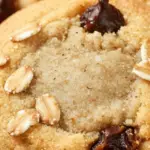
There’s a particular pleasure in biting into a cookie that yields at the center yet has a lightly crisped edge — something these cookies deliver every time when you follow the method. Beyond texture, the balance between brown sugar’s molasses warmth and the subtle brightness of vanilla creates a layered sweetness that feels nostalgic without being cloying.
I favor recipes that are forgiving: this one is flexible to small ingredient swaps, forgiving of ambient temperature differences, and lovely whether you add raisins or chocolate chips. The order of mixing here is deliberate to provide the structure that supports moisture from the oats, while still giving you that tender crumb.
I also love how approachable the dough is to work with — it scoops and holds shape, making portioning simple even when you’re juggling kids or a busy afternoon. And the aroma while baking? It’s a real mood-lifter: warm butter, toasted oats, and cinnamon.
Finally, these cookies scale well. You can easily double the dough for a party, or halve it for a smaller household. They’re equally great fresh from the oven or a day later with the texture gently mellowed; both states highlight different charms of the cookie. That combination of reliability and comfort is why I return to this recipe again and again.
Flavor & Texture Profile
What you taste and feel matters as much as the appearance.
At first bite you’ll notice the chew: a slightly dense center offset by a crackled, caramelized perimeter. That contrast is the hallmark of a well-made oatmeal cookie and is achieved by the interplay of sugars, butter, and oats. Brown sugar brings depth and a faint molasses note while granulated sugar helps with spread and crispness at the edges.
The oats provide both flavor and a toothsome texture that’s more interesting than a plain cookie. They toast during baking, offering a subtle nutty quality that pairs beautifully with the warming whisper of cinnamon. If you choose raisins, expect bursts of jammy chew; if you choose chocolate chips, they add a melty sweetness that contrasts the oat’s rustic nature.
The butter-to-flour ratio keeps the cookies tender without being cakey; since the liquid content is moderate, the cookie remains dense and satisfying rather than airy. Egg contributes to structure and a glossy, slightly chewy finish. Vanilla lifts the whole profile, making the flavors feel rounded and cohesive.
Finally, the cookie’s mouthfeel evolves as it cools: that initial warmth highlights fat and sugar, while later the oats and flour settle into a comforting chew. This layered tasting experience — warm, soft, slightly crisp, and subtly spiced — is why these cookies are so universally loved.
Gathering Ingredients
Assemble your ingredients with confidence.
Laying everything out before you begin takes the guesswork out of the process and lets you focus on technique. I recommend measuring in advance and using bowls to keep the sequence smooth. Below is a clear ingredient list presented for easy mise en place:
- Rolled oats — 2 cups
- All-purpose flour — 1 cup
- Baking soda — 1 tsp
- Salt — 1/2 tsp
- Ground cinnamon — 1 tsp
- Unsalted butter (softened) — 1/2 cup
- Brown sugar (packed) — 1 cup
- Granulated sugar — 1/2 cup
- Large eggs — 2
- Vanilla extract — 2 tsp
- Raisins or chocolate chips — 1 cup
A few practical notes on ingredient choices: opt for rolled oats for texture rather than quick oats for a softer result; use real butter for flavor — if it’s slightly cooler than room temperature, let it rest briefly until pliable. Choose a vanilla you enjoy because even small quantities influence the overall aroma. For the sweet element, packed brown sugar gives a moist, caramel depth while granulated sugar contributes to edge crisping.
If you’re swapping in chocolate, go for chips that hold their shape a bit so you get melty pockets instead of a fully spread chocolate layer. For raisins, plump them slightly if they’re very dry by briefly soaking in warm water, then draining fully before folding into the dough. These small preparation steps prevent dry spots and ensure even distribution during mixing.
Preparation Overview
Understanding the sequence makes the bake predictable.
Before you touch the mixer, take a moment to think about why each step exists. The dry mix gets aerated and combined to prevent pockets of leavening or spice; creaming the butter and sugars incorporates air for lift and a tender crumb; and folding in the oats and mix-ins gently distributes texture without overworking gluten. Each action shapes the final texture and appearance.
A few technique cues I always emphasize: when creaming, look for a lighter color and a fluffy mouth-feel rather than a full increase in volume. When adding eggs, integrate them slowly to keep a smooth emulsion. When combining wet and dry, stop as soon as the streaks disappear—over-mixing will tighten the structure and yield a tougher bite.
Portioning matters for consistent bakes: use a cookie scoop for even mounds and allow adequate spacing on the sheet so the cookies spread without joining. I also recommend chilling only if your kitchen is unusually warm; otherwise the dough behaves well at typical room temperatures.
Finally, keep an eye on color rather than time alone when assessing doneness—edges becoming a warm golden hue while the centers set and remain slightly pale is your visual cue. This approach gives you repeatable results in varied ovens and environments.
Cooking / Assembly Process
Follow these steps exactly for predictable results.
Below is the structured assembly and baking process. Presenting the method in ordered form keeps it clear and easy to follow:
- Preheat oven to 350°F (175°C) and line baking sheets with parchment paper.
- In a medium bowl whisk together flour, baking soda, salt, and cinnamon.
- In a large bowl cream softened butter with brown and granulated sugars until light and fluffy.
- Beat in eggs one at a time, then stir in vanilla.
- Gradually add dry ingredients to wet, mixing until just combined.
- Fold in rolled oats and raisins or chocolate chips.
- Scoop tablespoon-sized portions of dough onto prepared sheets, spacing about 2 inches apart.
- Bake 10-12 minutes until edges are golden and centers set.
- Let cookies cool on the baking sheet 5 minutes, then transfer to a wire rack to cool completely.
While the steps are straightforward, watch for a few action cues: when the dough is scooped it should hold a soft mound rather than collapse into a pancake; while baking the cookie edges will color first and the centers will look just set but not firm—this is the exact moment to remove them to preserve chew. Rotating your baking sheets midway can help if you notice uneven coloration across racks.
After the short cooling on the sheet, moving cookies to a rack allows airflow to finish the setting process so the underside doesn’t become soggy. These small timing and handling actions are what elevate a good cookie into a reliably chewy, well-textured result.
Serving Suggestions
Ways to present and enjoy your cookies.
These cookies are incredibly versatile and lend themselves to many serving situations. For a classic approach, serve warm with a glass of milk—the warmth highlights butter and brings the chocolate or raisins to a soft, inviting state. For a more grown-up take, pair with a strong black coffee or a spiced chai; the spice complements the cinnamon and deepens the overall flavor.
If you’re creating a cookie platter, mix plain cookies with a batch that includes chopped nuts or citrus zest for variation in texture and brightness. For a playful dessert, sandwich a spoonful of softened vanilla or caramel ice cream between two cooled cookies, then freeze briefly for a portable treat. For gifting, cool completely and stack in a tin layered with parchment; a thin ribbon and a note that they’re best enjoyed within a few days makes them feel special.
When serving to a crowd, keep a small bowl of warmed chocolate chips or softened butter nearby so guests can customize their cookies while still warm. If you have dietary needs in your group, offer a few cookies with mix-ins swapped to accommodate preferences: the base dough is friendly to minor adjustments that keep the spirit of the cookie intact. These are the kinds of thoughtful touches I use when sharing my bakes in person.
Storage & Make-Ahead Tips
Keep cookies fresh and plan ahead with confidence.
Proper storage preserves the chewy texture and flavor. Once fully cooled, store cookies in an airtight container at room temperature; layer them with parchment to prevent sticking if stacking. If you like a softer cookie, add a slice of bread to the container—the cookie will absorb a bit of moisture and the bread will dry out, a small trick I often recommend. For a crisper edge, store cookies in a container without the bread slice and enjoy within a day or two.
Make-ahead strategies are invaluable for gatherings: prepare dough, portion it into tablespoon-sized mounds on a tray, and freeze until firm. Transfer the frozen mounds to a resealable bag and bake straight from frozen, adding a minute or two to the bake as needed. This method keeps the dough ready for spontaneous baking without losing texture or flavor.
If you need longer storage, freeze cooled baked cookies in a single layer until solid, then stack with parchment and place in a freezer-safe container. Thaw at room temperature or warm briefly in a low oven for a fresh-from-the-oven feel. For flavor maintenance, avoid storing in the refrigerator as it can dry them out unless you want a firmer bite. These pragmatic steps help you maintain consistency whether you’re planning ahead or saving a few for later.
Frequently Asked Questions
Answers to common questions from home bakers.
Q: Can I swap quick oats for rolled oats?
A: Quick oats change the texture and generally result in a softer, less toothsome cookie. If you prefer a delicate crumb, quick oats work, but the cookie will lose some chew.
Q: How do I prevent cookies from spreading too much?
A: Keep butter at a pliable but not melted temperature and be mindful of over-creaming the butter and sugars. If your kitchen is very warm, chill the scooped dough briefly before baking.
Q: Can I use margarine or a butter alternative?
A: Butter contributes flavor and mouthfeel; alternatives may yield different spread and flavor profiles. If substituting, choose a high-fat alternative and expect subtle texture changes.
Q: What’s the best way to make the raisins plumper?
A: Briefly rehydrate in warm water, drain well, and pat dry. Adding moist fruit directly can make pockets of wetness if not drained thoroughly.
Q: How do I get even bake across multiple sheets?
A: Use the middle rack when possible and rotate sheets halfway through the bake. If your oven runs hot, adjust placement or consider a slightly shorter bake time for later trays.
Final paragraph: A few last tips from my test kitchen.
I always encourage bakers to rely on visual and tactile cues—edge color and center set—rather than a strict time alone. With these cookies, small adjustments to technique yield consistently excellent results, and the little personal touches—choice of mix-in, portion size, and whether you serve warm or cooled—make the recipe truly your own. Happy baking and enjoy every warm, chewy bite.
Classic Oatmeal Cookies
Ingredients
- Rolled oats — 2 cups 🥣
- All-purpose flour — 1 cup 🌾
- Baking soda — 1 tsp 🧪
- Salt — 1/2 tsp 🧂
- Ground cinnamon — 1 tsp 🍂
- Unsalted butter (softened) — 1/2 cup 🧈
- Brown sugar (packed) — 1 cup 🍯
- Granulated sugar — 1/2 cup 🍚
- Large eggs — 2 🥚
- Vanilla extract — 2 tsp 🍶
- Raisins or chocolate chips — 1 cup 🍫
Instructions
- Preheat oven to 350°F (175°C) and line baking sheets with parchment paper.
- In a medium bowl whisk together flour, baking soda, salt, and cinnamon.
- In a large bowl cream softened butter with brown and granulated sugars until light and fluffy.
- Beat in eggs one at a time, then stir in vanilla.
- Gradually add dry ingredients to wet, mixing until just combined.
- Fold in rolled oats and raisins or chocolate chips.
- Scoop tablespoon-sized portions of dough onto prepared sheets, spacing about 2 inches apart.
- Bake 10-12 minutes until edges are golden and centers set.
- Let cookies cool on the baking sheet 5 minutes, then transfer to a wire rack to cool completely.