Introduction
A confession: I bake this coffee cream layer cake when I want something that feels like a café indulgence and a celebration at once.
As a professional recipe developer, I chase contrasts: an airy, tender sponge married to a cloudlike, stabilized whipped cream and finished with a glossy coffee icing that snaps just enough when chilled. The result reads like a love letter to coffee, without the bitterness that can overwhelm a delicate cake. Instead, the coffee lifts the buttered sponge and plays off the cool, pillowy filling.
I always approach this cake with an eye for rhythm in the kitchen: simple steps that create texture in layers, moments of chill to firm and hold shape, and the quiet confidence of a recipe that travels well to gatherings. The real joy is in the assembly — stacking frozen layers, smoothing a cold stabilized cream so it holds peaks, and finally pouring a warm, satin-like icing that drapes the sides in ribbons.
In this introduction I’ll set your expectations: this is a recipe worth prepping mindfully. Expect deliberate pauses — chilling and brief freezes — that reward you with clean slices and an elegant silhouette. Whether you’re hosting a small brunch or sending a showstopper to a potluck, this cake reads both elevated and approachable. Keep reading for technique-forward notes and practical tips I’ve honed after many test bakes.
Why You’ll Love This Recipe
This cake is all about balance:
- A coffee-scented sponge that remains tender and never dry.
- A stabilized whipped cream filling that keeps its shape without becoming heavy.
- A glossy coffee icing that adds sheen and a gentle coffee finish.
As a food writer I look for recipes that are both technically forgiving and rewardful. This one fits: the batter is forgiving to slight mixing variations, the stabilized cream is resilient to short holds, and the icing bridges the textural gap between soft cream and tender cake. There’s also versatility here — the flavor profile sits beautifully beside toasted nuts, a dusting of cocoa, or a scattering of coffee nibs for contrast.
Beyond flavor, you’ll appreciate the methodical timeline. Staggering refrigeration and a short freeze during assembly simplifies handling and gives clean, elegant slices. For hosts, that makes transport and presentation far less stressful. For bakers who love small staging rituals — chilling the bowl for the whipped cream, warming the coffee butter, smoothing layers with a small offset spatula — this cake offers satisfying moments at every turn. It’s one of those recipes that looks harder than it is to execute but benefits hugely from a few deliberate steps.
Flavor & Texture Profile
What you taste and feel
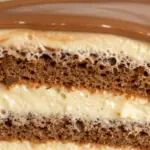
On the first forkful the impression is coffee-forward but elegant. The sponge gives a subtle roasted note that is rounded by butter, while the stabilized whipped cream tempers the coffee with cool, milky sweetness and a satiny mouthfeel. The coffee icing offers a glossy, slightly denser ribbon of flavor that contrasts the feather-light whipped layers without overwhelming them.
Texture plays a starring role: the sponge should be tender and springy, not crumbly; the filling should be airy yet structured, holding clean peaks and seams between slices; the icing should be pourable warm and set to a thin sheet that yields to the fork.
Pairing thoughts: because the cake rests on a stabilized, dairy-forward filling, it benefits from bright or textural accents at service — think a small spoonful of fruit compote, a crisp biscotti, or a dusting of finely grated dark chocolate. For beverage pairings, a medium-roast filter coffee or a rounded espresso complements the cake without overshadowing the cream’s delicate sweetness.
Baker’s note: The sensory success of this cake relies less on powerfully intense coffee and more on harmony. Gentle coffee notes throughout the layers and icing make each bite complex in a soft, layered way.
Gathering Ingredients
Ingredient checklist and sourcing notes
Below is a complete ingredient list organized so you can shop efficiently. I prefer to source the freshest dairy possible and a mid‑roast instant coffee that has a clean flavor profile; avoid anything with dark roast bitterness for this build. When weighing staples like flour and sugars, use a digital scale for consistency.
- For the cake — two 8-inch rounds: 1 cup (2 sticks / 227 g) unsalted butter, divided; 2 tablespoons instant coffee; 1 cup hot water; 2 cups (250 g) all-purpose flour; 2 cups (400 g) granulated sugar; 1/4 teaspoon kosher salt; 2 teaspoons baking soda; 1/2 cup (122.5 g) buttermilk, room temperature; 2 large eggs, room temperature; 1 tablespoon vanilla extract.
- Stabilized whipped cream filling: 2 ounces (about 56 g) cream cheese, softened; 1/2 cup (100 g) granulated sugar; 2 cups (476 g) heavy cream / whipping cream; 1/2 teaspoon vanilla extract; 1 pinch kosher salt.
- Coffee icing: 3/4 cup (1 1/2 sticks / 170 g) unsalted butter; 1 tablespoon instant coffee; 1/4 cup (60.5 g) half-and-half, room temperature; 2 teaspoons vanilla extract; 4 cups (500 g) confectioners’ sugar (icing sugar).
Sourcing tips: choose high-fat cream for lift in the stabilized whipped cream; view confectioners’ sugar as a texture foundation for the icing — finer sugars create a silkier finish. For the coffee, instant varieties vary widely; taste-test a pinch dissolved in water to ensure it delivers the aroma you want. If your butter is sold in wrapped sticks, keep them chilled until you need to melt; for the cream cheese, allow a brief warm-up to room temperature so it incorporates smoothly into the whipped cream.
Visual inventory: lay out your ingredients before starting. A quick check ensures you have every dairy, sugar, and leavener at hand and keeps the bake flowing.
Preparation Overview
How to approach the bake like a pro
This cake rewards an organized workflow. Begin by reading through the full method, then set up mise en place: measure dry and wet ingredients separately, chill the bowl for the whipped cream, and prep pans with parchment. The method intentionally spaces out chilling and handling steps so your layers and fillings are easier to manipulate and slice cleanly.
Key sequences to respect: melting the butter with coffee to bloom flavor; combining warm liquid with dry ingredients for an even crumb; chilling and slicing layers; stabilizing whipped cream to hold shape during assembly; and pouring a warm icing that sets to a glossy finish. These are deliberate choices to create contrast in texture and ensure neat presentation.
Tools that elevate results: a digital scale for accurate measurements, an offset spatula for even frosting and smoothing, a serrated knife for clean layer slicing, and a stand or hand mixer with a chilled whisk to create a stable whipped cream quickly. If you prefer to assemble in stages, freeze the layers briefly to firm them; this makes it far easier to apply the filling in even layers and avoid compression.
Timing tip: staging the bake over a couple of hours with rest periods improves the final texture and appearance more than rushing straight through.
Cooking / Assembly Process
Step-by-step instructions
Follow the method below exactly as written to achieve the intended textures and assembly feel. The order is important: warm coffee-butter into the batter, cool to avoid scrambling eggs when they are added, and freeze layers briefly so the stabilized whipped cream spreads without compressing the cake.
- Preheat oven to 350°F (175°C). Spray two 8-inch round cake pans with nonstick spray and line the bottoms with parchment paper; set aside.
- In a medium saucepan over medium heat, add 1 cup (227 g) butter. When melted, add 2 tablespoons instant coffee and 1 cup hot water; whisk until combined. Remove from heat and let cool slightly.
- In a large bowl, whisk together 2 cups flour, 2 cups granulated sugar, 1/4 tsp salt and 2 tsp baking soda.
- Pour the warm butter-coffee mixture into the dry ingredients and stir until combined into a smooth batter.
- In a separate bowl, whisk 1/2 cup buttermilk, 2 large eggs and 1 tablespoon vanilla. Pour into the batter and whisk until smooth and fully combined.
- Divide the batter evenly between the two prepared pans and smooth the tops with a spatula.
- Bake 24–26 minutes, or until a toothpick inserted into the center comes out mostly clean. Cool in the pans 10–15 minutes, then turn out onto a wire rack to cool completely.
- When cooled, use a serrated knife to slice each cake horizontally into two equal layers (4 layers total). Place layers on a lined baking sheet and freeze at least 2 hours (or overnight) to firm for easier assembly.
- While layers freeze, chill a mixing bowl and whisk attachment in the freezer for about 15 minutes to prepare for the stabilized whipped cream.
- Make the stabilized whipped cream: in the chilled bowl beat 2 oz softened cream cheese with 1/2 cup sugar on medium-high until smooth and lump-free.
- With the mixer off, pour in 2 cups heavy cream. Beat on medium until soft peaks form, then continue to stiff peaks. Add 1/2 tsp vanilla and a pinch of salt and briefly mix—do not overbeat.
- Assemble the cake: place one frozen layer on a cake stand or plate. Spread about one-third of the whipped cream evenly to the edges. Repeat with the next two layers, finishing with the top layer.
- Make the coffee icing: in a medium saucepan over low heat, melt 3/4 cup butter. Stir in 1 tablespoon instant coffee, 1/4 cup half-and-half and 2 tsp vanilla; whisk and remove from heat.
- In a large bowl add 4 cups confectioners’ sugar. Pour the warm butter-coffee mixture over the sugar and whisk until smooth and lump-free. If too thick, add half-and-half 1 tsp at a time to reach a drizzling consistency.
- Evenly drizzle the icing over the assembled cake, letting some drip down the sides. Chill briefly to set the icing, then let the cake come to room temperature 20–30 minutes before serving.
- Storage: keep refrigerated, covered, up to 3 days. For best texture bring slices to room temperature before serving.
Technique pointers: when pouring warm icing, work quickly and from the center so it settles into glossy ribbons; when slicing layers, use a sawing motion with a serrated blade and steady pressure to avoid tearing. If the stabilized whipped cream looks slightly loose after a short hold, give it a brief whisk on low speed to refresh the structure.
Serving Suggestions
Presentation and pairing ideas
This cake shines with minimal adornment: allow the glossy coffee icing and neat whipped layers to speak for themselves. For a café-worthy presentation, trim any uneven edges with a hot knife and finish the top with a light dusting of finely grated dark chocolate or a few toasted hazelnuts for crunch.
When slicing, serve slightly below room temperature to preserve the integrity of the stabilized whipped cream while letting the cake’s flavors bloom. Offer small spoons of brightly acidic fruit compote or a citrus‑salted caramel on the side for guests who want a contrasting bite. For a textural contrast, pair slices with crisp, twice-baked biscotti or a slender dark chocolate shard.
Beverage pairings are straightforward: a medium-roast brewed coffee keeps the theme cohesive, while a nutty tea or a lightly fermented sparkling beverage will refresh the palate between bites. If you’re serving at a brunch, plate smaller wedges with a dollop of extra stabilized whipped cream and a few fresh berries.
Plating tips: place the slice on a room-temperature plate to avoid chilling the crumb too quickly; a paper doily or small smear of fruit compote under the slice can catch any loose crumbs and add color for photos and presentation.
Storage & Make-Ahead Tips
Plan ahead — this cake rewards preparation
This recipe is inherently make-ahead friendly due to the freezing step during assembly. Layers can be frozen solid and kept wrapped for several days; the stabilized whipped cream maintains structure after a short hold, making it suitable for staging the day before serving. The icing can also be prepared ahead and chilled; gently warm it to a pourable consistency when ready to finish the cake.
For refrigeration: store the fully assembled cake covered and chilled. Because the filling is dairy-rich, refrigeration preserves texture and food safety. Bring slices to room temperature for 20–30 minutes before serving to soften the icing slightly and allow the cream to reach a more luxurious mouthfeel.
For freezing slices: wrap individual portions tightly to prevent freezer burn and thaw in the refrigerator overnight before bringing to room temperature. Avoid refreezing once thawed to preserve texture. When transporting the cake, keep it chilled and use a rigid carrier; a short cool pack under the box will maintain shape during transit.
Quick troubleshooting: if the icing firms too quickly while pouring, briefly warm it over very low heat and whisk to a pourable consistency. If the whipped cream loses structure, a short whisk on low speed will often revive it without overworking.
Frequently Asked Questions
Common concerns and quick answers
- Can I use brewed espresso instead of instant coffee?
Yes — but adjust to taste and be mindful of added liquid volume. The original method uses instant coffee for concentrated flavor without significantly altering wet ratios. - How do I prevent the whipped cream from breaking?
Chill equipment, start at medium speed to build volume, and stop once you reach stiff peaks; avoid overbeating which squeezes out moisture. - Why freeze the layers?
Freezing firms each layer, making them far easier to slice and to handle during assembly so the weight of the filling doesn’t compress the crumb. - Can sugar be reduced in the filling or icing?
You can experiment, but sugar here contributes to structure and mouthfeel; significant reductions can alter stability and texture.
Final FAQ paragraph
If you have additional questions about substitute ingredients, timing, or adjustments for altitude or equipment variations, ask away — I’m happy to troubleshoot with specifics about your kitchen setup or ingredient availability so you can get the same consistent results I aim for when developing this recipe.
Coffee Cream Layer Cake
Ingredients
- For the cake — two 8-inch rounds: 🍰 1 cup (2 sticks / 227 g) unsalted butter, divided 🧈
- ☕️ 2 tablespoons instant coffee
- 💧 1 cup hot water
- 🌾 2 cups (250 g) all-purpose flour
- 🍚 2 cups (400 g) granulated sugar
- 🧂 ¼ teaspoon kosher salt
- 🧪 2 teaspoons baking soda
- 🥛 ½ cup (122.5 g) buttermilk, room temperature
- 🥚 2 large eggs, room temperature
- 🍨 1 tablespoon vanilla extract
- Stabilized whipped cream filling: 🥄 2 ounces (about 56 g) cream cheese, softened 🧀
- 🍚 ½ cup (100 g) granulated sugar
- 🥛 2 cups (476 g) heavy cream / whipping cream
- 🍨 ½ teaspoon vanilla extract
- 🧂 1 pinch kosher salt
- Coffee icing: 🍯 ¾ cup (1 ½ sticks / 170 g) unsalted butter 🧈
- ☕️ 1 tablespoon instant coffee
- 🥛 ¼ cup (60.5 g) half-and-half, room temperature
- 🍨 2 teaspoons vanilla extract
- 🍚 4 cups (500 g) confectioners’ sugar (icing sugar)
Instructions
- Preheat oven to 350°F (175°C). Spray two 8-inch round cake pans with nonstick spray and line the bottoms with parchment paper; set aside.
- In a medium saucepan over medium heat, add 1 cup (227 g) butter. When melted, add 2 tablespoons instant coffee and 1 cup hot water; whisk until combined. Remove from heat and let cool slightly.
- In a large bowl, whisk together 2 cups flour, 2 cups granulated sugar, ¼ tsp salt and 2 tsp baking soda.
- Pour the warm butter-coffee mixture into the dry ingredients and stir until combined into a smooth batter.
- In a separate bowl, whisk ½ cup buttermilk, 2 large eggs and 1 tablespoon vanilla. Pour into the batter and whisk until smooth and fully combined.
- Divide the batter evenly between the two prepared pans and smooth the tops with a spatula.
- Bake 24–26 minutes, or until a toothpick inserted into the center comes out mostly clean. Cool in the pans 10–15 minutes, then turn out onto a wire rack to cool completely.
- When cooled, use a serrated knife to slice each cake horizontally into two equal layers (4 layers total). Place layers on a lined baking sheet and freeze at least 2 hours (or overnight) to firm for easier assembly.
- While layers freeze, chill a mixing bowl and whisk attachment in the freezer for about 15 minutes to prepare for the stabilized whipped cream.
- Make the stabilized whipped cream: in the chilled bowl beat 2 oz softened cream cheese with ½ cup sugar on medium-high until smooth and lump-free.
- With the mixer off, pour in 2 cups heavy cream. Beat on medium until soft peaks form, then continue to stiff peaks. Add ½ tsp vanilla and a pinch of salt and briefly mix—do not overbeat.
- Assemble the cake: place one frozen layer on a cake stand or plate. Spread about one-third of the whipped cream evenly to the edges. Repeat with the next two layers, finishing with the top layer.
- Make the coffee icing: in a medium saucepan over low heat, melt ¾ cup butter. Stir in 1 tablespoon instant coffee, ¼ cup half-and-half and 2 tsp vanilla; whisk and remove from heat.
- In a large bowl add 4 cups confectioners’ sugar. Pour the warm butter-coffee mixture over the sugar and whisk until smooth and lump-free. If too thick, add half-and-half 1 tsp at a time to reach a drizzling consistency.
- Evenly drizzle the icing over the assembled cake, letting some drip down the sides. Chill briefly to set the icing, then let the cake come to room temperature 20–30 minutes before serving.
- Storage: keep refrigerated, covered, up to 3 days. For best texture bring slices to room temperature before serving.