When it comes to decorating cookies, not all frostings are created equal. A great cookie decorating buttercream should be smooth, easy to pipe, rich in flavor, and firm enough to hold its shape—yet soft enough to spread effortlessly. Unlike royal icing, buttercream offers a creamy texture, luxurious taste, and forgiving consistency that makes it ideal for beginners and experienced bakers alike.
This comprehensive guide covers everything you need to know about making the best cookie decorating buttercream, including ingredient roles, step-by-step instructions, consistency adjustments, coloring tips, piping techniques, storage, and common mistakes to avoid.
Why Choose Buttercream for Cookie Decorating?
Buttercream is a popular alternative to royal icing for several reasons:
- Creamy, rich flavor that enhances sugar cookies
- Easy to work with—no precise timing or drying stages
- Perfect for piping borders, flowers, and textures
- Beginner-friendly with flexible consistency
- Visually soft and elegant finish
While royal icing dries hard, buttercream stays soft, making cookies more enjoyable to eat and easier to decorate creatively.
Types of Buttercream and Why American Buttercream Is Best for Cookies
There are several buttercream styles, but American buttercream is the best choice for cookie decorating.
Why American Buttercream Works Best
- Simple ingredients
- Sturdy and stable
- Holds piping details well
- Easy to adjust thickness
Other buttercreams (Swiss, Italian, French) are too soft or delicate for detailed cookie work.
Ingredients for Cookie Decorating Buttercream
Core Ingredients
- 1 cup unsalted butter, softened
- 3½–4 cups powdered sugar, sifted
- 2–3 tablespoons heavy cream or milk
- 1½ teaspoons vanilla extract
- ¼ teaspoon salt
Optional Flavor Variations
- Almond extract
- Lemon or orange zest
- Cocoa powder (for chocolate buttercream)
Step-by-Step Instructions
Step 1: Beat the Butter
In a large mixing bowl, beat softened butter on medium speed for 3–4 minutes until pale, smooth, and fluffy. This step removes air bubbles and creates a silky base.
Step 2: Add Powdered Sugar Gradually
Add powdered sugar one cup at a time, mixing on low speed until incorporated. Scrape down the bowl frequently.
Step 3: Add Liquid and Flavoring
Add heavy cream, vanilla extract, and salt. Increase speed to medium-high and beat for 2–3 minutes until smooth and fluffy.
Step 4: Adjust Consistency
- Too thick: Add milk or cream 1 teaspoon at a time
- Too thin: Add powdered sugar gradually
The ideal consistency should hold stiff peaks and pipe clean lines without spreading.
Perfect Buttercream Consistencies for Decorating
Outline and Borders
- Thick, stiff consistency
- Holds shape and sharp edges
Flooding Cookies
- Slightly thinned with milk or cream
- Smooth but not runny
Piping Flowers
- Medium-stiff consistency
- Holds petals and texture
Spreading
- Soft, creamy consistency
How to Color Buttercream for Cookies
- Use gel food coloring—never liquid
- Add color using a toothpick for precision
- Mix thoroughly to avoid streaks
- Let colors rest 10–15 minutes to deepen
- Store covered to prevent drying
For vibrant colors, use white or clear vanilla extract.
Piping Tips for Cookie Decorating
Best Tips to Use
- Round tips (#2, #3, #4) for outlines
- Star tips (#16, #18) for borders and rosettes
- Leaf tip (#352) for floral accents
Piping Tips for Success
- Practice on parchment first
- Use consistent pressure
- Keep piping bags sealed to prevent drying
- Rotate the cookie—not your wrist
Common Buttercream Mistakes (and How to Fix Them)
Grainy Buttercream
Cause: Cold butter or unsifted sugar
Fix: Beat longer and ensure butter is fully softened
Air Bubbles
Cause: Over-whipping
Fix: Mix slowly at the end or stir with spatula
Melting Buttercream
Cause: Warm environment
Fix: Chill briefly and work in small batches
Too Sweet
Fix: Add a pinch of salt or a splash of lemon juice
Flavor Variations for Cookie Buttercream
- Chocolate: Add ½ cup cocoa powder
- Lemon: Add zest and lemon juice
- Almond: Add almond extract sparingly
- Peppermint: Perfect for Christmas cookies
Storage and Make-Ahead Tips
Room Temperature
Use within 24 hours if kitchen is cool.
Refrigeration
Store in airtight container up to 7 days. Bring to room temperature and rewhip before use.
Freezing
Freeze buttercream for up to 3 months. Thaw overnight in fridge, then rewhip.
Best Cookies to Decorate with Buttercream
- Roll-out sugar cookies
- Shortbread cookies
- Gingerbread cookies
- Chocolate sugar cookies
- Cut-out vanilla cookies
Buttercream adheres best to cookies with flat, firm surfaces.
Frequently Asked Questions
Q1: Can buttercream replace royal icing?
Yes, but buttercream stays soft and won’t harden fully.
Q2: Will buttercream decorations melt?
They may soften in warm temperatures. Keep cookies cool.
Q3: Can I stack buttercream-decorated cookies?
Use parchment between layers to prevent smudging.
Q4: How do I make buttercream bright white?
Use clear vanilla extract and whip thoroughly.
Q5: Can I pipe detailed designs?
Yes. Use stiff consistency and fine piping tips.
Conclusion
This Cookie Decorating Buttercream is smooth, stable, and incredibly easy to work with—perfect for beautifully decorated cookies without the stress of royal icing. With its rich flavor, flexible consistency, and endless customization options, it’s an essential recipe for holidays, birthdays, and everyday baking creativity.
Once you master this buttercream, decorating cookies becomes not just easier—but far more enjoyable.
Print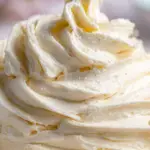
Cookie Decorating Buttercream: Smooth, Pipeable, and Perfect for Beautiful Cookies
Ingredients
• ½ cup (1 stick) unsalted butter, softened (or refined coconut oil for dairy-free)
• 1½ cups powdered monk fruit–erythritol blend (ensure it’s ultra-fine or sifted!)
• 1–2 tbsp unsweetened almond milk or heavy cream
• 1 tsp pure vanilla extract
• Pinch of sea salt
• Natural food gels or powders (e.g., beet, spirulina, turmeric—avoid liquid dyes; they thin icing!)
Instructions
- Beat softened butter 2–3 min until light and creamy.
- Gradually add powdered sweetener, ¼ cup at a time, mixing on low to avoid clouds—then increase speed until smooth and fluffy (~3 min).
- Add vanilla, salt, and 1 tbsp milk. Mix. If too thick, add ½ tsp more milk at a time—ideal consistency: ribbons hold shape for 2–3 seconds before melting back in.
- For flooding consistency (smooth base layer): Thin with additional ½–1 tsp milk until it flows like honey.
- Divide into bowls; tint with gel or powder colorants (start with toothpick tip—build slowly!).
- Pipe outlines first → let dry 15–20 min → flood centers with thinner icing.
- Dry uncovered 4–6 hours (or overnight). Once set, cookies stack beautifully!
PRO TIPS:
🔹 Humidity? Add ¼ tsp arrowroot powder to stabilize.
🔹 Extra shine? Add ¼ tsp light corn-free glucose syrup (optional—but not needed for great results!).
🔹 Storage: Keep covered at room temp 3 days, or refrigerate 1 week (bring to room temp + re-whip before use).
PREP TIME & NUTRITION : (per 2-tbsp, unfrosted)
Prep Time: 10 min | Total Time: 10 min | Servings: ~12 (for 24 cookies)
Calories: 80 | Net Carbs: 1g | Fats: 7g | Protein: 0g