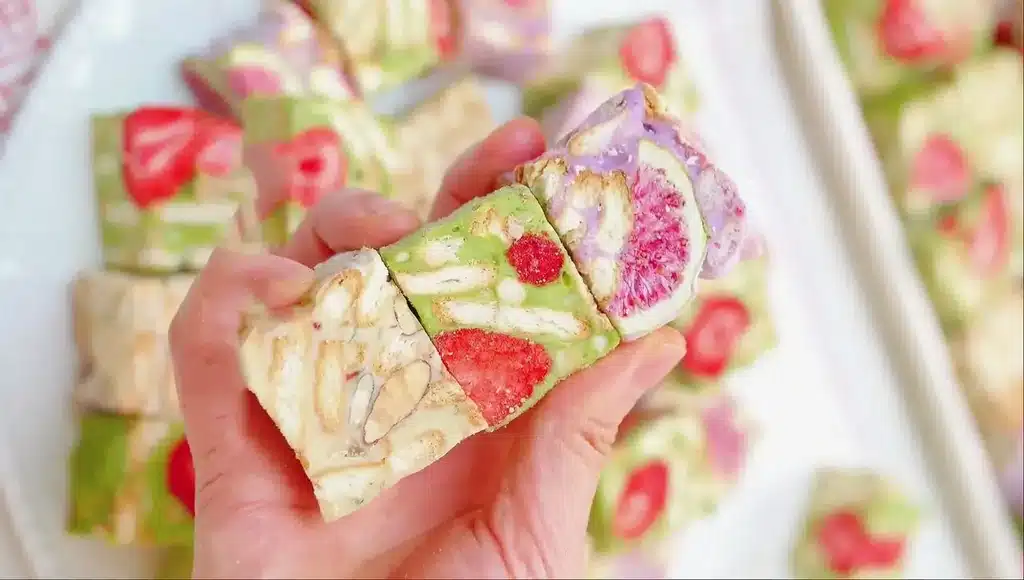
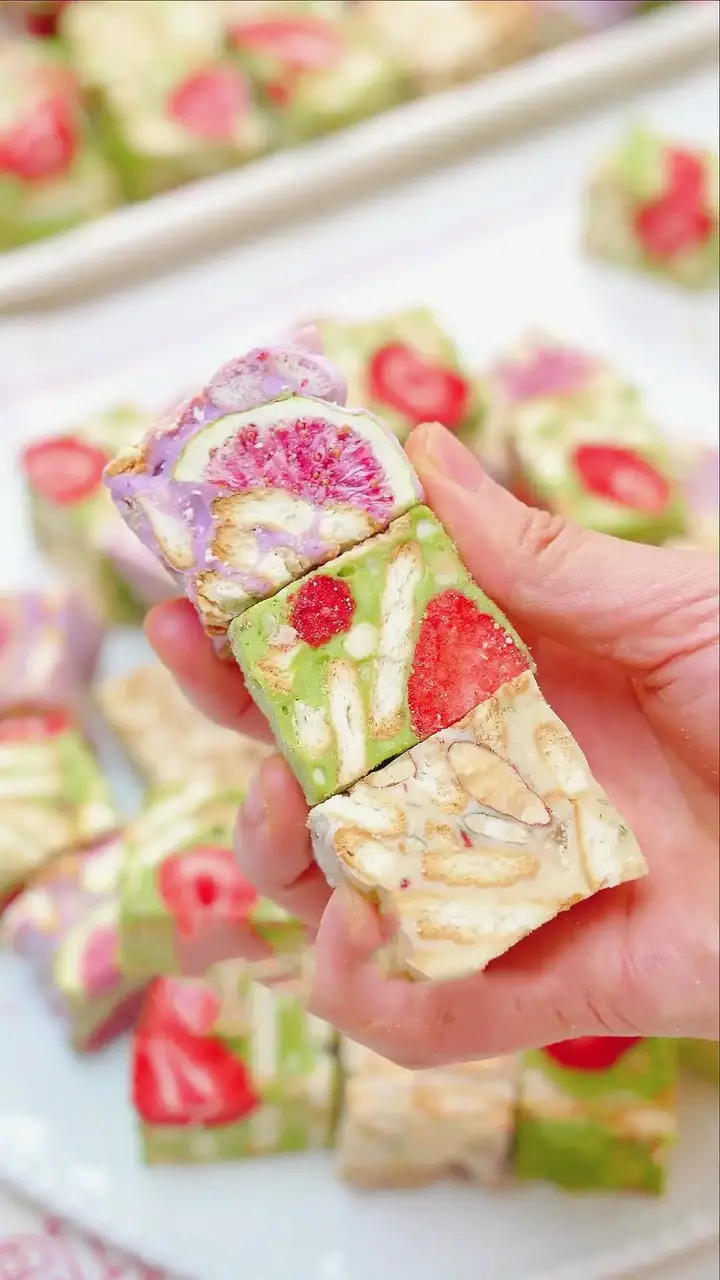
No bake, just chill! Snowflake crisps (雪花酥) are the easiest winter snack to make for your next holiday gathering with friends and family. Make this crispy, sweet, nutty, and milky snack in three flavors: classic nut, strawberry matcha, and purple potato.
What Are Snowflake Crisps?
Snowflake crisps (雪花酥) are a popular crunchy treat in Taiwan and China. It is similar to a nougat that is made with sugar and different kinds of nuts. However, snowflake crisps make use of almost anything!

You can use nuts, seeds, biscuits, crackers, granola, freeze-dried fruits, oatmeal, and many more. That’s definitely something to love about this no-bake treat since you can customize the flavoring ingredients the way you like them. You can make it nutty, fruity, or both!
These crunchy ingredients are compressed and fused together with a melted butter and marshmallow base. For a milky outer layer, I sprinkle lots of milk powder on top before chilling the treat.
The best part? No need for baking in the oven! Just let it cool before cutting it into small cubes for serving.
The only manual effort that you need to put in is compressing and shaping it into a rectangular block of crisps. You really have to push your hands to break the ingredients and evenly coat it with the base.
What Are The Ingredients For The Three Flavors?

The base is made with butter and marshmallows. You can use salted or unsalted butter. If you want to make it dairy-free, use plant-based or dairy-free butter. For the marshmallows, I suggest using white marshmallows to have a white base for the three flavors, but any color will do.
Cook the butter and marshmallows in the pan until both ingredients are completely melted. Then, you will stir in milk powder. Use coconut milk powder, soy milk powder, or cashew powder if you are lactose intolerant. After making the base, these are the following ingredients and suggestions for the three flavors:
- Classic Nut: The ingredients I used are almonds, pumpkin seeds, biscuits, and dried cranberries. You can add more variety of nuts with walnuts, pistachios, hazelnuts, and macadamia. The biscuits I used are actually specifically made for snowflake crisps, but you can use biscuits or crackers available to you. Ritz crackers, Digestive biscuits, bourbon cream, and nice biscuits are some examples you can use.
- Strawberry Matcha: To make a green-colored base, I add matcha powder before adding the rest of the mix. You can also use green spinach juice to make it green. If you prefer a pink-colored crisp, use pink beetroot or strawberry juice. Then, I make it strawberry flavored with frozen dried strawberries. Add the rest of the biscuits and peanuts.
- Purple Potato: Last but not least, I make a purple base with purple potato flour. If you want to make this chocolate instead, add some chocolate powder to the base. This is different from others with the added dried figs and yogurt oatmeal crisps. You can also use dried apricots, dates, raisins, prunes, plums, or pears. Aside from yogurt oatmeal crisps or cookies, you can use oatmeal cookies, raisin cookies, or any other types of cookies.
One thing to note about adding fruits is to use freeze-dried fruits rather than frozen. If you use frozen fruits, it will defrost and add moisture to the snowflake crisps. And you don’t want a soft and soggy treat, right?
After chopping these into small cubes, keep them in an airtight container in a cool and dry place or in the fridge. It can be stored in the fridge for 3 to 5 days. When you are ready to eat them, take them out of the fridge and allow them to come to room temperature to make it less cold and easier to eat.
Ingredients And Kitchen Tools To Prepare
Prepare a non-stick pan to ensure the ingredients and the base do not stick and burn on the pan. As part of a baker’s must-have tools, I recommend using a kitchen weighing scale for accurate measurements of the butter and marshmallow base. Here’s a complete list of what to prepare:
Kitchen Tools
- Mixing bowls
- Non-stick pan
- Spatula
- Kitchen scale (optional but recommended for accurate measurements)
- Kitchen gloves
- Baking sheet
- Baking tray
- Sifter
- Pastry brush
- Knife and chopping board
Ingredients
Classic Nut:
- 65g butter
- 230g marshmallows
- 80g milk powder
- 100g almond and pumpkin seeds
- 200g biscuits
- 40g cranberries
- A sprinkle of milk powder
Strawberry Matcha:
- 65g butter
- 230g marshmallows
- 75g milk powder
- 5g matcha powder
- 150g biscuits
- 100g freeze-dried strawberries
- 50g peanuts
- A sprinkle of milk powder
Purple Potato:
- 65g butter
- 230g marshmallows
- 75g milk powder
- 5g purple potato flour
- 150g biscuits
- 100g freeze-dried figs
- 50g yogurt oatmeal crisps
- A sprinkle of milk powder
Steps On How To Make Snowflake Crisps

The steps are pretty basic and easy to do. Simply melt the butter and marshmallow in the pan, mix in the rest of the ingredients, and compress and shape into cubes.
1. Make The Classic Nut
- Melt the butter and add in marshmallows.
- Stir until the marshmallows are completely melted and turn off the heat.
- Stir in milk powder.
- Add almonds, pumpkin seeds, biscuits, and cranberries.
- Mix thoroughly to coat it with the butter and marshmallow mixture evenly.
- Use your hands to compress the ingredients together. By this time, it will be firm and somewhat sticky and webby.
- Keep compressing until you form a rectangular block.
- Spread on a baking sheet and sprinkle sifted milk powder on all sides.
- Dust off excess milk powder and set aside.


2. Make The Strawberry Matcha Snowflake Crisps
- In a bowl, combine milk powder and matcha powder.
- Melt the butter and add in marshmallows.
- Stir until the marshmallows are completely melted and turn off the heat.
- Stir in milk and matcha powder mixture.
- Add biscuits, freeze-dried strawberries, and peanuts.
- Mix thoroughly to coat it with the butter and marshmallow mixture evenly.
- Use your hands to compress the ingredients together.
- Keep mixing and compressing until you form a rectangular block.
- Spread on a baking sheet and sprinkle sifted milk powder on all sides.
- Dust off excess milk powder and set aside.

3. Make The Purple Potato Snowflake Crisps
- In a bowl, combine milk powder and purple potato flour.
- Melt the butter and add in marshmallows.
- Stir until the marshmallows are completely melted and turn off the heat.
- Stir in milk and purple potato flour mixture.
- Add biscuits, dried figs, and yogurt oatmeal crisps.
- Mix thoroughly to coat it with the butter and marshmallow mixture evenly.
- Use your hands to compress the ingredients together.
- Keep mixing and compressing until you form a rectangular shape.
- Spread on a baking sheet and sprinkle sifted milk powder on all sides.
- Dust off excess milk powder and set aside.

4. Cut And Serve!
- Let it cool in the fridge.


2. Cut it into small cubes, about 1 inch thick.
- Serve it with a refreshing drink like Winter Melon Tea!
How to Store Snowflake Crispy Cookies:
Storing Snowflake Crispy Cookies is simple and ensures they remain fresh and crunchy for extended periods. The key to maintaining their crisp texture is keeping them in a cool, dry place, ideally in an airtight container or sealed bag. This prevents exposure to moisture, which could soften the cookies and ruin their signature crunch.
For short-term storage, placing the cookies in a resealable plastic bag or a container with a tight-fitting lid will suffice. Make sure to separate the layers of cookies using parchment paper or wax paper to avoid them sticking together. Keep them in a pantry or cupboard away from direct sunlight or heat sources.
If you want to store the cookies for a longer period, they can be refrigerated. In this case, follow the same steps for layering them in an airtight container or bag. In the refrigerator, they will last for up to a month. Before serving, allow the cookies to come to room temperature for a more pleasant texture and taste. If the cookies harden slightly due to refrigeration, leaving them out for 10-15 minutes will help soften them.
Avoid freezing the cookies, as this could lead to texture changes and moisture retention upon thawing. By following these simple storage tips, you can enjoy the freshness and delicious crunch of Snowflake Crispy Cookies even days or weeks after making them.
Conclusion:
In conclusion, Snowflake Crispy Cookies offer a delightful balance of sweetness, crunch, and versatility, making them a perfect snack for any occasion. Their customizable nature allows for endless flavor combinations, whether you’re in the mood for nutty, fruity, or even chocolatey variations. This recipe’s flexibility means that home chefs can easily swap out ingredients based on their personal preferences or dietary needs, making it accessible to all.
The simplicity of the preparation process, which requires no baking, adds to the recipe’s appeal. With just a few basic ingredients, such as butter, marshmallows, and your chosen mix-ins, you can create a batch of delicious cookies in no time. The detailed instructions ensure that even beginner cooks can successfully make these treats with minimal effort.
What truly sets these cookies apart is their shelf life and convenience. With proper storage in airtight containers, you can prepare them ahead of time, making them perfect for holiday gatherings or as gifts. Their ability to stay fresh for weeks means they can be enjoyed long after they are made, offering a convenient snack to grab whenever you need a sweet treat.
Overall, Snowflake Crispy Cookies are an excellent choice for anyone looking to make a simple, yet flavorful snack. Their customizable nature, combined with their ease of storage, makes them a versatile and enjoyable dessert that can be shared with friends and family at any time of the year.