Introduction
A modern classic for chocolate lovers
I fell in love with this combination the first time I noticed a fudgy, chocolate-y layer peeking out from beneath a silky, tangy cheesecake. The interplay between deep cocoa and lavish cream cheese creates a dessert that feels both familiar and indulgent.
As a recipe developer I always look for a balance between texture, ease, and presentation. This particular composition offers three distinct layers — a dense, brownie-like foundation, a lusciously smooth cheesecake middle, and a bright, glossy sour cream cap — that each bring something unique to the bite. The contrast is the point: the brownie gives a chewy, almost molten counterpoint to the cheesecake’s cool creaminess, while the sour cream provides a gentle tang that cuts through the richness.
What I love to emphasize in writing about desserts is how small technique choices change the whole experience. From how you mix the batter to how you cool the pan, those steps decide whether you serve a velvety, crack-free wedge or a dense, slightly overworked slab. Throughout this article I’ll share practical tips, sensory cues, and troubleshooting advice so you can reproduce that perfect set cheesecake with a decadent brownie base in your own kitchen. Expect warm, straightforward guidance, with a focus on achieving impeccable texture and show-stopping flavor without unnecessary fuss.
Why You’ll Love This Recipe
A dessert that checks all the boxes
There are desserts that are impressive and desserts that are comforting; this one manages both. The brownie layer offers the kind of chocolate intensity that feels like a hug, while the cheesecake component brings a refined, silky counterpoint. The sour cream finish sends the whole profile into bright, balanced territory so each slice feels perfectly composed.
As a food blogger I always test a recipe for approachability and for sensory payoff. Here, the payoff is immediate: when you slice through a chilled cake and reveal the dark river of brownie peeking from beneath the pale cheesecake, the visual is as seductive as the taste. The mouthfeel progression — slightly crackly edges, a tender interior, a fudgy base giving way beneath a creamy top — is what keeps guests reaching for seconds.
Beyond flavor and texture, this dessert is also a great candidate for making ahead and portability. I appreciate desserts that travel well and retain structure after refrigeration; this one slices cleanly when chilled and stays indulgent without becoming heavy. Finally, the components are familiar pantry players rather than obscure ingredients, so you can pull this off spontaneously for a special dinner or a weekend bake-along with friends.
Flavor & Texture Profile
Layered sensations: what to expect
This recipe is built around a deliberate contrast of textures and a complementary flavor marriage. The brownie base reads as concentrated chocolate — not overly sweet, with roasted cocoa notes and a satisfying chew that borders on fudgy. It acts as both foundation and flavor anchor, grounding the lighter, tang-forward cheesecake layer above.
The cheesecake component is intentionally creamy and smooth. In an ideal execution it will be dense enough to hold clean slices yet tender and airy on the palate — a delicate balance between silk and structure. The richness is softened by a subtle acid lift that keeps the experience from becoming cloying, so every forkful feels bright and luxurious rather than heavy.
The sour cream topping finishes the composition with a glossy, slightly tangy cap that adds complexity and a professional sheen. Texturally, it also seals moisture into the cheesecake and offers a cool, satin mouthfeel that contrasts with the tactile, almost molten sensation of the brownie layer.
When you taste this dessert pay attention to:
- How the brownie’s density amplifies the chocolate flavor
- The cheesecake’s mouth-coating creaminess balanced by subtle acidity
- The sour cream’s refreshing finish that brightens each bite
These three elements working together are why this dessert feels decadent yet balanced.
Gathering Ingredients
Exact ingredients for this recipe
Before you begin, assemble everything so you can work efficiently. I recommend bringing refrigerated items to room temperature where specified and measuring dry ingredients precisely for consistent texture.
- ¾ cup (94 g) all-purpose flour 🌾
- 3 tablespoons dark cocoa powder 🍫
- ¼ teaspoon baking powder 🥄
- ⅛ teaspoon salt 🧂
- 2 large eggs (room temperature) 🥚
- 1 cup (200 g) granulated sugar 🍚
- 6 tablespoons (¾ stick) butter, softened 🧈
- 1 teaspoon vanilla extract 🍦
- 2 packages (16 oz / 454 g) cream cheese, softened 🧀
- 2 large eggs for the cheesecake (room temperature) 🥚
- ½ cup (100 g) granulated sugar for the cheesecake 🍚
- ½ cup sour cream (room temperature) 🥛
- 2 teaspoons confectioners’ (powdered) sugar 🍧
Having everything prepped — butter softened, cream cheese at room temperature, eggs out of the fridge, and dry ingredients measured — streamlines the process. Also, choose a reliable nonstick or parchment-lined springform pan and quality cream cheese for the best texture and flavor outcome. If your cocoa powder is particularly intense, taste the batter as you go to adjust sweetness in the cheesecake component, but avoid altering the prescribed ingredient amounts unless you know how that will change baking behavior.
Preparation Overview
Plan first, then bake
A little pre-bake organization makes a big difference. Start by choosing the right equipment and prepping the mise en place so transitions feel seamless. For layered desserts, the order in which you assemble components determines both the final texture and the visual impact when you slice through the cake.
I always recommend these general preparation steps before you begin mixing:
- Line and grease your chosen pan so the base releases cleanly.
- Bring dairy items to room temperature to ensure smooth, lump-free batters.
- Sift or whisk dry ingredients together for even distribution of cocoa and leavening.
Technique notes matter more than rigid timing. When creaming butter and sugar, aim for a pale, aerated texture to provide lift without overworking the mix. For the cheesecake component, beat just until silky and homogeneous — overbeating can incorporate excess air which leads to cracks. Also, when layering batters, smooth the surface gently to avoid blending the layers together; you want a distinct brownie base with a clean cheesecake cap.
Finally, adopt a cooling routine that supports structure: gradual cooling reduces the risk of dramatic shrinkage or surface cracking. I’ll walk through the precise assembly and bake steps in the dedicated instructions section, but keeping these preparation principles in mind will put you on the path to a consistent result every time.
Cooking / Assembly Process
Step-by-step instructions
- Preheat the oven and prepare a 9-inch springform pan: grease the pan and line the bottom with parchment paper.
- Make the brownie layer by whisking the flour, cocoa powder, baking powder, and salt together until combined, then cream the eggs, granulated sugar, softened butter, and vanilla until light and fluffy; fold in the dry mixture until just combined to form a soft brownie batter.
- Pour the brownie batter into the prepared pan and spread it evenly across the bottom.
- Bake the brownie base briefly until it is partially set; it will not be fully baked through — remove and keep the oven temperature steady.
- Prepare the cheesecake layer by beating the cream cheese until smooth, adding the cheesecake sugar until silky, then adding the cheesecake eggs one at a time and finishing with vanilla to achieve a homogeneous batter.
- Carefully spread the cheesecake batter over the partially baked brownie base and smooth the top with a spatula.
- Return the pan to the oven and bake until the edges are set and the center remains slightly jiggly to the touch.
- Turn off the oven and allow the cake to cool inside with the door slightly ajar to minimize sudden temperature change; then transfer to a wire rack to cool completely.
- Whisk together sour cream and confectioners’ sugar, spread over the cooled cake, then chill until fully set before releasing the springform and slicing to serve.
These steps are written to give a clear flow for assembly and timing cues. Pay attention to sensory signals — look for a set edge and a gently wobbly center during baking — rather than relying solely on exact clocks. Little touches, like smoothing the cheesecake layer with a warm spatula for a glassy finish and cooling the cake gradually, yield professional-looking slices and help prevent common issues such as top cracks or a soggy base.
Serving Suggestions
How to serve for maximum impact
When it comes time to serve, treat the cake like the centerpiece it is: slice with a warm, clean knife and present each wedge chilled so layers hold their shape. A few finishing touches can elevate the experience without masking the dessert’s natural flavors.
Consider one or two of these simple accents:
- A light dusting of cocoa powder or confectioners’ sugar on the sour cream top to enhance contrast.
- A drizzle of warm chocolate sauce or a spoonful of salted caramel at the table for guests who prefer more richness.
- Fresh raspberries, sliced strawberries, or a tart berry compote to add a bright, acidic foil that plays beautifully against the dense chocolate and creamy cheese.
For plating, leave a small border on each slice so the layers remain visible; that presentation is part of the dessert’s charm. Pair servings with a robust coffee, an espresso, or a fortified wine; these beverage choices harmonize with the chocolate depth and cut through the richness. If you’re catering to a crowd with varying sweet-tooth levels, offer optional sauces and fruit so guests can tailor the experience.
Storage & Make-Ahead Tips
Make it ahead and keep it perfect
One of the greatest strengths of this dessert is its make-ahead friendliness. After chilling until fully set, the cake becomes firmer and easier to slice neatly. For best texture retention, store the whole cake or individual slices in an airtight container in the refrigerator.
If you plan to prepare this in advance, consider these strategies:
- Chill thoroughly before releasing the springform to keep edges crisp and prevent slumping.
- Wrap slices individually for gifting or travel; airtight wrapping prevents flavor transfer in the fridge.
- For longer storage, you can freeze well-wrapped slices for up to a month; thaw in the fridge overnight to preserve texture.
When reheating or serving chilled, remember that gentle tempering (letting slices sit at room temperature for a short time) brings out the flavors more vividly. Avoid leaving the cake unrefrigerated for extended periods because of its cream cheese content. If condensation forms after refrigeration, blot gently with a paper towel before garnishing to keep the sour cream topping glossy and attractive.
Frequently Asked Questions
Answers to common troubleshooting and technique questions
- How do I prevent cracks on the cheesecake surface?
Cracks usually appear when too much air is incorporated into the batter or the cake cools too quickly. Beat the cheesecake mixture only until smooth; avoid overbeating. Cooling gradually inside a slightly ajar oven helps minimize sudden temperature shifts that cause cracking. - Can I use low-fat cream cheese or sour cream?
Lower-fat dairy can change both texture and flavor, often yielding a less creamy mouthfeel and possible separation. For best results use full-fat products. - My brownie base seems underbaked after the full bake — is that okay?
The brownie base is designed to remain fudgy beneath the cheesecake; avoid overbaking. The key is to partially set the base before adding the cheesecake layer so it supports the top without hardening into a dry crust. - How long should I chill before slicing?
Chilling until fully set is crucial for clean slices. Refrigerating for several hours or overnight is recommended to allow the layers to firm up.
If you have a question not covered here, feel free to ask for tips on ingredient swaps, altitude adjustments, or alternate bake vessels. I include targeted troubleshooting in the article because small adjustments often deliver the biggest improvements — whether you’re preventing cracks, achieving a silkier top, or preserving a fudgy base. That final note is the last paragraph of this FAQ section: I welcome follow-up questions — tell me what happened in your bake and I’ll suggest the simplest fix for your kitchen conditions.
Print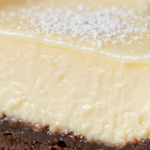
Decadent Brownie-Bottom Cheesecake
Ingredients
- ¾ cup (94 g) all-purpose flour 🌾
- 3 tablespoons dark cocoa powder 🍫
- ¼ teaspoon baking powder 🥄
- ⅛ teaspoon salt 🧂
- 2 large eggs (room temperature) 🥚
- 1 cup (200 g) granulated sugar 🍚
- 6 tablespoons (¾ stick) butter, softened 🧈
- 1 teaspoon vanilla extract 🍦
- 2 packages (16 oz / 454 g) cream cheese, softened 🧀
- 2 large eggs for the cheesecake (room temperature) 🥚
- ½ cup (100 g) granulated sugar for the cheesecake 🍚
- ½ cup sour cream (room temperature) 🥛
- 2 teaspoons confectioners’ (powdered) sugar 🍧
Instructions
- Preheat oven to 350°F (175°C). Grease a 9-inch (23 cm) springform pan and line the bottom with parchment paper.
- Make the brownie layer: In a bowl whisk together the flour, cocoa powder, baking powder and salt until combined.
- In a separate large bowl or stand mixer, beat 2 eggs, 1 cup granulated sugar, softened butter and 1 teaspoon vanilla until light and fluffy.
- With the mixer off, add the dry flour mixture and mix on low just until combined into a soft brownie batter.
- Pour the brownie batter into the prepared springform pan and spread it evenly across the bottom.
- Bake the brownie base for 12 minutes. It will not be fully set — that’s fine. Remove from the oven and keep the oven at 350°F (175°C).
- Prepare the cheesecake layer: In a large bowl beat the cream cheese until smooth and creamy.
- Add ½ cup granulated sugar to the cream cheese and mix until combined and silky.
- Add the 2 cheesecake eggs one at a time, beating after each addition, then beat in 1 teaspoon vanilla until the batter is smooth and homogeneous.
- Carefully spread the cheesecake batter over the partially baked brownie layer, smoothing the top with a spatula.
- Return the pan to the oven and bake for about 40 minutes at 350°F (175°C), until the edges are set and the center is just slightly jiggly.
- Turn off the oven and let the cheesecake cool inside with the door slightly ajar for 30–45 minutes to help prevent cracking. Then remove and cool completely on a wire rack.
- Make the sour cream topping: Whisk together ½ cup sour cream and 2 teaspoons confectioners’ sugar until smooth.
- Spread the sour cream topping over the cooled cheesecake, cover loosely and refrigerate for at least 4 hours (preferably overnight) to set.
- When chilled, run a knife around the edge, release the springform, slice and serve chilled. Enjoy!