Introduction
Welcome to a dessert that feels like summer — a recipe designed for busy cooks, relaxed hosts, and anyone who loves big flavor with minimal fuss.
This pineapple dump cake is the sort of sweet that arrives with warmth and nostalgia: fruit-forward, buttery, and easy enough to trust on a weeknight yet reliable enough for a potluck or holiday table. As a professional food blogger I find joy in recipes that simplify technique without sacrificing texture or comfort. The magic of a dump cake is in its joyful simplicity: layers assembled in a single pan that transform while baking into contrasting textures — saucy fruit below and a golden, tender crust above.
Why it works:
– The canned pineapple brings bright acidity and syrupy juices that meld into the crumb as it bakes.
– A boxed cake mix provides an approachable shortcut that still yields a delightfully tender top.
– Brown sugar and butter create caramelized notes and a glossy crust that offset the fruit’s freshness.
In this article you’ll find thoughtful guidance on technique, ingredient choices, assembly and serving ideas from a pro’s perspective. Expect practical tips for consistent texture, ideas for small tweaks, and foolproof serving suggestions to elevate this humble dessert into a crowd favorite.
Why You’ll Love This Recipe
This dump cake is beloved for its combination of convenience and comforting flavor.
As someone who writes recipes every week, I appreciate dishes that deliver maximum payoff with minimal hands-on time. This dessert is built around pantry-friendly ingredients and a straightforward method that eliminates fussy steps. Instead of creaming, folding, or weighing, you layer and bake — and the oven does the transformative work.
The texture contrast is a major win: the syrupy fruit base stays moist and tangy while the top becomes a tender, golden sheet of cake dotted with browned butter notes. That interplay makes each spoonful interesting and satisfying.
Beyond texture, the flavor profile leans bright and slightly tropical, making it a unique alternative to heavier chocolate or custard desserts. The ease of the method also makes this recipe forgiving for bakers of every level; the assembly lacks precise layering so small variations rarely ruin the outcome. For hosts, it’s a reliably crowd-pleasing option that can be doubled or adapted with other fruits if you want to swap ingredients later. In short, you’ll love this for its simplicity, dependable results, and the way it evokes homemade warmth with almost zero fuss.
Flavor & Texture Profile
Understanding the flavors and textures helps you serve this dessert at its best.
The central flavor note is bright pineapple — sweet with a hint of natural acidity that cuts through the richness of the buttery topping. Brown sugar brings a deep molasses sweetness that rounds the fruit’s edges and contributes to caramelized pockets in the final bake. The boxed cake mix, when combined with melted butter and baked, becomes a golden, gently crisped layer with an interior that stays tender — think of it as a cross between cobbler topping and cake crumb.
Texturally, the dessert thrives on contrast. The pineapple remains saucy and spoonable, providing a juicy base. The topping, when properly saturated with butter, achieves a pleasant balance: edges become crisp and caramelized while the center stays soft enough to yield under a spoon yet structured enough to hold a scoop of ice cream. Serving temperature alters the experience: warm from the oven emphasizes syrupy juices and melting ice cream creates a silky sauce, while a slightly cooled slice showcases the crust’s chew and the pineapple’s concentrated sweetness.
As a pro tip, think about textures when you serve: a crunchy garnish or a dollop of cold cream complements rather than competes with the cake’s inherent contrasts. That interplay between hot and cold, crisp and saucy, is what makes each bite memorable.
Gathering Ingredients
Assemble everything before you start — a small mise en place goes a long way.
Below is the exact ingredient list for this recipe so you can prep once and bake without interruption.
- 2 (20 oz) cans crushed pineapple, undrained
- 15.25 oz yellow cake mix
- 1/2 cup packed brown sugar
- 1 cup (2 sticks) unsalted butter, melted
- Vanilla ice cream, for serving
- Maraschino cherries, for garnish
Ingredient notes from a pro:
– Choose crushed pineapple in syrup if you want a sweeter, more saucy result; the juice contributes to the dessert’s luscious texture.
– A standard yellow cake mix provides structure and a familiar, buttery cake flavor; swapping to a different boxed mix will change sweetness and crumb character.
– Brown sugar adds depth; light or dark varieties slightly shift caramel notes.
– Use unsalted butter so you can control salt; salted butter introduces variable seasoning that can be harder to predict.
Gather these items on a flat surface before you begin. Having a shallow baking dish and a vessel for melted butter ready will make assembly smooth and fast.
Preparation Overview
A quick preparation plan keeps the process calm and efficient.
Start by lining up your equipment: a 9×13 baking dish, a small saucepan or microwave-safe bowl for melting butter, and a spatula or spoon for spreading. Once ingredients are gathered, the assembly proceeds quickly — the most important moments are even distribution and ensuring the dry cake mix is sprinkled evenly so the butter can saturate it predictably during baking.
Timing is forgiving, but organization matters. Place your cans of pineapple nearby and open them just before layering to prevent excess cold syrup from chilling the butter. Melt the butter until just liquefied — you want it warm enough to drizzle easily but not so hot that it creates steam that may disturb the dry mix. When you drizzle the butter, think of coverage rather than saturation: aim to wet most of the surface so the mix bakes into a unified crust with pockets of caramelization.
Little pro touches elevate the result: gently nudging the cake mix into any gaps and scattering brown sugar evenly will promote even browning. If you like a slightly denser crust, reserve a spoonful of butter to drizzle toward the end of baking to deepen caramel notes. Keep tools simple and purposeful for the best, most reliable outcome.
Cooking / Assembly Process
Follow these steps exactly as your structured instructions for assembly and baking.
- Preheat the oven to 350°F (175°C) and lightly grease a 9×13-inch baking dish with butter or nonstick spray.
- Pour the two cans of crushed pineapple with their juice evenly into the prepared dish, spreading slightly so the bottom is covered.
- Evenly sprinkle the dry yellow cake mix over the pineapple, trying to cover the fruit as much as possible.
- Sprinkle the packed brown sugar evenly over the layer of cake mix.
- Drizzle the melted butter over the top, aiming to wet as much of the dry mix as you can so it bakes into a golden crust.
- Bake in the preheated oven for 40–45 minutes, or until the top is golden brown and pineapple juices are bubbling around the edges.
- Remove from the oven and let the dump cake cool for 10–15 minutes to set slightly.
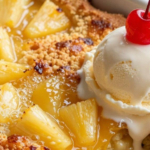
- Serve warm with a scoop of vanilla ice cream and a maraschino cherry on top.
Technique tips during assembly:
– When sprinkling the dry mix, hold the box low and move in a steady motion to avoid large clumps; the goal is a uniform sheet that the butter can penetrate.
– Drizzle the butter in a lattice or zig-zag to maximize coverage rather than pouring in a few large pools. This encourages even browning and caramel pockets.
– Keep an eye on the edges while baking; they often brown faster and will let you judge doneness by color and bubbling juices rather than the clock alone. Let the dessert rest briefly after baking so the juices thicken slightly and slices hold better.
Serving Suggestions
How you present this dessert shapes the final experience.
Serve the cake warm to highlight the contrast between hot syrupy fruit and cold toppings. A classic accompaniment is a scoop of high-quality vanilla ice cream that melts into the warm crevices and adds creamy balance. For a playful retro touch, top each serving with a maraschino cherry. If you want to introduce texture, consider a scattering of toasted coconut flakes or chopped macadamia nuts; these elements add crunch and deepen the tropical impression.
For a slightly more refined presentation, spoon the cake into shallow bowls and add a small quenelle of ice cream beside the warm portion so guests can savor both hot and cold in a single bite. Garnish ideas to elevate the look without fuss include a light dusting of finely grated citrus zest or a few fresh mint leaves for color contrast.
When serving to a crowd, bring the baking dish straight to the table for a relaxed family-style approach; keep a serving spoon and ramekins nearby so guests can personalize toppings. This dessert also pairs well with coffee or lightly spiced teas, making it versatile across different gatherings and seasons.
Storage & Make-Ahead Tips
Make-ahead and storage strategies ensure the dessert stays delicious and convenient.
If you want to prepare elements in advance, assemble the dish up to the point of adding melted butter, cover tightly, and refrigerate for a short period before finishing the assembly and baking. This allows you to speed up final prep on a busy day without losing quality. After baking, let the dessert cool completely before covering to prevent condensation from making the crust soggy.
Store leftovers in an airtight container in the refrigerator; the texture will firm as the juices are absorbed and the top softens slightly. Reheat individual portions gently in a microwave or warm in the oven until warmed through — the reheating method affects the crust differently, so the oven will better preserve a slight crisp while the microwave yields a saucier, softer top. To refresh the texture, a brief blast under a broiler (watch carefully) or a quick reheat in a heated skillet can revive some surface caramelization.
For longer storage, scoop cooled portions into freezer-safe containers or wrap the whole dish tightly and freeze. Thaw overnight in the refrigerator and reheat thoroughly before serving. When freezing, note that textures soften upon thawing; adding a fresh crunchy garnish at service helps reintroduce contrast.
Frequently Asked Questions
Answers to common questions from home bakers and hosts.
Q: Can I use fresh pineapple instead of canned? — A: Fresh pineapple can work if it’s well-drained and slightly macerated; however, canned crushed pineapple provides consistent syrup and moisture that the recipe is formulated around. Adjust sweetness and liquid accordingly if you swap.
Q: What variations work well with this method? — A: This technique adapts to many fruits; try cherries, peaches, or mixed berries. Consider the fruit’s water content and sweetness so the topping-to-fruit balance remains harmonious.
Q: How do I get a crisper top? — A: Ensuring the dry mix is evenly distributed and the butter is well-drizzled helps; finishing briefly under high heat or broiling (watch closely) will increase surface browning without overcooking the fruit.
Q: Is this dessert suitable for large crowds? — A: Yes — it scales well. Use multiple pans or larger hotel pans, and monitor baking times as depth can affect how juices bubble and how the top browns.
Q: Can I make this gluten-free or use a different boxed mix? — A: Gluten-free boxed mixes can be substituted; expect some textural differences based on the mix’s formulation. Adjust butter and sugar amounts if needed for texture preferences.
If you have other questions about adapting this recipe, troubleshooting texture, or pairing ideas, ask away — I’m happy to help with specific substitutions or serving scenarios.
Easy Pineapple Dump Cake
Ingredients
- 2 (20 oz) cans crushed pineapple, undrained 🍍
- 15.25 oz yellow cake mix 🎂
- 1/2 cup packed brown sugar 🟤
- 1 cup (2 sticks) unsalted butter, melted 🧈
- Vanilla ice cream, for serving 🍨
- Maraschino cherries, for garnish 🍒
Instructions
- Preheat the oven to 350°F (175°C). Lightly grease a 9×13-inch (23×33 cm) baking dish with butter or nonstick spray.
- Pour the two cans of crushed pineapple with their juice evenly into the prepared dish, spreading slightly so the bottom is covered.
- Evenly sprinkle the dry yellow cake mix over the pineapple, trying to cover the fruit as much as possible.
- Sprinkle the packed brown sugar evenly over the layer of cake mix.
- Drizzle the melted butter over the top, aiming to wet as much of the dry mix as you can so it bakes into a golden crust.
- Bake in the preheated oven for 40–45 minutes, or until the top is golden brown and pineapple juices are bubbling around the edges.
- Remove from the oven and let the dump cake cool for 10–15 minutes to set slightly.
- Serve warm with a scoop of vanilla ice cream and a maraschino cherry on top. Enjoy!