Halloween is the perfect time to whip up creative, fun, and slightly spooky treats. One of the most adorable and simple recipes to make for parties, school events, or family gatherings is Easy Witch Hat Cookies. These cookies are festive, no-bake, and can be customized with colorful candies and frosting. Best of all, they’re quick to make, so you don’t need to spend hours in the kitchen to impress your guests.
In this article, we’ll dive into what witch hat cookies are, why they’re perfect for Halloween, step-by-step instructions, variations, and serving ideas. By the end, you’ll have everything you need to make these magical little cookies for your spooky celebrations.
What Are Witch Hat Cookies?
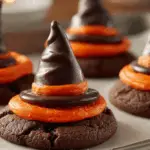
Witch hat cookies are a festive Halloween dessert that look just like tiny witch hats. Traditionally, they’re made using chocolate cookies as the base, a chocolate kiss candy for the pointy top, and frosting or candy for decoration.
They are:
- No-bake (easy to assemble, no oven needed)
- Kid-friendly (perfect for baking with children)
- Festive and customizable (use different candies and colors)
- Great for parties (easy to transport and serve)
Why You’ll Love Witch Hat Cookies
- Simple and Quick – Takes less than 20 minutes to prepare.
- Fun for Kids – A great way to get children involved in Halloween baking.
- Customizable – Decorate with orange, purple, green, or black candies and icing.
- Perfect for Parties – Bite-sized, mess-free, and easy to serve.
- Spooky-Cute – They look magical and bring festive Halloween vibes.
Ingredients for Witch Hat Cookies
You only need a handful of ingredients:
- Chocolate wafer cookies or fudge-striped cookies (the base of the hat)
- Chocolate kisses (Hershey’s Kisses or similar) (the pointy top of the hat)
- Colored frosting or icing (orange, purple, green, or black)
- Mini candies or sprinkles (for decoration, optional)
- Small piping bag or plastic bag (to apply the frosting neatly)
Step-by-Step Instructions
Step 1: Prepare the Cookies
Lay out your chocolate wafer cookies or fudge-striped cookies flat on a tray. These will be the base of your witch hats.
Step 2: Add Frosting
Pipe a small ring of frosting around the center of each cookie. This will act as “glue” and also create the hat’s band.
Step 3: Place the Chocolate Kiss
Press a chocolate kiss candy upside-down into the center of the frosting. The pointed shape will create the witch hat’s tip.
Step 4: Decorate the Hat
Use extra frosting to add a colorful band around the hat. Add sprinkles, mini candies, or edible glitter for extra Halloween flair.
Step 5: Let Them Set
Allow the frosting to firm up slightly before serving.
Tips for Perfect Witch Hat Cookies
- Choose the right base: Fudge-striped cookies look extra cute because the chocolate side makes the brim darker.
- Use vibrant frosting: Orange, green, or purple makes the hats pop.
- Let kids decorate: This is a fun, family-friendly project.
- Keep it neat: A piping bag makes frosting application easier and cleaner.
- Make ahead: These can be stored in an airtight container for 2–3 days.
Fun Variations
Want to make your witch hat cookies stand out? Try these variations:
- Peanut Butter Hat – Use peanut butter cups instead of chocolate kisses.
- Colorful Brims – Dip the cookie edges in colored candy melts.
- Spider Witch Hats – Add small licorice pieces for legs to make the hat look like a spider.
- Glittery Witch Hats – Use edible glitter for a magical sparkle.
- Minty Witch Hats – Use mint chocolate cookies and mint Hershey’s Kisses.
How to Serve Witch Hat Cookies
These cookies are versatile and fit perfectly into any Halloween spread:
- Halloween Party Platters – Pair with ghost cupcakes, candy corn bark, or mummy brownies.
- Trick-or-Treat Bags – Wrap individually for a spooky party favor.
- School Bake Sales – No-bake makes them safe and quick to prepare.
- Movie Nights – Serve with hot cocoa while watching spooky films.
Storage and Shelf Life
- Room Temperature: Store in an airtight container for 2–3 days.
- Refrigerator: Can be stored for up to a week, though frosting may harden.
- Freezer: Not recommended, as chocolate kisses may lose their texture.
Why Witch Hat Cookies Are Perfect for Halloween
Halloween treats are all about creativity and fun. Witch hat cookies check all the boxes: they’re cute, festive, simple, and crowd-pleasing. Unlike complicated Halloween desserts that require hours of baking, these cookies are stress-free and enjoyable to assemble, especially with kids.
They’re also budget-friendly, using inexpensive ingredients that can be found in almost any grocery store.
FAQs About Witch Hat Cookies
1. Can I make witch hat cookies without chocolate kisses?
Yes! Try mini peanut butter cups or chocolate truffles as the hat top.
2. Can I make these ahead of time?
Absolutely. Just store in an airtight container until ready to serve.
3. What frosting works best?
A thick buttercream or store-bought decorating icing works best. Gel frosting may not hold the candy in place.
4. Can I make them gluten-free?
Yes, just swap the cookies for gluten-free chocolate wafers.
5. Can kids help make these?
Definitely! They’re no-bake, so kids can decorate without needing the oven.
Final Thoughts
Easy Witch Hat Cookies are the perfect no-bake Halloween dessert. With just a few simple ingredients, you can create a festive, spooky, and fun treat that both kids and adults will love. Whether you’re throwing a Halloween party, preparing for a bake sale, or just want to add some magic to your dessert table, these cookies are sure to impress.
So grab some chocolate cookies, colorful frosting, and Hershey’s Kisses, and get ready to create a tray full of witchy, whimsical hats that will be the star of your Halloween spread!
Print
Easy Witch Hat Cookies: A Fun & Spooky Halloween Treat
Ingredients
• 2¾ cups all-purpose flour • 1 tsp baking soda • ½ tsp salt • 1 cup butter, softened • 1½ cups granulated sugar • 2 eggs • 2 tsp vanilla extract • Black and purple food coloring • Orange and green sprinkles • 1 cup powdered sugar • 2-3 tbsp milk • Black decorating gel
Instructions
- Preheat oven to 350°F
- Line baking sheets with parchment paper
- Whisk together flour, baking soda, and salt
- Cream butter and sugar until light and fluffy
- Add eggs and vanilla, beat well
- Gradually add flour mixture to wet ingredients
- Divide dough into thirds
- Color one third black, one third purple
- Keep one third plain for contrast
- Drop rounded tablespoons onto baking sheets
- Bake 10-12 minutes until edges are set
- Cool on baking sheets 5 minutes
- Transfer to wire racks to cool completely
- Mix powdered sugar and milk for glaze
- Divide glaze and color with food coloring
- Decorate cookies to look like witch hats
- Use black decorating gel for hat details
PREP TIME & NUTRITION: Prep Time: 25 mins, Cook Time: 12 mins, Total Time: 37 mins, Servings: 24, Calories: 140, Net Carbs: 20g, Fats: 7g, Protein: 2g
