Introduction to Witch Finger Cookies
Halloween is the season for spooky snacks and ghoulishly fun desserts. While candy often takes center stage, nothing captures the eerie charm of Halloween quite like Witch Finger Cookies. These creepy-looking cookies are shaped like fingers, complete with almond “nails” and knuckle-like indentations that give them a disturbingly realistic touch.
Despite their frightening appearance, witch finger cookies are absolutely delicious. Traditionally, they’re made with a buttery shortbread-style dough, tinted green or left natural, then baked until golden. Once cooled, red jam or melted chocolate is added beneath the almond nails to mimic “bloody” details.
Whether you’re preparing for a Halloween party, a classroom event, or just want a fun treat for trick-or-treat night, witch finger cookies bring laughter, surprise, and a bit of fright to the dessert table. They’re enchanting in their creativity, proving that Halloween baking can be equal parts spooky and sweet.
Why Witch Finger Cookies Are Perfect for Halloween
There are hundreds of festive treats you could bake for Halloween, but witch finger cookies stand out for several reasons:
1. Eye-Catching Presentation
Their creepy, realistic look immediately draws attention. Guests can’t help but smile—or gasp—when they see them.
2. Easy to Customize
You can change the dough color, the “nails” (almonds, candy, or chocolate), and the decorations (bloody jam, icing, or food coloring) to suit your style.
3. Kid-Friendly Activity
Kids love shaping the dough into “fingers” and pressing in the almond nails. It’s a fun hands-on kitchen activity for families.
4. Perfect Make-Ahead Treat
These cookies store well, so you can bake them a few days before the party.
5. Great Conversation Starter
No one forgets a plate of witch fingers at the Halloween dessert table—they’re spooky, memorable, and a little bit mischievous.
That’s what makes witch finger cookies one of the most enchanting Halloween treats.
A Brief History of Spooky Halloween Treats
To understand where witch finger cookies fit in, let’s take a quick look at the tradition of creepy food for Halloween.
- Origins of Halloween → Rooted in the Celtic festival of Samhain, Halloween began as a way to honor spirits and ward off ghosts. Food played an important role, with offerings left for the dead.
- Medieval Europe → “Soul cakes” were given to beggars in exchange for prayers for the dead, a tradition that influenced modern trick-or-treating.
- 20th Century America → Halloween transformed into a child-centered holiday with costumes, candies, and themed baked goods.
- Modern Era → Themed treats—like ghost cupcakes, mummy hot dogs, and witch finger cookies—emerged as a way to bring creativity and playfulness to parties.
Witch finger cookies, in particular, became popular in the late 20th century as a fun, slightly spooky, but family-friendly dessert perfect for the holiday.
Healthier Twists on Witch Finger Cookies
Halloween is usually about indulgence, but witch finger cookies can be adapted into lighter versions without losing their creepy charm.
1. Whole Wheat or Oat Flour
Swap traditional flour for whole wheat or oat flour to add fiber and nutrients.
2. Reduced Sugar
Lower the sugar content or replace it with coconut sugar, maple syrup, or honey for a more natural sweetness.
3. Plant-Based Options
Use vegan butter and almond milk to make dairy-free witch finger cookies. Replace eggs with flaxseed or chia seed “eggs.”
4. Gluten-Free Versions
Gluten-free flour blends work wonderfully for this recipe without sacrificing taste or texture.
5. Natural Colors
Instead of food coloring, use spinach powder for green dough or beet powder for a reddish tint.
This way, you can enjoy spooky treats while still keeping them a little healthier for kids and adults alike.
Key Ingredients for Witch Finger Cookies
The magic of witch finger cookies lies in their simple yet versatile ingredients. Here’s what you’ll typically need:
For the Cookie Dough:
- Butter → Creates a rich, buttery shortbread texture.
- Sugar → Granulated or powdered sugar for sweetness.
- Egg → Adds structure and binds ingredients.
- Flour → All-purpose flour forms the base of the dough.
- Vanilla extract → For warmth and aroma.
- Baking powder → Helps the cookies hold their shape.
- Food coloring (optional) → Green or red for a spooky twist.
For Decoration:
- Whole almonds → Perfect for creating the look of witch nails.
- Jam (strawberry or raspberry) → Used under the almond for a “bloody” effect.
- Cocoa powder or food-safe markers → To enhance knuckle wrinkles.
These key ingredients combine to create cookies that are simple to bake, creepy to look at, and enchanting to eat.
Print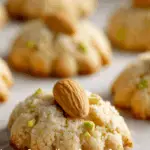
Enchanting Treats: Witch Finger Cookies – A Spooky Delight for Halloween
Ingredients
• 1 cup (2 sticks) unsalted butter, softened
• ¾ cup granulated sugar
• 1 large egg
• 1 tsp vanilla extract
• 2 ½ cups all-purpose flour
• ½ tsp salt
• Green or purple food-safe gel (optional, for color)
• Whole blanched almonds (1 per cookie)
• Red decorating gel or melted strawberry jam (for “blood”)
Instructions
- In a large bowl, beat butter and sugar until light and fluffy (2–3 minutes).
- Beat in egg and vanilla until smooth.
- Gradually add flour and salt, mixing until a soft dough forms.
- Optional: Knead in a drop of green or purple food coloring for an eerie witchy hue.
- Chill dough 30 minutes (makes shaping easier).
- Preheat oven to 350°F (175°C). Line baking sheets with parchment paper.
- Roll dough into 2-inch logs, then gently pinch one end to form a “knuckle” look. Curve slightly for a natural finger shape.
- Press one blanched almond into the wide end for the “fingernail.”
- Bake 10–12 minutes, until edges are lightly golden. Cool completely on a wire rack.
- Cast the spell: Use red gel or jam to dab at the base of each almond nail for a gory, “bloody” effect!
✨ Perfect for Halloween parties, school treats, or scaring guests on the dessert table!
💡 Kid-friendly fun: Let little witches help shape the cookies and add the “blood”!
PREP TIME & NUTRITION :
Prep Time : 30 mins (includes chilling) , Cook Time : 12 mins , Total Time : 45 mins , Servings : 18 cookies , Calories : 120 , Net Carbs: 14g , Fats: 7g , Protein: 2g