When the nights grow longer and the jack-o’-lanterns glow, one thing is certain: it’s time for Halloween Fudge. This rich, creamy, and indulgent no-bake treat is the ultimate way to satisfy sweet cravings during the spookiest season of the year. Whether you’re making it for a school party, trick-or-treat goodie bags, or a haunted house dessert table, Halloween fudge is a show-stopping favorite that’s as fun to make as it is to eat.
With its smooth chocolate or white chocolate base, festive colors, and playful mix-ins like candy eyes, sprinkles, and crushed cookies, this fudge is more than just a sweet—it’s a mini celebration in every bite. And the best part? It requires no baking, just a few simple ingredients and a little creativity.
In this comprehensive, SEO-optimized guide of over 1,500 words, we’ll cover:
- What makes Halloween fudge special
- A foolproof, easy recipe (with stovetop and microwave options)
- Creative variations (chocolate, white chocolate, swirls, and themed versions)
- Tips for perfect texture and presentation
- How to store, gift, and serve
- And why this recipe is a must-have for food bloggers, parents, and seasonal content creators
Let’s get ready to make some fudge that’s frightfully delicious.
What Is Halloween Fudge?
Halloween Fudge is a seasonal twist on classic fudge, made with a creamy base of chocolate, sweetened condensed milk, and butter, then customized with Halloween-themed colors, flavors, and decorations. It’s typically set in an 8×8-inch pan, chilled until firm, and cut into squares that are as eye-catching as they are tasty.
Common versions include:
- Chocolate Peanut Butter Spider Fudge (with pretzel legs)
- White Chocolate Mummy Fudge (wrapped with icing “bandages”)
- Orange & Black Swirl Fudge (pumpkin spice or candy corn layers)
- Candy-Studded Fudge (with gummy worms, chocolate bats, or candy corn)
It’s a no-bake, make-ahead dessert that’s perfect for:
- Halloween parties
- Classroom treats
- DIY gift boxes
- Potlucks and fall festivals
And because it’s so easy to customize, it’s a hit with kids and adults alike.
Why Halloween Fudge Is a Seasonal Staple
1. No-Bake Convenience
No oven needed—perfect for busy parents, classrooms, or hot kitchens.
2. Endlessly Customizable
Switch up colors, flavors, and toppings to match any theme: witches, ghosts, pumpkins, or zombies.
3. Great for Gifting
Cut into squares and package in cellophane bags, mason jars, or treat boxes with spooky tags.
4. Kid-Friendly & Fun to Make
Let kids help stir, pour, and decorate—great for family baking or school activities.
5. Affordable & Scalable
Ingredients are inexpensive, and one batch feeds a crowd.
Classic Halloween Fudge Recipe (No-Bake, 3-Ingredient Base)
Prep Time: 15 minutes
Chill Time: 2–3 hours
Total Time: ~3.5 hours
Servings: 36 small squares
Difficulty: Easy
Dietary Note: Vegetarian (can be made gluten-free, nut-free, or vegan with substitutions)
Ingredients:
For the Base (Choose One):
- Option 1: Chocolate Fudge
- 3 cups semi-sweet chocolate chips
- 1 can (14 oz) sweetened condensed milk
- 2 tbsp unsalted butter
- Option 2: White Chocolate Fudge
- 3 cups white chocolate chips
- 1 can (14 oz) sweetened condensed milk
- 2 tbsp unsalted butter
For Halloween Mix-Ins (Choose Your Theme):
- ½ cup Halloween sprinkles (orange, black, purple)
- ¼ cup crushed Oreos or chocolate sandwich cookies
- ¼ cup candy corn or mini chocolate pumpkins
- 2–3 tbsp colored sugar (for swirls)
- 10–12 gummy worms (for “dirt” fudge)
- 12 candy eyes (for mummy or monster fudge)
- 6–8 pretzel sticks (to make spider legs)
Optional Add-Ins:
- ½ tsp vanilla extract
- ¼ tsp pumpkin pie spice (for fall flavor)
- 1–2 tbsp peanut butter (for a swirl)
Step-by-Step Instructions:
1. Prepare the Pan
- Line an 8×8-inch baking pan with parchment paper, leaving overhang for easy removal.
- Lightly grease if needed.
2. Melt the Fudge Base Choose your method:
Stovetop Method (Recommended for Smoothness)
- In a medium saucepan, combine chocolate chips, sweetened condensed milk, and butter.
- Heat over low heat, stirring constantly, until fully melted and smooth (5–7 minutes).
- Remove from heat. Stir in vanilla or spices if using.
Microwave Method (Quick & Easy)
- In a microwave-safe bowl, combine all base ingredients.
- Heat in 30-second intervals, stirring between each, until smooth (about 1.5–2 minutes total).
3. Pour Into Pan
- Pour the melted mixture into the prepared pan.
- Use a spatula to spread evenly.
4. Add Mix-Ins & Decorate Now for the fun part! Customize your fudge:
Pumpkin Patch Fudge
- Swirl in orange and yellow food coloring.
- Press in candy corn and gummy worms.
Mummy Fudge
- Let fudge set slightly (15 mins), then pipe white icing “bandages” across the surface.
- Add candy eyes where the bandages cross.
Spider Fudge
- Press a candy eye into the center of each future square.
- After chilling, cut into squares and attach pretzel legs (4 per side).
Candy Corn Swirl Fudge
- Divide white chocolate base into 3 bowls.
- Tint one orange, one yellow, and leave one white.
- Spoon dollops into the pan and swirl with a knife.
5. Chill to Set
- Refrigerate for 2–3 hours, or until firm and easily cut.
6. Cut & Serve
- Lift fudge out using parchment overhang.
- Cut into 1-inch squares with a sharp knife.
- Wipe the knife between cuts for clean edges.
Tips for Perfect Halloween Fudge
- Use high-quality chocolate chips: They melt smoother and taste better.
- Stir constantly: Prevents scorching on the stovetop.
- Don’t overheat: Microwave in short bursts to avoid grainy texture.
- Add mix-ins after melting: Stir in sprinkles or candy just before pouring.
- Chill fully: Warm fudge will smear when cut.
- Use parchment paper: Makes removal and cleanup a breeze.
Creative Variations to Try
Make your fudge uniquely spooky:
1. Peanut Butter Chocolate Swirl Fudge
- Swirl in ¼ cup melted peanut butter before chilling.
- Top with crushed Reese’s cups.
2. Vegan Halloween Fudge
- Use dairy-free chocolate chips and vegan sweetened condensed milk (or homemade coconut version).
- Choose plant-based sprinkles and candy.
3. Gluten-Free Fudge
- Ensure chocolate chips and candies are certified gluten-free.
- Use GF sprinkles and cookies.
4. Zombie Brain Fudge
- Use white chocolate base.
- After chilling, score the top with a knife in a brain-like pattern.
- Drizzle with red syrup or raspberry jam “blood.”
5. Layered Fudge
- Make two batches (e.g., chocolate and white).
- Pour one layer, chill 20 mins, then add the second.
- Swirl with a knife for a marbled effect.
6. Mini Fudge Bites
- Use a mini muffin tin lined with paper liners.
- Bake time: chill 1.5 hours.
- Perfect for treat bags.
7. Boozy Adult Fudge
- Add 1–2 tbsp Baileys, Kahlúa, or spiced rum to the base.
- Label clearly for adult-only events.
Why This Recipe Is Perfect for Food Bloggers & SEO
If you’re a food blogger, recipe developer, or content creator, Halloween Fudge is a high-traffic, seasonal SEO goldmine. Here’s why:
1. High Seasonal Search Volume
Keywords like “Halloween fudge recipe,” “no-bake Halloween treats,” and “easy fudge for kids” spike every August through October. Ranking for these can bring thousands of visitors.
2. Long-Tail Keyword Opportunities
Target low-competition, high-intent phrases:
- “Easy Halloween fudge with candy eyes”
- “No-bake white chocolate fudge recipe”
- “Kid-friendly Halloween fudge ideas”
- “Gluten-free Halloween dessert fudge”
- “Spider fudge with pretzel legs”
3. Pinterest & Social Media Magnet
This fudge is incredibly photogenic—colorful, themed, and fun. Perfect for:
- Pinterest pins
- Instagram Reels (show the swirling and decorating)
- TikTok “Halloween treat hack” videos
- YouTube shorts for party planners
4. Affiliate Marketing Potential
Promote:
- Quality chocolate chips
- Halloween sprinkles and candy
- Baking pans and parchment paper
- Candy decorating kits
5. Link-Worthy for Roundups
This recipe is likely to be featured in:
- “Top 20 Halloween Treats for 2024”
- “Best No-Bake Desserts for Kids”
- “DIY Halloween Party Favors” Earning you valuable backlinks and authority.
Serving & Packaging Ideas
Make your fudge unforgettable:
- Treat Bags: Place 2–3 squares in cellophane with a spider ring or sticker.
- Gift Boxes: Layer in a tin with a “Trick or Treat” tag.
- Dessert Table: Arrange on a black tray with dry ice (for fog effect).
- Label It: Use a sign:
“Warning: May Cause Spontaneous Cackling”
Storage & Make-Ahead Tips
- Refrigerator: Store in an airtight container for up to 2 weeks.
- Freezer: Wrap tightly and freeze for up to 3 months. Thaw in the fridge.
- Make Ahead: Prepare 3–5 days in advance—fudge keeps well.
- Room Temperature: Only for 1–2 days (in cool weather).
Safety & Allergy Tips
- Choking Hazard: Not recommended for children under 4.
- Check Labels: Some candies contain gelatin, nuts, or allergens.
- Nut-Free: Use nut-free chocolate and candies.
- Food Coloring: Use plant-based dyes if needed.
Conclusion: A Sweet, Spooky Staple
Halloween Fudge is more than just a dessert—it’s a fun, festive, and flavorful tradition that brings joy to the season. With its creamy texture, vibrant colors, and playful decorations, it’s the kind of treat that makes Halloween feel magical.
Whether you’re making it with your kids, handing it out at a party, or using it as a centerpiece, this fudge is guaranteed to impress.
And for content creators, it’s a seasonal SEO powerhouse—easy to rank for, highly shareable, and endlessly customizable.
So grab your chocolate, melt the butter, and get ready to stir up some spooky sweetness.
Recipe Summary: Halloween Fudge
Prep Time: 15 mins
Chill Time: 2–3 hours
Total Time: ~3.5 hours
Servings: 36 squares
Calories: ~120 per square (varies by base)
Ingredients:
- 3 cups chocolate or white chocolate chips
- 1 can sweetened condensed milk
- 2 tbsp butter
- Halloween mix-ins (sprinkles, candy, pretzels, etc.)
Instructions:
- Melt chocolate, milk, and butter.
- Pour into pan.
- Add decorations.
- Chill, cut, and serve.
Pro Tip: Add a pinch of sea salt to balance sweetness and enhance flavor!
Print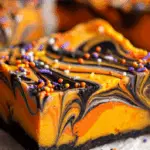
Halloween Fudge: A Spooktacular, No-Bake Treat That’s Easy, Creamy, and Perfect for the Season
Ingredients
• 3 cups semi-sweet chocolate chips • 1 can (14oz) sweetened condensed milk • ¼ cup butter • 1 tsp vanilla extract • Orange food coloring • Black food coloring • Halloween sprinkles • Candy eyeballs • Crushed chocolate cookies
Instructions
- Line 8×8 inch pan with parchment paper
- In medium saucepan, combine chocolate chips, condensed milk, and butter
- Cook over low heat, stirring constantly until smooth
- Remove from heat and stir in vanilla extract
- Divide fudge mixture into thirds
- Leave one third plain, add orange coloring to one third, black to last third
- Pour plain fudge into prepared pan
- Drop spoonfuls of orange and black fudge on top
- Swirl with knife to create Halloween effect
- Sprinkle with Halloween sprinkles and candy eyeballs
- Refrigerate 2 hours until set
- Remove from pan and cut into squares
- Store covered in refrigerator
PREP TIME & NUTRITION: Prep Time: 20 mins, Cook Time: 10 mins, Total Time: 2 hours 30 mins, Servings: 16, Calories: 180, Net Carbs: 22g, Fats: 12g, Protein: 3g