When it comes to Halloween sweets, fudge is the unsung hero of the season. Unlike fragile cookies or time-consuming cakes, Halloween fudge is rich, creamy, no-bake, and ready in under 20 minutes—making it the perfect solution for last-minute parties, school treats, or midnight cravings. But this isn’t your grandma’s plain chocolate square. We’re talking vibrant orange swirls, ghostly white layers, eerie green streaks, and candy-eyed monsters that look like they crawled straight out of a cauldron… yet melt in your mouth with decadent, buttery sweetness.
The best part? You only need 5–6 basic ingredients and a microwave to create a batch of fudge that looks like you spent hours crafting it. Whether you’re making pumpkin spice swirls, witches’ brew marbled bars, or mummy-wrapped bites, this versatile treat is endlessly customizable, kid-friendly, and guaranteed to disappear faster than a ghost at sunrise.
In this ultimate guide, we’ll share a foolproof base recipe, reveal pro decorating tricks for maximum Halloween flair, offer creative variations (including vegan and allergy-friendly options), and answer all your candy-coating questions. Get ready to stir up some spooky magic in your kitchen!
Why Halloween Fudge Is Your Seasonal Secret Weapon
This treat isn’t just cute—it’s practical magic:
- No-Bake & Lightning-Fast: Ready in 15 minutes of active time. Perfect for busy parents or procrastinators!
- Kid-Approved & Safe for School: Nut-free options available; easy to portion and pack.
- Budget-Friendly: Made with pantry staples like chocolate chips and sweetened condensed milk.
- Customizable Canvas: Endless color, swirl, and topping possibilities for pumpkins, ghosts, bats, and more.
- Make-Ahead Friendly: Stays fresh for weeks, so you can prep early and enjoy the holiday stress-free.
- Gift-Ready: Package in cute Halloween bags or boxes for neighbors, teachers, or party favors.
The Foolproof Halloween Fudge Base Recipe
(Makes 25–30 squares)
Ingredients
- 3 cups (510g) semi-sweet chocolate chips
- 1 (14 oz) can sweetened condensed milk
- 2 tbsp unsalted butter
- 1 tsp pure vanilla extract
- Pinch of salt
For Halloween Fun:
- Gel food coloring (orange, green, purple, black—avoid liquid!)
- Candy eyes (for monsters, ghosts)
- Orange & black sprinkles
- Melted white chocolate (for drizzling or ghost shapes)
- Crushed Oreos (for “dirt” or witch hat bases)
- Pretzel sticks (for broom handles)
- Mini marshmallows (for mummy bandages)
Equipment
- 8×8-inch baking pan
- Parchment paper
- Microwave-safe bowl
- Rubber spatula
Step-by-Step Instructions
1. Prep the Pan
Line an 8×8-inch pan with parchment paper, leaving overhang on two sides for easy removal.
2. Melt the Base
In a large microwave-safe bowl, combine chocolate chips, sweetened condensed milk, and butter.
Microwave on MEDIUM (50%) power in 30-second intervals, stirring between each, until smooth (usually 2–3 minutes total).
Stir in vanilla and salt until glossy.
3. Add Color & Swirl (Optional but Festive!)
- For solid colors: Divide mixture into bowls, tint with gel food coloring, and pour into pan.
- For marbled effect: Pour plain fudge into pan. Drop spoonfuls of colored fudge on top. Swirl gently with a toothpick.
- For layered fudge: Pour one color, chill 10 mins, then add second layer.
4. Add Toppings
Before fudge sets (within 2–3 minutes of pouring), press in:
- Ghost Fudge: Candy eyes + white chocolate drizzle
- Pumpkin Fudge: Orange sprinkles + green M&M stem
- Monster Fudge: Candy eyes + green-tinted base + black sprinkles
- Witch Hat Fudge: Mini chocolate kiss + crushed Oreo brim
- Mummy Fudge: Drizzle with melted white chocolate in bandage lines
5. Chill & Set
Refrigerate for at least 2 hours (or freeze for 45 mins) until firm.
6. Cut & Serve
Lift fudge out using parchment overhang. Cut into 1-inch squares with a sharp knife (wipe blade between cuts for clean edges).
Pro Tips for Perfect, Spooky Fudge
- Gel > Liquid Food Coloring: Liquid adds moisture and prevents setting. Gel is concentrated and vibrant.
- Medium Power Only: High heat scorches chocolate. Patience = smooth fudge!
- Don’t Over-Stir After Coloring: Swirl gently to maintain defined patterns.
- Work Fast with Toppings: Fudge sets quickly—have candy eyes and sprinkles ready!
- Storage: Keep in an airtight container at room temperature for 2 weeks, or refrigerate for 3 weeks.
Creative Halloween Variations
- Pumpkin Spice Fudge: Add 1½ tsp pumpkin pie spice + ½ cup canned pumpkin puree (reduce condensed milk by 2 tbsp).
- Vegan Halloween Fudge: Use dairy-free chocolate chips, coconut condensed milk, and vegan butter.
- Gluten-Free: Ensure all add-ins (sprinkles, cookies) are certified GF.
- Peanut Butter Monster Fudge: Swirl ½ cup melted peanut butter into chocolate base.
- Candy Corn Swirl: Layer orange, yellow, and white fudge in stripes.
- Spider Web Fudge: Drizzle black icing in circles, then drag toothpick from center outward.
Frequently Asked Questions (FAQs)
Q: Can I use evaporated milk instead of sweetened condensed milk?
A: No! Evaporated milk is unsweetened and won’t set the fudge. Sweetened condensed milk is essential.
Q: Why is my fudge grainy?
A: Likely overheated chocolate. Always use medium power and stir gently.
Q: Can I make it nut-free for school?
A: Yes! Use nut-free chocolate chips (like Enjoy Life) and avoid peanut butter swirls.
Q: How far ahead can I make it?
A: Up to 2 weeks ahead! Store in layers separated by parchment paper.
Q: Can I freeze Halloween fudge?
A: Absolutely! Wrap tightly in plastic, then foil. Freeze for up to 3 months. Thaw at room temperature.
Why This Fudge Will Be Your Halloween Hero
Halloween fudge is more than just dessert—it’s a stress-free, joyful way to celebrate the season. It’s safe for classrooms, impressive at parties, and satisfyingly rich for adults. Whether you’re handing out squares in spiderweb bags, serving them at a monster mash, or sneaking one while carving pumpkins, these treats capture the playful spirit of Halloween without the hassle.
So grab your cauldron (aka microwave bowl), summon your inner witch or wizard, and whip up a batch of these spooktacular squares. One bite, and you’ll be howling for more!
Happy Haunting—and Happy Snacking! 🎃🍫👻
Print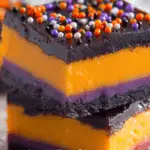
Halloween Fudge: Spooktacularly Easy, No-Bake Treats That Haunt Your Taste Buds (in the Best Way!)
Ingredients
• 1 can (14 oz) sweetened condensed milk
• 2 cups white chocolate chips (or dairy-free alternative)
• ½ tsp vanilla extract
• Orange and black food-safe gel (or green, purple)
• ½ cup Halloween sprinkles (worms, bats, ghosts, candy eyes)
• Optional: crushed cookies or gummy worms for “dirt” layers
Instructions
- Line an 8×8-inch baking pan with parchment paper or foil.
- In a saucepan over low heat, combine sweetened condensed milk and white chocolate chips. Stir constantly until fully melted and smooth (5–7 minutes).
- Remove from heat. Stir in vanilla.
- Divide mixture into 2–3 bowls. Tint each with different Halloween colors (orange, black, purple).
- Pour one color into the pan and spread evenly. Sprinkle with Halloween sprinkles or gummy worms.
- Carefully add second layer on top. Swirl gently with a knife for a marbled “witch’s brew” effect.
- Chill in the refrigerator for 2–3 hours, until firm.
- Lift out using the parchment and cut into small squares.
✨ Make it extra fun: Use ghost-shaped molds or press candy eyes into the top before chilling!
💡 Great for classroom treats, trick-or-treat handouts, or dessert tables—kids love the colors and crunch!
PREP TIME & NUTRITION :
Prep Time : 10 mins , Cook Time : 7 mins , Total Time : 3 hrs 15 mins (includes chilling) , Servings : 16 squares , Calories : 130 , Net Carbs: 17g , Fats: 7g , Protein: 2g