When the leaves fall and the jack-o’-lanterns glow, it’s time to bake up some Halloween Sugar Cookie Bars—a festive, no-fuss dessert that combines the buttery softness of sugar cookies with the ease of a bar treat. These colorful, fun-to-decorate bars are the ultimate Halloween party food, perfect for school events, trick-or-treat trays, haunted house spreads, or a cozy night of pumpkin carving.
Unlike traditional cut-out cookies, these bars require no rolling, no chilling, and no cookie cutters—just a simple batter baked in a pan, cooled, and topped with a sweet vanilla icing ready for Halloween-themed decorations. Whether you’re making ghostly white drizzles, spiderweb designs, or bloody red handprints, these Halloween Sugar Cookie Bars are a canvas for creativity and seasonal fun.
In this comprehensive, SEO-optimized guide, you’ll get a foolproof recipe, step-by-step instructions, decorating ideas, expert tips, variations, and everything you need to make the spookiest (and tastiest) sugar cookie bars of the season.
Why You’ll Love Halloween Sugar Cookie Bars
✅ Easy & Quick – No rolling or chilling required
✅ Perfect for Decorating – Smooth surface ideal for icing and sprinkles
✅ Crowd-Pleasing – Loved by kids and adults alike
✅ Make-Ahead Friendly – Bake and ice 1–2 days in advance
✅ Great for Gifting – Cut into squares and pack in treat bags or boxes
✅ Festive & Fun – Endless Halloween decoration possibilities
These aren’t just cookies—they’re edible Halloween art.
Key Ingredients for Halloween Sugar Cookie Bars
This recipe makes one 9×13-inch pan (12–16 bars).
For the Cookie Base:
- ½ cup (115g) unsalted butter, softened
- ¾ cup (150g) granulated sugar
- 1 large egg
- 1 tsp pure vanilla extract
- 1 ½ cups (190g) all-purpose flour
- ½ tsp baking powder
- ¼ tsp salt
For the Vanilla Icing:
- 1 cup (120g) powdered sugar
- 1–2 tbsp milk or cream
- ½ tsp vanilla extract
- Pinch of salt
For Halloween Decorations:
- Food coloring gels (black, orange, purple, green, red)
- Sprinkles (Halloween-themed: bats, ghosts, pumpkins, worms)
- Candy eyes (store-bought or DIY with mini marshmallows)
- Candy melts or chocolate (for piping)
- Edible markers (for fine details)
Step-by-Step Recipe: How to Make Halloween Sugar Cookie Bars
Follow these simple steps for soft, buttery bars ready for spooky decoration.
Step 1: Preheat and Prepare
- Preheat oven to 350°F (175°C).
- Grease a 9×13-inch baking pan and line with parchment paper for easy removal.
Step 2: Make the Cookie Batter
- In a large bowl, beat softened butter and sugar until light and fluffy (2–3 minutes).
- Add egg and vanilla. Mix until smooth.
- In a separate bowl, whisk together flour, baking powder, and salt.
- Gradually add dry ingredients to wet, mixing until just combined. Do not overmix.
Step 3: Bake
- Pour batter into the prepared pan and spread evenly with a spatula.
- Bake for 20–25 minutes, until edges are golden and center is set.
- A toothpick should come out clean.
- Let cool completely in the pan on a wire rack (about 1–2 hours).
Tip: For extra softness, do not overbake.
Step 4: Make the Vanilla Icing
- In a small bowl, whisk powdered sugar, 1 tbsp milk, vanilla, and salt.
- Add more milk, ½ tsp at a time, until icing is smooth and drizzle-able (like thick syrup).
Step 5: Ice the Bars
- Pour icing over the cooled bars.
- Use an offset spatula or the back of a spoon to spread evenly.
- Let icing set for 10–15 minutes before decorating.
Alternative: For a two-tone look, divide icing and tint portions with food coloring.
Step 6: Decorate for Halloween!
Now the fun begins! Here are 5 spooky decoration ideas:
- Ghostly Drizzle
- Use black icing to draw ghost outlines or “Boo!” messages.
- Add candy eyes.
- Spiderweb Design
- Start with a white base.
- Pipe concentric circles with black icing, then drag a toothpick from center outward.
- Pumpkin Patch
- Tint icing orange and pipe jack-o’-lantern faces.
- Add green icing stems.
- Witch’s Brew
- Use purple and green icing with “bubbling” swirls.
- Add plastic spiders or gummy worms.
- Bloody Handprints
- Dip hands in red-tinted icing and press lightly (great for kids).
- Add black icing fingernails.
Let decorations set for 30 minutes before slicing.
Step 7: Slice and Serve
- Use a sharp knife for clean cuts.
- Wipe the blade between slices for neat edges.
Tips for the Best Halloween Sugar Cookie Bars
- Cool Completely – Warm bars will melt the icing.
- Use Gel Food Coloring – More vibrant and less liquid than liquid dyes.
- Parchment Paper is Key – Makes lifting and cutting easier.
- Make-Ahead Friendly – Bake and ice 1–2 days in advance. Store covered.
- Prevent Cracking Icing – Don’t over-thin. If needed, add more powdered sugar.
- Double the Batch – These disappear fast at parties!
Creative Variations to Try
Make these bars your own:
1. Gluten-Free Halloween Bars
Use a 1:1 gluten-free baking blend. Add ½ tsp xanthan gum if not included.
2. Vegan Version
- Use plant-based butter and egg substitute (e.g., flax egg)
- Choose vegan powdered sugar and sprinkles
3. Pumpkin Spice Sugar Cookie Bars
Add 1 tsp pumpkin pie spice to the batter for a fall twist.
4. Lemon Sugar Cookie Bars
Replace vanilla with lemon extract and zest. Use lemon icing.
5. Confetti Cookie Bars
Mix ¼ cup rainbow or Halloween sprinkles into the batter before baking.
6. Mini Cookie Bar Bites
Bake in a muffin tin for 15–18 minutes—perfect for party favors.
How to Store and Preserve Your Cookie Bars
- Room Temperature: Store in an airtight container for up to 4 days.
- Refrigerator: Keep for up to 1 week. Bring to room temperature before serving.
- Freezer: Freeze un-iced bars for up to 3 months. Thaw and ice when ready.
- Make-Ahead Tip: Bake and ice 1–2 days in advance. Decorate the morning of the party.
Serving Suggestions: How to Enjoy Your Halloween Sugar Cookie Bars
These bars are perfect for:
- Halloween Parties – Centerpiece on a spooky dessert table
- School Treats – Easy to pack and share
- Trick-or-Treat Goodie Bags – Cut into small squares
- Movie Nights – Pair with hot cocoa and a scary film
- Gifts – Wrap in cellophane with a “Boo!” tag
Serve with:
- Apple cider
- Spiced tea
- Vanilla ice cream (for a cookie bar sundae)
Nutritional Information (Approximate per Bar, 1/16 of Pan)
| Calories | 180 |
| Fat | 7g |
| Saturated Fat | 4g |
| Carbohydrates | 28g |
| Sugar | 18g |
| Protein | 2g |
| Fiber | 0g |
Note: Values vary based on icing and add-ins.
A sweet treat best enjoyed in moderation—perfect for Halloween indulgence.
Frequently Asked Questions (FAQs)
Q: Can I use store-bought sugar cookie dough?
A: Yes! Press one tube of dough into the pan and bake 18–22 minutes at 350°F.
Q: Can I make them without icing?
A: Yes, but the icing is key for decorating. Dust with powdered sugar instead.
Q: Why did my bars crack?
A: Overbaking or overmixing. Measure flour correctly and check early.
Q: Can I use cream cheese icing?
A: Yes! Mix 2 oz cream cheese + 1 cup powdered sugar + 1 tsp vanilla for a tangy twist.
Q: Are the sprinkles kid-safe?
A: Yes—just ensure they’re labeled as edible and allergen-free if needed.
Q: Can I freeze decorated bars?
A: Not recommended—icing may bleed or crack. Freeze before icing.
Why This Recipe Is SEO-Optimized
This article is crafted to rank well and deliver maximum value. Key SEO elements include:
- Primary Keyword: “Halloween Sugar Cookie Bars” in title, headers, and body
- Secondary Keywords: “easy Halloween dessert,” “sugar cookie bars with icing,” “no-roll Halloween cookies,” “spooky cookie bars,” “Halloween party treats”
- Long-Tail Keywords: “how to make Halloween sugar cookie bars from scratch,” “best decorated sugar cookie bars for kids,” “easy Halloween dessert with sprinkles”
- Header Structure: H1, H2, H3 tags for clarity and SEO
- Image Alt Text Suggestions: “Halloween sugar cookie bars with spiderweb design,” “Decorated spooky cookie bars on tray,” “Ghost and pumpkin cookie squares”
- Internal Linking Opportunities: Link to related recipes (e.g., Halloween cupcakes, sugar cookies, candy decorating)
- Meta Description (for web): “Make festive Halloween Sugar Cookie Bars—soft, buttery, and ready for spooky icing and sprinkles. Easy no-roll recipe perfect for parties, school treats, and trick-or-treat trays.”
Final Thoughts: A Sweet Treat for a Spooky Season
Halloween Sugar Cookie Bars are more than just a dessert—they’re a celebration of creativity, fun, and the magic of the season. With their soft texture, sweet icing, and endless decoration possibilities, they bring joy to bakers of all ages.
Whether you’re hosting a party, packing school treats, or just indulging in some seasonal baking, these bars are the perfect way to add a little sweetness to your Halloween.
So preheat your oven, grab the sprinkles, and let your inner artist run wild. Because when it comes to Halloween, the sweeter and spookier, the better.
Print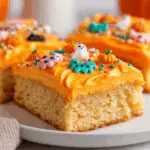
Halloween Sugar Cookie Bars: Spooky, Sweet, and Perfect for Fall Fun
Ingredients
• 2¾ cups all-purpose flour • 1 tsp baking powder • ½ tsp salt • 1 cup butter, softened • 1½ cups granulated sugar • 2 eggs • 2 tsp vanilla extract • ½ cup orange and black sprinkles • 1 cup Halloween-themed sprinkles • Orange and black food coloring (optional)
FOR GLAZE: • 1 cup powdered sugar • 2-3 tbsp milk • ½ tsp vanilla extract • Orange and black food coloring
Instructions
- Preheat oven to 350°F
- Grease 9×13 inch baking pan
- Whisk together flour, baking powder, and salt
- Cream butter and sugar until light and fluffy
- Add eggs and vanilla, beat well
- Gradually add flour mixture to wet ingredients
- Fold in orange and black sprinkles
- Spread batter evenly in prepared pan
- Bake 20-25 minutes until edges are golden
- Cool completely in pan
- Mix glaze ingredients until smooth
- Divide glaze and color with food coloring
- Drizzle colored glaze over bars
- Sprinkle with additional Halloween sprinkles
- Let glaze set before cutting
PREP TIME & NUTRITION: Prep Time: 20 mins, Cook Time: 25 mins, Total Time: 45 mins, Servings: 16, Calories: 180, Net Carbs: 25g, Fats: 8g, Protein: 2g