Introduction
A nostalgic mashup reimagined.
This recipe elevates a beloved candy-bar profile into a generously portioned slab of indulgence designed for sharing or savoring solo. From the first forkful you’re greeted with concentrated chocolate depth balanced by plush, sweet mid-layers and a high-shine finishing coat that snaps gently under the teeth.
As a creator who chases texture contrasts and emotional bites, I built this treat to deliver immediate comfort and layered surprises: a dense, obedient base that yields without crumbling; a cushiony, aerated middle that feels almost pillowy; ribbons of slow-moving sweetness that thread between layers; and a mirror-like top that adds a tidy contrast. The recipe is about rhythm—how each layer sets before the next, how temperatures coax the right give and gloss, and how a simple chill can transform spreadable elements into perfectly sliceable bars.
Expect weekend-baking energy—hands-on, rewarding, and ideal for gifting. The steps reward patience: modest active work with cooling pauses that pay dividends in neat slices and pronounced flavor layers. Read on for ingredient details, process sequencing, and practical tips to make assembly smooth and results impressive every time.
Why You’ll Love This Recipe
Designed for the lover of contrasts.
What makes these bars so irresistible is the interplay between density and lift, between slow-sweet ribbons and quick-melting gloss. The architecture of the recipe is deliberate: a compact chocolate foundation that keeps structure, yielding to a softer cushion in the middle, and finished with a satin top that breaks with a gentle give. Those contrasts ensure every bite offers an immediate textural payoff.
Beyond texture, this recipe leans into approachable techniques that produce bakery-like results. You don’t need specialized equipment—most steps can be executed with basic kitchen tools—yet the payoff looks and tastes like something made with care. There’s also versatility: the base is forgiving, the middle can be scooped and adapted for slight flavor shifts, and the surface finishing responds well to a light glossing oil for a professional sheen.
In short, you’ll love this because it strikes a rare balance: dramatic, layered results without overly fussy execution. It’s the kind of dessert you bring to a gathering and instantly field requests for the recipe, or keep all to yourself in blissful, chocolatey silence.
Flavor & Texture Profile
What your fork will experience.
The overall profile is anchored by a deep, roasted cocoa presence undercut by a subtle, buttery richness. The center offers a pillowy, slightly elastic sensation that reads as a sweet, aerated contrast—this is the element that keeps each bite from feeling monotonous. Mid-layer inclusions introduce bursts of savory crunch, giving intermittent teeth-clacking relief against softer components.
Temperature plays a key role: when slightly chilled, the bars slice cleanly and the top holds a glossy, satisfying snap. At warmer serving temperatures, the interior becomes silkier and more melded, which is delightful for spoon-friendly enjoyment but less tidy for transporting. The finishing layer provides a tempered sweetness and quick, pleasant gloss; a faint smear of neutral oil enhances shine and gives a gentle sliding texture on the tongue.
Balancing sweetness and texture is the goal—each element should amplify the others rather than fight for dominance. The result is indulgent but nuanced: deep cocoa, a rounded buttery undertone, fleeting floral warmth from vanilla, and an alternating cadence of soft and crunchy sensations that keeps you going back for one more square.
Gathering Ingredients
Full ingredient list — gather everything before you begin.
- 1 ½ cups (187.5 g) all-purpose flour 🌾
- 1 tablespoon cornstarch 🌽
- ⅓ cup (39 g) Dutch-processed cocoa powder 🍫
- ½ teaspoon baking powder 🧂
- ¼ teaspoon kosher salt 🧂
- 4 large eggs, room temperature 🥚
- 2 cups (400 g) granulated sugar 🍚
- ¾ cup (170 g) unsalted butter, softened 🧈
- 2 teaspoons vanilla extract 🌿
- ¼ cup (½ stick / 56–59 g) unsalted butter (for nougat) 🧈
- 1 cup (200 g) granulated sugar (for nougat) 🍚
- ¼ cup (59–60 g) heavy whipping cream (for nougat) 🥛
- ¼ cup (64.5 g) creamy peanut butter 🥜
- 1 jar (7 ounces) marshmallow fluff 🍯
- 1 teaspoon vanilla extract (for nougat) 🌿
- 2 cups (≈292 g) salted peanuts 🥜
- 1 bag (11 ounces) caramel bits (for caramel) 🍬
- ¼ cup (59–60 g) heavy whipping cream (for caramel) 🥛
- 2 cups (364 g) milk chocolate chips (for topping) 🍫
- 1 teaspoon vegetable oil (to gloss chocolate) 🛢️
Gathering everything up front saves repeated trips and keeps the assembly flowing smoothly. Measure into small bowls where possible so each element is ready at its turn; this mise en place approach makes temperature adjustments and quick pours much easier, and reduces stress while working with warm, sticky elements.
Preparation Overview
How the bake is staged and why it matters.
Successful assembly depends on sequence and patience: you build a sturdy base, allow it to cool and firm, then layer softer, warmer elements that will set when chilled. This approach ensures clean edges and distinct strata rather than a melded, indistinct mass. Begin by preparing your work station—have cooling space in the refrigerator and a flat baking surface ready for the pan. Preheat the oven only when the dry and wet components are assembled and the pan is lined. The base benefits from a short period of cooling at room temperature followed by a longer chill so the top firms sufficiently to accept spreadable topping without sinking.
For warm, sugar-based middle layers, control is everything: gentle heat to dissolve and combine, then a brief boil or heating step to achieve the proper sugar development; once mixed with aerating or binding elements, these should be poured while still warm so they adhere evenly. After each warm layer is applied, a rapid chill helps the structure set quickly and prevents the next layer from mixing into it. Finish with a glossy coating applied warm and smoothed in one confident motion to avoid streaks. The timing of these transitions is forgiving when you prepare bowls and tools in advance.
Cooking / Assembly Process
Step-by-step instructions — follow the sequence for best results.
- Preheat oven to 350°F (175°C). Line a 9×13-inch (23×33 cm) baking pan with parchment paper, leaving an overhang for easy removal.
- In a large bowl whisk together flour, cornstarch, Dutch-process cocoa, baking powder and salt until evenly combined.
- In the bowl of a stand mixer (or with a hand mixer) beat the eggs, granulated sugar, softened butter and vanilla on medium speed until light and fluffy, about 2–3 minutes.
- With the mixer off, add the dry ingredients and mix on low just until combined and no flour streaks remain. Do not overmix.
- Pour batter into the prepared pan and smooth the top. Bake 30–35 minutes, until the edges look set but the center remains slightly shiny for a fudgy texture. Remove from oven and let cool to room temperature.
- Once cooled, chill the brownie base in the refrigerator for about 2 hours so the top firms before adding the nougat layer.
- Make the nougat: in a medium saucepan over medium heat combine ¼ cup butter, 1 cup sugar and ¼ cup heavy cream. Stir occasionally until it comes to a boil.
- Let the mixture boil undisturbed until it reaches about 246°F (119°C) on a candy thermometer, roughly 5–7 minutes. Remove from heat and immediately stir in the peanut butter, marshmallow fluff and 1 teaspoon vanilla until smooth.
- Pour the warm nougat evenly over the chilled brownie base. Scatter the salted peanuts over the nougat and gently press them in so they adhere. Return pan to the refrigerator or freezer to firm while you prepare the caramel.
- Make the caramel: place caramel bits and ¼ cup heavy cream in a microwave-safe bowl. Heat in 30-second intervals, stirring between each, until fully melted and smooth (about 1–2 minutes).
- Pour the warm caramel evenly over the nougat and peanut layer. Chill for about 5 minutes so the caramel firms slightly.
- Prepare the chocolate layer: combine milk chocolate chips and 1 teaspoon vegetable oil in a microwave-safe bowl. Microwave in 30-second intervals, stirring between each, until melted and glossy (about 1–2 minutes).
- Pour the melted chocolate over the set caramel and spread evenly with an offset spatula to cover completely. Return to the refrigerator and chill 15–20 minutes, or until the chocolate is fully set and shiny.
- Using the parchment overhang, lift the slab from the pan and transfer to a cutting board. Slice into squares and serve slightly cooled. Store leftovers refrigerated in an airtight container.
Keep a steady hand while pouring warm layers and use a broad spatula to keep spreads even. Chilling between applications is the single most important habit to develop here; it prevents unwanted bleeding between layers and makes slicing clean and satisfying.
Serving Suggestions
How to present and enjoy these bars.
For the neatest presentation, remove the chilled slab using the parchment overhang and slice with a sharp knife warmed briefly under hot water and wiped dry between cuts. Serve slightly cool so each piece retains a defined top and tidy edges; if served too cold, the textures tighten and the mouthfeel becomes firmer, while too warm will make portions softer and less structured.
These bars are showstoppers on a dessert board: arrange them in staggered rows and balance their rich sweetness with a selection of bright accompaniments—think tart fruit slices, mild cream, or a sharply brewed coffee to cut through richness. For gifting, stack squares in parchment-lined boxes separated by waxed paper to protect the glossy top and maintain crisp edges.
If serving at a party where guests will graze, consider pre-cutting uniform pieces and presenting them at room temperature for immediate indulgence. For a more casual setting, offer napkins and small dessert forks so diners can handle the slug of sweetness without sticky fingers. Finally, a light dusting of flaky salt right before serving can elevate the layers by introducing a bright, savory counterpoint.
Storage & Make-Ahead Tips
Keep your bars looking and tasting their best.
Store the finished, fully chilled slab in an airtight container in the refrigerator to maintain the glossy top and preserve layer integrity. When stacked, use parchment or wax paper between layers to prevent sticking and preserve the visual shine. The bars hold well chilled and will retain structure for multi-day enjoyment; allow a short rest at room temperature before serving for optimal texture if reheating is not desired.
For make-ahead strategy, the base can be prepared and chilled in the pan ahead of time, then topped and finished closer to the event—this staggers the work and ensures the warm layers are freshly made for best adhesion and gloss. Alternatively, the fully assembled slab can be frozen for longer storage; wrap tightly and thaw overnight in the refrigerator to avoid condensation on the top. When slicing from frozen, allow partial thaw so cuts remain clean and layers don’t compress.
Avoid prolonged exposure to humid conditions, which can dull the glossy top and soften crisp edges. If the surface has lost some shine, a scant application of neutral oil warmed and spread thinly with a pastry brush can revive the gloss right before serving.
Frequently Asked Questions
Answers to common questions from bakers.
- Can I make substitutions for dietary needs?
Some elements can be adapted, but the recipe’s balance relies on specific textures; consider tested swaps for key items and proceed with caution to retain structural integrity. - Why did my layers bleed into each other?
This usually happens when a warm layer is applied to a base that hasn’t sufficiently chilled; always cool the base until the surface feels firm to the touch before adding warm toppings. - How do I get a glossy top without streaks?
Ensure the topping is fully melted and glossy and spread it in one confident pass with a flat spatula; chilling promptly helps it achieve a smooth, shiny finish. - Can I scale this recipe up or down?
Scaling is possible but keep proportions exact and be mindful of changes in pan depth—adjust baking time and cooling intervals accordingly.
If you have a question not covered here—perhaps about ingredient substitutions, altitude adjustments, or gift-wrapping ideas—feel free to ask and I’ll share tested tips and alternatives tailored to your kitchen. This final paragraph invites readers to reach out for clarification or adaptation help.
Print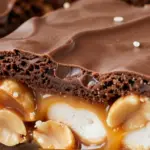
Luscious Snickers Brownies
Ingredients
- 1 ½ cups (187.5 g) all-purpose flour 🌾
- 1 tablespoon cornstarch 🌽
- ⅓ cup (39 g) Dutch-processed cocoa powder 🍫
- ½ teaspoon baking powder 🧂
- ¼ teaspoon kosher salt 🧂
- 4 large eggs, room temperature 🥚
- 2 cups (400 g) granulated sugar 🍚
- ¾ cup (170 g) unsalted butter, softened 🧈
- 2 teaspoons vanilla extract 🌿
- ¼ cup (½ stick / 56–59 g) unsalted butter (for nougat) 🧈
- 1 cup (200 g) granulated sugar (for nougat) 🍚
- ¼ cup (59–60 g) heavy whipping cream (for nougat) 🥛
- ¼ cup (64.5 g) creamy peanut butter 🥜
- 1 jar (7 ounces) marshmallow fluff 🍯
- 1 teaspoon vanilla extract (for nougat) 🌿
- 2 cups (≈292 g) salted peanuts 🥜
- 1 bag (11 ounces) caramel bits (for caramel) 🍬
- ¼ cup (59–60 g) heavy whipping cream (for caramel) 🥛
- 2 cups (364 g) milk chocolate chips (for topping) 🍫
- 1 teaspoon vegetable oil (to gloss chocolate) 🛢️
Instructions
- Preheat oven to 350°F (175°C). Line a 9×13-inch (23×33 cm) baking pan with parchment paper, leaving an overhang for easy removal.
- In a large bowl whisk together flour, cornstarch, Dutch-process cocoa, baking powder and salt until evenly combined.
- In the bowl of a stand mixer (or with a hand mixer) beat the eggs, granulated sugar, softened butter and vanilla on medium speed until light and fluffy, about 2–3 minutes.
- With the mixer off, add the dry ingredients and mix on low just until combined and no flour streaks remain. Do not overmix.
- Pour batter into the prepared pan and smooth the top. Bake 30–35 minutes, until the edges look set but the center remains slightly shiny for a fudgy texture. Remove from oven and let cool to room temperature.
- Once cooled, chill the brownie base in the refrigerator for about 2 hours so the top firms before adding the nougat layer.
- Make the nougat: in a medium saucepan over medium heat combine ¼ cup butter, 1 cup sugar and ¼ cup heavy cream. Stir occasionally until it comes to a boil.
- Let the mixture boil undisturbed until it reaches about 246°F (119°C) on a candy thermometer, roughly 5–7 minutes. Remove from heat and immediately stir in the peanut butter, marshmallow fluff and 1 teaspoon vanilla until smooth.
- Pour the warm nougat evenly over the chilled brownie base. Scatter the salted peanuts over the nougat and gently press them in so they adhere. Return pan to the refrigerator or freezer to firm while you prepare the caramel.
- Make the caramel: place caramel bits and ¼ cup heavy cream in a microwave-safe bowl. Heat in 30-second intervals, stirring between each, until fully melted and smooth (about 1–2 minutes).
- Pour the warm caramel evenly over the nougat and peanut layer. Chill for about 5 minutes so the caramel firms slightly.
- Prepare the chocolate layer: combine milk chocolate chips and 1 teaspoon vegetable oil in a microwave-safe bowl. Microwave in 30-second intervals, stirring between each, until melted and glossy (about 1–2 minutes).
- Pour the melted chocolate over the set caramel and spread evenly with an offset spatula to cover completely. Return to the refrigerator and chill 15–20 minutes, or until the chocolate is fully set and shiny.
- Using the parchment overhang, lift the slab from the pan and transfer to a cutting board. Slice into squares and serve slightly cooled. Store leftovers refrigerated in an airtight container.