Introduction
A note from the kitchen
As a baker who chases texture and depth of flavour, I fell in love with this chocolate cheesecake the moment I tasted its first cut. The experience is indulgent yet balanced: rich chocolate running through a luxuriously smooth cheese custard, anchored by a crisp crumb base and finished with a satin ganache. This recipe has become my go-to when I want to impress guests without complicating the process.
What makes it special isn’t just the components, but how they work together: the crust acts as both foundation and foil; the filling is crafted to be dense enough to feel decadent while keeping a gentle wobble that speaks of bake-perfect timing; the ganache adds a mirror-like gloss that contrasts with the creaminess beneath. In this piece you’ll find not only the precise ingredient list and step-by-step process, but also the bakerly context — how to feel for doneness, the temperature cues I trust, and easy finishing touches that elevate presentation.
Whether you’re planning a celebration or simply carving out time for a weekend bake, this recipe rewards patience and small technique choices. I’ll walk you through each stage, share troubleshooting tips that save a cracked top or a dry edge, and explain the small habits that lead to the most satisfying, sliceable cheesecake you’ll ever serve.
Why You’ll Love This Recipe
Emotion-first baking
This cheesecake delivers an immediate emotional response: comfort, luxury, and the urge to share. It’s the kind of dessert that turns an ordinary dinner into an event and gives bakers big payoff for thoughtfully applied technique. I often recommend it because it’s forgiving in the hands of an attentive baker — small adjustments produce excellent results.
Technically, the recipe balances density and silkiness. The styling of the crust and filling avoids extremes: not cracker-dry, not underbaked and jiggly. That means a clean slice that still melts on the palate. The chocolate content provides depth without bitterness, while the ganache finishes with a glossy sheen that reads high-end.
Practical reasons to choose this method include its make-ahead friendliness and reliable texture. You can prepare elements in stages, chill, and finish the glaze shortly before serving; the structure holds up to slicing and transport. If you enjoy experimenting, it’s receptive to small adjustments — a touch of espresso to deepen the chocolate, or a sprinkle of flaky salt on top for contrast. For confident home cooks who want a show-stopping dessert without gimmicks, this cheesecake is a perennial favourite.
Flavor & Texture Profile
What to expect on the palate
First bite reveals a layered sensation: a toasty, buttery base that gives way to a dense, cocoa‑tinged creaminess. The filling is intentionally silky, with a restrained sweetness that lets the chocolate speak. Mid-palate you’ll notice the tang from cultured dairy balancing the chocolate’s depth; this tension is what keeps the dessert from feeling cloying. Finally, the ganache caps the experience with a glossy richness that introduces a slight snap and concentrated cocoa flavour.
In terms of texture, the goal is contrast and harmony. The crust should be crisp yet tender so it doesn’t crumble excessively when sliced. The body of the cake should hold clean edges while maintaining a luxurious mouthfeel — think compact, not air-filled. Achieving the slight wobble in the centre is key: that softness transforms into a velvet finish once chilled and sliced. Temperature plays a role too; the filling’s flavours bloom as it comes to the chill stage in the fridge, and the ganache firms to a pleasant, yielding texture.
- Bright dairy tang that lifts the chocolate
- Deep cocoa notes from both powder and melted chocolate
- A textural playlist: crisp base, smooth custard, satin ganache
These combined elements create a dessert that reads as decadent but never one-dimensional — each forkful offers a little discovery.
Gathering Ingredients
What to have on your counter
Before you begin, assemble every component so the bake flows without interruption. I always recommend a mise en place approach for cheesecakes: room-temperature dairy, pre-measured dry ingredients, and chocolate ready to be melted. Keeping the eggs and cream cheese at warmth helps the filling become luxuriously smooth with minimal mixing, and pre-crushing the biscuits saves time and reduces handling when pressing the base.
- 200g digestive biscuits or graham crackers
- 100g unsalted butter, melted
- 700g cream cheese, room temperature
- 150g caster sugar
- 3 large eggs, room temperature
- 200g sour cream or crème fraîche
- 120g dark chocolate (70%), melted
- 30g unsweetened cocoa powder
- 1 tsp vanilla extract
- 1/4 tsp salt
- 100g dark chocolate for ganache
- 100ml double cream for ganache
- Fresh berries or shaved chocolate for serving
Having these staged on a tray — biscuits crushed in a bowl, chocolate chopped, dairy warmed — reduces the temptation to rush and helps preserve the texture you’re aiming for. Small tools to keep nearby: a springform pan, a food processor or rolling pin, a fine sieve for cocoa, a rubber spatula for folding, and a kettle if you plan to use a water bath. Now is the moment to check your oven thermometer and springform seal; reliable equipment prevents the common setbacks that derail even the best plans.
Preparation Overview
Big-picture rhythm
A successful cheesecake is built on a simple timeline: prepare the crust, make a velvety filling, bake gently, cool slowly, and finish with a glossy ganache. Each stage benefits from small rituals that improve texture and presentation. For instance, chilling the pressed crust before adding filling prevents migration of butter into the batter and helps maintain a defined base after baking. Likewise, warming dairy ingredients to room temperature minimises lumps and allows air incorporation to be gentle and controlled.
Technique choices matter more than speed. When creaming, use a paddle attachment or a sturdy whisk and stop as soon as smooth; overworking injects too much air and can create tiny fissures on the surface. Folding in eggs one at a time with low-speed mixing reduces bubbles and promotes a compact crumb in the bake. The water-bath method is included because it stabilises oven heat around the cheesecake, giving you glossy edges and a tender centre. Cooling gradually — stepping the cheesecake from oven to slightly open door, then to a wire rack before refrigeration — prevents sudden temperature swings that can cause cracking.
This overview is about pacing: plan the day so each step has room. Clean as you go, and resist the urge to rush the chill times; they’re part of the flavour development and the key to a clean slice.
Cooking / Assembly Process
Step-by-step method
Follow these steps in order to build and bake the cheesecake. Read through them first so your mise en place is complete and your oven and equipment are ready.
- Preheat the oven to 160°C (320°F). Grease a 23cm springform pan and line the base with parchment.
- Make the crust: crush 200g digestive biscuits or graham crackers to fine crumbs using a food processor or a sealed bag and rolling pin. Mix the crumbs with 100g melted unsalted butter until evenly combined.
- Press the crumb mixture firmly and evenly into the base of the prepared pan. Chill in the fridge while you prepare the filling.
- Prepare the filling: beat 700g cream cheese and 150g caster sugar together until smooth and creamy, about 2–3 minutes.
- Add 30g unsweetened cocoa powder and 120g melted dark chocolate (70%) to the cream cheese mixture and mix until fully incorporated.
- Add 3 large eggs one at a time, mixing on low speed after each addition until just combined. Do not overmix.
- Fold in 200g sour cream (or crème fraîche), 1 tsp vanilla extract and 1/4 tsp salt until the batter is silky and uniform.
- Pour the filling over the chilled crust and smooth the top with a spatula. Tap the pan gently to release air bubbles.
- Place the springform pan inside a larger roasting tin. Pour hot water into the outer tin until it reaches about halfway up the side of the springform (water bath).
- Bake for 55–65 minutes, until the edges are set and the center still has a slight wobble. The top should not crack excessively.
- Turn off the oven and leave the cheesecake inside with the door ajar for 30 minutes to cool gradually.
- Remove from the oven, take the cheesecake out of the water bath, and cool completely on a wire rack. Then chill in the fridge for at least 4 hours or overnight for best results.
- Make the ganache: heat 100ml double cream until just simmering, pour over 100g chopped dark chocolate, let sit 1–2 minutes then stir until smooth. Cool slightly.
- Pour the ganache over the chilled cheesecake, spreading evenly. Return to the fridge for 15–20 minutes to set.
- Run a thin knife around the pan edge before releasing the springform. Slice with a hot, dry knife for clean cuts. Serve chilled with fresh berries or shaved chocolate.
Work steadily and use the cues described rather than guessing; the wobble in the centre and a lightly set edge are the visual signals I trust. If you notice the top colouring too quickly, tent the cheesecake loosely with foil and continue baking to avoid a hardened crust.
Serving Suggestions
Finishing touches that make an impression
Presentation elevates any dessert, and chocolate cheesecake is no exception. After chilling and glazing, allow the ganache to firm to a pleasant sheen before slicing; a warm, dry knife yields the cleanest edges. For plating, contrasts are your friend. Bright, tart berries cut through the richness and add vibrant colour; a sprinkle of flaky sea salt or a whisper of espresso powder across the top can accentuate the chocolate without overwhelming it.
Think about temperature and texture when serving. A slice served straight from the fridge will hold a firmer profile and slice cleanly; a brief sit at room temperature will soften the bite and release flavours. For gatherings, consider pairing with lightly sweetened whipped cream or a dollop of crème fraîche to balance intensity. If you’re composing a dessert plate, add a smear of berry coulis or a quenelle of mascarpone for visual contrast.
- Garnish: fresh raspberries, strawberries, or a few salted caramel shards
- Textural contrast: toasted hazelnuts or almond praline sprinkled at service
- Beverage pairings: a robust espresso, aged port, or a full-bodied red wine
Small aesthetic details — a clean rim, consistent slice widths, and a few scattered berries — add polish. If you expect leftovers, store slices with minimal exposure to air to keep textures pristine; the slices maintain their character beautifully and can be dressed individually at the moment of service for maximum impact.
Storage & Make-Ahead Tips
Plan ahead and preserve quality
This cheesecake rewards planning. It’s ideal for making a day ahead: chilling overnight allows flavours to meld and the texture to firm, making slicing cleaner and the ganache more settled. When storing, airtight containment is essential to prevent the cake from absorbing other refrigerator aromas and to keep the ganache glossy. For short-term storage, keep the whole cake covered in a cake box or wrapped in plastic wrap; for slices, use individual airtight containers or wrap each wedge snugly in cling film.
Freezing is possible and works best without the fresh garnish. Freeze whole or in slices on a tray until firm, then transfer to a freezer-safe container with interleaving parchment to avoid sticking. Thaw slowly in the refrigerator to preserve texture; rapid thawing at room temperature can cause condensation that dulls the ganache and softens the filling excessively. Rewarm slightly at room temperature before serving if you prefer a softer bite, but avoid leaving it out long enough to lose its structure.
When reheating individual slices briefly for a warmed bite, use a low oven or gentle microwave bursts, but be cautious: the cheesecake is best enjoyed chilled or at slightly below room temperature. For make-ahead convenience, you can prepare the crust and filling a day ahead, then bake and glaze on the serving day to retain the freshest ganache sheen. These small scheduling choices ensure stress-free service and reliably beautiful results.
Frequently Asked Questions
Troubleshooting and clarifications
Here are answers to the questions I receive most often when home bakers tackle a chocolate cheesecake. I’ve focused on practical fixes and reassurance so you can approach the bake with confidence.
- Why did my cheesecake crack on top?
Rapid temperature changes, overmixing or overbaking are the usual culprits. To prevent cracks, avoid incorporating excess air into the batter, bake gently in a water bath for even heat, and allow the cake to cool gradually with the oven door ajar before refrigerating. - How do I get a smooth, lump-free filling?
Bring the cream cheese and other dairy to room temperature before mixing. Beat until just smooth with minimal air, and fold ingredients using a rubber spatula to finish. If you encounter small lumps, press the batter through a fine mesh or use a hand blender briefly to even it out, taking care not to over-aerate. - Can I use a different chocolate percentage?
Yes; higher percentages lend more bitter, intense notes, while lower percentages result in a sweeter finish. Balance the bake with the cocoa and sugar levels, and taste a melted sample to judge the flavor profile before committing. - Is the water bath necessary?
A water bath moderates oven heat and prevents edges from baking too quickly, which helps produce a creamy centre and reduces the chance of cracking. For drier ovens, I strongly recommend it. - How long should I chill before slicing?
Chilling until thoroughly firm improves slicing and texture. Overnight refrigeration is ideal; if you’re pressed for time, several hours will still yield a good result.
If you have a question not covered here — about substitutions, altitude, or adapting the recipe for a different pan size — I’m happy to help. Leave specifics about your oven or the variation you’re considering, and I’ll offer tailored advice to keep your cheesecake journey smooth and successful.
Print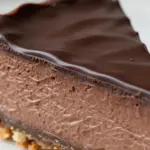
Perfect Chocolate Cheesecake
Ingredients
- 200g digestive biscuits or graham crackers 🍪
- 100g unsalted butter, melted 🧈
- 700g cream cheese, room temperature 🧀
- 150g caster sugar 🍚
- 3 large eggs, room temperature 🥚
- 200g sour cream or crème fraîche 🥛
- 120g dark chocolate (70%), melted 🍫
- 30g unsweetened cocoa powder 🍫
- 1 tsp vanilla extract 🌿
- 1/4 tsp salt 🧂
- 100g dark chocolate for ganache 🍫
- 100ml double cream for ganache 🥛
- Fresh berries or shaved chocolate for serving 🍓
Instructions
- Preheat the oven to 160°C (320°F). Grease a 23cm springform pan and line the base with parchment.
- Make the crust: crush the biscuits to fine crumbs (use a food processor or a sealed bag and rolling pin). Mix crumbs with the melted butter until evenly combined.
- Press the crumb mixture firmly and evenly into the base of the prepared pan. Chill in the fridge while you prepare the filling.
- Prepare the filling: beat the cream cheese and sugar together until smooth and creamy, about 2–3 minutes.
- Add the cocoa powder and melted dark chocolate to the cream cheese mixture and mix until fully incorporated.
- Add the eggs one at a time, mixing on low speed after each addition until just combined. Do not overmix.
- Fold in the sour cream, vanilla extract and salt until the batter is silky and uniform.
- Pour the filling over the chilled crust and smooth the top with a spatula. Tap the pan gently to release air bubbles.
- Place the springform pan inside a larger roasting tin. Pour hot water into the outer tin until it reaches about halfway up the side of the springform (water bath).
- Bake for 55–65 minutes, until the edges are set and the center still has a slight wobble. The top should not crack excessively.
- Turn off the oven and leave the cheesecake inside with the door ajar for 30 minutes to cool gradually.
- Remove from the oven, take the cheesecake out of the water bath, and cool completely on a wire rack. Then chill in the fridge for at least 4 hours or overnight for best results.
- Make the ganache: heat the double cream until just simmering, pour over the chopped 100g dark chocolate, let sit 1–2 minutes then stir until smooth. Cool slightly.
- Pour the ganache over the chilled cheesecake, spreading evenly. Return to the fridge for 15–20 minutes to set.
- Run a thin knife around the pan edge before releasing the springform. Slice with a hot, dry knife for clean cuts. Serve chilled with fresh berries or shaved chocolate.