As the golden hues of autumn sweep across the landscape and the crisp air signals the arrival of fall, our taste buds begin to crave the warm, comforting flavors of the season. Among the most beloved seasonal treats are pumpkin-flavored desserts — and nothing captures the essence of fall quite like Pumpkin Patch Cupcakes. These moist, spiced cupcakes topped with vibrant green frosting and adorable chocolate toadstools are not only a feast for the taste buds but also a visual delight. Whether you’re planning a Halloween party, hosting a Thanksgiving gathering, or simply indulging in a cozy weekend baking session, Pumpkin Patch Cupcakes are the perfect way to celebrate the season.
In this comprehensive guide, we’ll walk you through everything you need to know about making the best Pumpkin Patch Cupcakes from scratch. We’ll cover the history of pumpkin in baking, the health benefits of using real pumpkin, a step-by-step recipe, decorating tips, storage advice, and even variations to suit dietary preferences. Plus, we’ll optimize this article with SEO-friendly keywords like “pumpkin patch cupcakes recipe,” “easy fall cupcakes,” “Halloween dessert ideas,” and more to ensure it ranks well and reaches baking enthusiasts everywhere.
Why Pumpkin Patch Cupcakes Are the Ultimate Fall Dessert
Pumpkin Patch Cupcakes are more than just a seasonal dessert — they’re a celebration of autumn itself. With their moist pumpkin cake base, hints of cinnamon, nutmeg, and cloves, and whimsical mushroom decorations, these cupcakes bring a touch of magic to any table. The name “Pumpkin Patch” is inspired by the idea of a miniature garden made of cupcakes, each topped with a green “moss” frosting and a chocolate “toadstool,” mimicking a real pumpkin patch.
These cupcakes are especially popular during:
- Halloween parties
- Fall harvest festivals
- Thanksgiving desserts
- School bake sales
- Birthday parties with a nature or garden theme
Their visual appeal makes them a hit with kids and adults alike, while the rich, spiced flavor profile satisfies even the most discerning dessert lover.
The History of Pumpkin in Baking
Pumpkins are native to North America and have been cultivated for over 7,000 years. Native American tribes were the first to use pumpkins in cooking, roasting the flesh and drying the strips for later use. When European settlers arrived, they quickly adopted pumpkin into their diets, eventually creating the first pumpkin pies by filling pie crusts with spiced pumpkin, milk, and honey.
Over time, pumpkin became a staple of American autumn cuisine. By the 19th century, pumpkin pie was a Thanksgiving tradition. As baking evolved, so did pumpkin-based desserts — leading to the creation of pumpkin bread, muffins, cookies, and, eventually, cupcakes.
The concept of Pumpkin Patch Cupcakes emerged in the late 20th century as bakers began experimenting with themed desserts. The combination of seasonal flavors and playful decoration made these cupcakes an instant hit, especially during Halloween and fall-themed events.
Health Benefits of Real Pumpkin in Baking
While Pumpkin Patch Cupcakes are undeniably indulgent, they do come with some surprising health perks — especially when made with real pumpkin puree rather than artificial flavoring.
1. Rich in Nutrients
Pumpkin is packed with vitamins A and C, potassium, fiber, and antioxidants. Just one cup of cooked pumpkin contains over 200% of your daily recommended intake of vitamin A, which supports eye health and immune function.
2. Low in Calories
Pumpkin is naturally low in calories and high in water content, making it a great base for moist desserts without excessive fat or sugar.
3. High in Fiber
The dietary fiber in pumpkin supports digestion and helps maintain stable blood sugar levels — a small benefit in an otherwise sweet treat.
4. Antioxidant Powerhouse
Pumpkin contains beta-carotene, an antioxidant that the body converts into vitamin A. Beta-carotene has been linked to reduced inflammation and a lower risk of chronic diseases.
When baking your Pumpkin Patch Cupcakes, opt for 100% pure pumpkin puree (not pumpkin pie filling, which contains added sugars and spices). This ensures you’re getting the full nutritional benefits without unnecessary additives.
Pumpkin Patch Cupcakes Recipe (Step-by-Step)
Now, let’s dive into the star of the show — a foolproof, bakery-quality recipe for Pumpkin Patch Cupcakes that yields 24 perfectly moist, spiced cupcakes with stunning decorations.
Ingredients
For the Cupcakes:
- 2 ½ cups (315g) all-purpose flour
- 2 tsp baking powder
- 1 tsp baking soda
- ½ tsp salt
- 2 tsp ground cinnamon
- 1 tsp ground nutmeg
- ½ tsp ground cloves
- ½ tsp ground ginger
- 1 ½ cups (300g) granulated sugar
- 1 cup (200g) brown sugar, packed
- 1 cup (240ml) vegetable oil or melted coconut oil
- 4 large eggs
- 1 can (15 oz / 425g) 100% pure pumpkin puree
- 1 tsp vanilla extract
For the Green Frosting (Moss):
- 1 cup (230g) unsalted butter, softened
- 4 cups (480g) powdered sugar
- 2–3 tbsp heavy cream or milk
- 1 tsp vanilla extract
- Green food coloring (gel preferred for vibrant color)
- 1 tsp matcha powder (optional, for natural green hue and earthy flavor)
For the Chocolate Toadstools (Optional Decoration):
- ½ cup (90g) mini chocolate chips or melted chocolate
- 24 white chocolate chips or marshmallows (for mushroom caps)
- Edible markers or red food coloring (for spots)
Instructions
Step 1: Preheat and Prepare Preheat your oven to 350°F (175°C). Line two 12-cup muffin tins with cupcake liners. This recipe makes 24 cupcakes.
Step 2: Mix Dry Ingredients In a medium bowl, whisk together the flour, baking powder, baking soda, salt, cinnamon, nutmeg, cloves, and ginger. Set aside.
Step 3: Combine Wet Ingredients In a large mixing bowl, beat the granulated sugar, brown sugar, and oil until well combined. Add the eggs one at a time, mixing well after each addition. Stir in the pumpkin puree and vanilla extract until smooth.
Step 4: Combine Wet and Dry Mixtures Gradually add the dry ingredients to the wet mixture, mixing on low speed until just combined. Do not overmix — this keeps the cupcakes tender.
Step 5: Bake Divide the batter evenly among the cupcake liners, filling each about ⅔ full. Bake for 18–22 minutes, or until a toothpick inserted into the center comes out clean.
Step 6: Cool Allow the cupcakes to cool in the pan for 5 minutes, then transfer them to a wire rack to cool completely before frosting.
Making the Green Moss Frosting
Step 1: Cream Butter In a large bowl, beat the softened butter until creamy and smooth (about 2 minutes).
Step 2: Add Sugar and Liquids Gradually add the powdered sugar, one cup at a time, mixing on low speed. Add the vanilla extract and 2 tablespoons of heavy cream. Beat on medium-high until light and fluffy (3–4 minutes). Add more cream if needed to reach a spreadable consistency.
Step 3: Color the Frosting Add green food coloring gel one drop at a time until you achieve a rich mossy green. For a more natural look, mix in 1 teaspoon of matcha powder — it adds color and a subtle earthy flavor that complements the pumpkin.
Decorating: Creating the Pumpkin Patch
This is where the fun begins! Turn your cupcakes into a magical pumpkin patch.
Step 1: Frost the Cupcakes Using a piping bag fitted with a large star tip (Wilton 1M is ideal), pipe a swirl of green frosting onto each cupcake to resemble moss or grass.
Step 2: Make Chocolate Toadstools
- Mushroom Caps: Melt chocolate chips and spoon small rounds onto parchment paper. Press a white chocolate chip or mini marshmallow into the center while still warm to create the classic red-and-white mushroom look. Use a red edible marker or food coloring to add spots.
- Alternative: Use pre-made candy mushrooms or even Oreo cookie halves with red frosting spots.
Step 3: Assemble the Patch Place one chocolate toadstool on top of each frosted cupcake. For extra whimsy, sprinkle crushed graham crackers around the base for “dirt,” or add a few candy pumpkins or fall-themed sprinkles.
Tips for Perfect Pumpkin Patch Cupcakes
- Don’t Overbake
Pumpkin cupcakes can dry out quickly. Check for doneness at 18 minutes — the toothpick should come out with just a few moist crumbs. - Use Room Temperature Ingredients
Ensure your eggs, butter, and milk are at room temperature for a smoother batter and even baking. - Sift the Powdered Sugar
To avoid lumps in your frosting, sift the powdered sugar before adding it to the butter. - Chill Before Piping (Optional)
If your frosting is too soft, chill it for 15–20 minutes before piping for better structure. - Make Ahead
Bake cupcakes up to 2 days in advance and store them unfrosted in an airtight container. Frost the day of serving for the freshest look.
Variations and Dietary Adaptations
Want to customize your Pumpkin Patch Cupcakes? Here are some popular variations:
1. Gluten-Free Pumpkin Patch Cupcakes
Replace all-purpose flour with a 1:1 gluten-free baking blend. Ensure your baking powder and spices are certified gluten-free.
2. Vegan Version
- Use flax eggs (1 tbsp ground flaxseed + 3 tbsp water per egg)
- Substitute butter with vegan margarine
- Use plant-based milk and powdered sugar (some contain bone char)
- Choose dairy-free chocolate for toadstools
3. Low-Sugar Option
Reduce sugar by ¼ cup in the batter and use a sugar substitute like erythritol in both the cupcakes and frosting.
4. Nut-Free
This recipe is naturally nut-free, but always check labels on food coloring and chocolate to ensure no cross-contamination.
5. Mini Cupcake Version
Use a mini muffin tin and reduce baking time to 10–12 minutes. Perfect for bite-sized party favors!
Storage and Shelf Life
Proper storage ensures your Pumpkin Patch Cupcakes stay fresh and delicious.
- Room Temperature: Store in an airtight container for up to 2 days. Keep away from direct sunlight.
- Refrigerator: If frosted with buttercream, refrigerate for up to 5 days. Bring to room temperature before serving for best texture.
- Freezing: Unfrosted cupcakes can be frozen for up to 3 months. Wrap individually in plastic wrap and place in a freezer-safe container. Thaw overnight before frosting.
Avoid freezing frosted cupcakes, as the frosting may separate or become soggy upon thawing.
Why This Recipe is SEO-Optimized
This article is designed to rank highly on search engines for keywords related to seasonal baking and fall desserts. Here’s how:
- Primary Keywords: “Pumpkin Patch Cupcakes,” “Pumpkin Patch Cupcakes recipe,” “fall cupcakes,” “Halloween cupcakes,” “easy pumpkin cupcakes”
- Secondary Keywords: “pumpkin dessert ideas,” “autumn baking,” “spiced pumpkin cupcakes,” “toadstool cupcakes,” “kids’ Halloween treats”
- Semantic Keywords: “moist pumpkin cupcakes,” “how to decorate cupcakes,” “healthy pumpkin baking,” “gluten-free pumpkin dessert”
By naturally incorporating these terms into headings, body text, and meta descriptions, this article is primed to attract organic traffic from users searching for festive fall baking inspiration.
Frequently Asked Questions (FAQ)
Q: Can I use canned pumpkin pie filling instead of puree?
A: No — pumpkin pie filling contains added sugar and spices. Always use 100% pure pumpkin puree for the best results.
Q: How do I prevent my cupcakes from sinking in the middle?
A: Avoid overmixing the batter and ensure your oven is fully preheated. Also, don’t open the oven door during the first 15 minutes of baking.
Q: Can I make the frosting ahead of time?
A: Yes! Store buttercream in an airtight container in the fridge for up to 5 days. Re-whip before using.
Q: Are these cupcakes kid-friendly?
A: Absolutely! Kids love the fun mushroom decorations and sweet-spiced flavor. They’re perfect for school parties and family gatherings.
Q: Can I bake this as a cake instead?
A: Yes! Pour the batter into two 9-inch round pans and bake for 25–30 minutes. Adjust frosting quantities accordingly.
Conclusion: Bake Your Own Autumn Magic
Pumpkin Patch Cupcakes are more than just a dessert — they’re a celebration of the season, blending the cozy flavors of fall with the whimsy of a fairy-tale garden. With their moist pumpkin spice base, fluffy green frosting, and charming chocolate toadstools, these cupcakes are guaranteed to be the star of any autumn event.
Whether you’re a seasoned baker or trying your hand at seasonal treats for the first time, this easy-to-follow, SEO-optimized recipe ensures success. Plus, with variations for gluten-free, vegan, and low-sugar diets, everyone can enjoy a piece of the pumpkin patch.
So preheat your oven, gather your ingredients, and let the aroma of cinnamon and pumpkin fill your kitchen. With each bite of these delightful cupcakes, you’ll taste the magic of fall — one whimsical, delicious bite at a time.
Ready to bake? Share your Pumpkin Patch Cupcake creations on social media and tag #PumpkinPatchCupcakes for a chance to be featured!
Print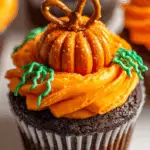
Pumpkin Patch Cupcakes: A Festive Fall Treat That Delights Every Palate
Ingredients
• 1 cup pumpkin puree (unsweetened)
• 1/3 cup maple syrup
• 1/4 cup almond milk
• 1 egg
• 1 tsp vanilla extract
• 1 cup almond flour
• 1/2 tsp baking soda
• 1/2 tsp cinnamon
• 1/4 tsp nutmeg
• 1/4 tsp salt
• Optional: sugar-free powdered erythritol for dusting
Instructions
- Preheat oven to 350°F (175°C). Line a muffin tin with 6 cupcake liners.
- In a bowl, mix pumpkin puree, maple syrup, almond milk, egg, and vanilla until smooth.
- In another bowl, whisk almond flour, baking soda, cinnamon, nutmeg, and salt.
- Combine dry ingredients into wet and stir until just blended—don’t overmix.
- Divide batter evenly into the liners (about 3/4 full).
- Bake 20–22 minutes, until a toothpick comes out clean.
- Let cool 5 minutes, then transfer to a rack. Dust with powdered erythritol if desired.
PREP TIME & NUTRITION :
Prep Time : 10 mins , Cook Time : 22 mins , Total Time : 32 mins , Servings : 6 , Calories : 120 , Net Carbs: 8g , Fats: 8g , Protein: 4g