When autumn arrives and the air turns crisp, there’s one dessert that feels like a warm hug in edible form: Pumpkin Whoopie Pies.
Soft, spiced pumpkin cake cookies — sandwiched together with a cloud-like cream cheese filling, dusted with powdered sugar, and kissed by the scent of cinnamon and nutmeg — these are not just cookies. They’re nostalgia, comfort, and celebration all rolled into one bite-sized masterpiece.
Often mistaken for cupcakes or giant cookies, whoopie pies have been a beloved New England tradition since the 1920s. But when you swap the classic chocolate or vanilla for rich, moist pumpkin, add a tangy-sweet cream cheese frosting, and finish with a sprinkle of sea salt… you don’t just get a treat.
You get an experience.
And while you can buy them at bakeries for $3–$5 each, they’re even better — and far more affordable — when made at home.
In this definitive guide, you’ll learn how to bake the perfect Pumpkin Whoopie Pies — the kind that make people close their eyes, sigh, and ask for seconds.
We’ll show you:
✅ The science behind ultra-soft, non-crumbly pumpkin cakes
✅ How to make the ideal cream cheese filling (not runny, not grainy)
✅ Foolproof step-by-step instructions with exact measurements
✅ Gluten-free, vegan, keto, and dairy-free adaptations
✅ Pro tips for perfect dome-shaped cakes, clean assembly, and no-sag filling
✅ Storage hacks, make-ahead secrets, and gift-ready presentation
✅ Why this recipe is blowing up on TikTok and Pinterest (and how to rank #1 on Google)
✅ Instagram-worthy plating ideas and viral photo prompts
No more dry, dense pumpkin cakes. No more greasy, sweet fillings. This is bakery-quality perfection — baked in your own kitchen.
Let’s begin.
Why Pumpkin Whoopie Pies Are the Secret Weapon of Fall Baking
Whoopie pies are the ultimate hybrid: part cookie, part cake, all comfort.
But traditional versions use chocolate or vanilla — both delicious, but neither captures the soul of fall like pumpkin does.
🧪 The Science Behind the Magic
| Pumpkin Puree | Adds moisture, natural sweetness, and structure. Its fiber helps retain water, keeping cakes tender for days. |
| Brown Sugar + Spice Blend | Deepens flavor with molasses notes and warming spices (cinnamon, nutmeg, ginger, clove). |
| Oil + Butter | Oil keeps cakes soft; butter adds aroma and richness. |
| Baking Soda + Vinegar | Creates lift without eggs — the acid reacts with baking soda for fluffy texture. |
| Cream Cheese Filling | Tanginess cuts through sweetness, balances richness, and creates a stable base that holds its shape. |
| Powdered Sugar & Salt | Dusting adds visual appeal and enhances flavor complexity. |
The result?
Two tender, slightly chewy pumpkin cakes with a cloud-like, velvety filling that doesn’t slide out, melt, or overpower.
This isn’t just dessert. It’s emotional comfort.
🍂 Seasonal Perfection
Perfect for:
- Thanksgiving dessert tables
- Halloween parties
- Fall potlucks and school events
- Teacher gifts & holiday swaps
- Cozy weekend baking sessions
- Lunchbox surprises for kids
And here’s the kicker:
These taste even better after sitting overnight. The cakes absorb moisture from the filling, becoming irresistibly soft — like a pumpkin-flavored moon pie.
The Ultimate Recipe: Pumpkin Whoopie Pies
(Makes 12 large whoopie pies – 24 cakes)
Prep Time: 15 minutes
Bake Time: 10–12 minutes per batch
Cool Time: 1 hour
Frosting Prep: 10 minutes
Total Time: 2 hours (mostly hands-off)
✅ Ingredients
For the Pumpkin Cakes:
- 1 cup (240g) 100% pure pumpkin puree (NOT pie filling!)
- ¾ cup (150g) packed dark brown sugar
- ¼ cup (50g) granulated sugar
- ½ cup (1 stick / 115g) unsalted butter, melted
- 1 tbsp vegetable oil (key for moisture)
- 1 large egg, room temperature
- 1 tsp vanilla extract
- 2 cups (250g) all-purpose flour
- 1 tsp baking soda
- 1 ½ tsp ground cinnamon
- ½ tsp ground ginger
- ¼ tsp ground nutmeg
- ¼ tsp ground cloves
- ½ tsp salt
- 1 tsp apple cider vinegar (secret ingredient for fluffiness!)
For the Cream Cheese Filling:
- 8 oz (225g) full-fat cream cheese, softened to room temperature
- ½ cup (115g) unsalted butter, softened
- 3 cups (360g) powdered sugar, sifted
- 1 tsp vanilla extract
- Pinch of salt
- Optional: 1–2 tbsp heavy cream or milk to adjust consistency
For Finishing:
- Powdered sugar, for dusting
- Flaky sea salt (like Maldon), for garnish (optional but recommended)
- Crushed pecans or candied ginger (optional)
💡 Pro Tip: Use real pumpkin puree — not canned “pumpkin pie filling.” The latter contains added sugar, spices, and thickeners that will ruin texture and flavor.
Step-by-Step Instructions: Bake Like a Professional Baker
Step 1: Preheat & Prep
Preheat oven to 350°F (175°C). Line two large baking sheets with parchment paper. Set aside.
Step 2: Make the Cake Batter
In a large bowl, whisk together the pumpkin puree, brown sugar, granulated sugar, melted butter, oil, egg, and vanilla until smooth — about 1 minute.
In a separate bowl, sift together the flour, baking soda, cinnamon, ginger, nutmeg, cloves, and salt.
Gradually add the dry ingredients to the wet mixture. Stir gently with a spatula just until combined. Do NOT overmix!
Stir in the apple cider vinegar last — it activates the baking soda for extra lift and tenderness.
⚠️ Critical Rule: Mix only until no streaks of flour remain. Overmixing = dense, tough cakes.
Step 3: Scoop & Bake
Using a medium cookie scoop (about 2 tbsp), drop rounded mounds of batter onto prepared baking sheets, spacing them 2 inches apart.
Bake for 10–12 minutes, rotating pans halfway through, until the tops spring back when lightly touched and a toothpick inserted comes out clean.
🔥 Secret to Perfect Dome Tops:
Place baking sheets on a preheated baking stone or another hot pan. Extra heat underneath = faster rise = taller, rounder cakes.
Let cool on pans for 5 minutes, then transfer to wire racks to cool completely — at least 1 hour. Frosting on warm cakes = melt disaster.
Step 4: Make the Cream Cheese Filling
In a large mixing bowl, beat softened cream cheese and butter together with an electric mixer on medium speed for 2–3 minutes until light and fluffy.
Add sifted powdered sugar, 1 cup at a time, beating on low until incorporated. Add vanilla and salt. Beat on medium for 1 minute until smooth and spreadable.
If too thick, add 1–2 tbsp heavy cream. If too thin, chill for 15 minutes and rewhip.
✅ Ideal Texture: Holds stiff peaks but still pipes smoothly — like soft whipped cream with body.
Step 5: Assemble the Whoopie Pies
Once cakes are completely cool, flip half of them over (bottom side up).
Spoon 2–3 tablespoons of filling onto each flat side. Gently press a second cake on top, pressing lightly to form a sandwich.
💡 Pro Tip: Use a piping bag with a round tip for neat, controlled filling. Or use a spoon — just go slow!
Step 6: Finish & Serve
Dust the tops lightly with powdered sugar. For gourmet flair, sprinkle each pie with a tiny pinch of flaky sea salt.
Optional: Press a single crushed pecan or piece of candied ginger into the center.
Serve immediately — or let rest for 1 hour to allow flavors to meld.
Pro Tips for Perfect Pumpkin Whoopie Pies Every Time
| Using pumpkin pie filling | Always use100% pure pumpkin puree— check labels. Pie filling has added sugar/spices. |
| Overmixing batter | Stop as soon as flour disappears. Lumps = tender crumb. |
| Not cooling cakes fully | Warm cakes = melted filling. Chill for 1 hour minimum. |
| Skipping apple cider vinegar | It’s the secret to fluffy, soft cakes. Don’t omit! |
| Using cold cream cheese | Cold cream cheese = lumpy frosting. Soften at room temp for 2 hours. |
| Piping too much filling | Too much = oozing. Stick to 2–3 tbsp per sandwich. |
| Forgetting the salt | A pinch elevates sweetness and balances spice. Don’t skip! |
💡 Bonus Hack: Brush cooled cakes lightly with simple syrup (equal parts sugar + water, boiled and cooled) before assembling for extra moisture and shine.
Dietary Adaptations: Gluten-Free, Vegan, Keto-Friendly?
Yes — even this decadent treat can be customized.
🌾 Gluten-Free Version
Replace all-purpose flour with a 1:1 gluten-free baking blend (Bob’s Red Mill or King Arthur GF Flour).
Add ½ tsp xanthan gum if not included in blend.
Use certified GF vanilla and cream cheese.
Result: Slightly denser, but still moist and delicious.
🌱 Vegan Version
- Replace egg with 1 flax egg (1 tbsp ground flaxseed + 3 tbsp water, let sit 5 min)
- Use vegan butter and vegan cream cheese (Kite Hill or Miyoko’s)
- Swap powdered sugar with organic cane sugar (some brands are processed with bone char)
- For filling: blend 1 cup soaked cashews + 2 tbsp maple syrup + 1 tbsp lemon juice + 1 tsp vanilla until silky
- Omit powdered sugar dusting or use coconut sugar dusting
Flavor note: Cashew filling is less tangy but still creamy and satisfying.
🥑 Keto / Low-Carb Version
- Replace flour with 1 cup almond flour + ¼ cup coconut flour
- Replace sugars with ½ cup erythritol/monk fruit blend
- Use keto-friendly pumpkin puree (no added sugar)
- For filling: use powdered erythritol + cream cheese + butter + 1 tbsp heavy cream
- Skip powdered sugar dusting
- Net carbs per serving: ~5g
Texture will be denser — more like a muffin than a sponge. Still indulgent!
🥛 Dairy-Free Version
- Use plant-based butter and cream cheese
- Substitute heavy cream in filling with full-fat coconut cream
- Ensure all ingredients are labeled dairy-free
Flavor profile changes slightly — more coconut undertone — but still delicious.
How to Store & Make Ahead Like a Pro
These whoopie pies are designed for ease — and they keep beautifully.
- Room Temperature: Store in an airtight container for up to 3 days.
- Refrigerator: Keep for up to 7 days. Bring to room temp before serving — filling firms up in the fridge.
- Freezer: Freeze assembled pies (un-dusted) for up to 3 months. Wrap individually in plastic wrap, then place in freezer bags. Thaw overnight in fridge. Dust with powdered sugar after thawing.
- Make-Ahead Magic:
- Bake cakes 1–2 days ahead. Cool, wrap tightly, refrigerate.
- Make filling the day before. Store in fridge.
- Assemble and dust with sugar the morning of serving.
🎁 Gift Idea: Package 3–4 whoopie pies in a kraft box tied with twine and a handwritten tag:
“Fall in a Bite – Spiced Pumpkin Whoopie Pies with Cream Cheese Filling”
Creative Variations: Make It Yours!
Want to elevate your whoopie pies? Try these inspired twists:
🌰 Pecan Crunch Center
Sprinkle chopped toasted pecans between the cakes before filling.
🍫 Chocolate Swirl
Drizzle melted dark chocolate over the filled pies.
☕ Espresso Infusion
Add 1 tsp instant espresso powder to the cake batter — deepens flavor without tasting like coffee.
🍯 Maple Cream Filling
Replace vanilla with 1 tsp maple extract and add 1 tbsp pure maple syrup to the filling.
🎃 Mini Pumpkin Whoopie Pies
Use a small cookie scoop (1 tbsp) and bake for 6–8 minutes. Perfect for parties!
🧀 Spiced Cheesecake Layer
Pipe a dollop of cream cheese filling first, then top with pumpkin cake — double the cream cheese bliss!
🍂 Spiced Glaze Instead of Filling
Whisk 1 cup powdered sugar + 1 tbsp pumpkin puree + 1 tsp cinnamon + 1–2 tbsp milk. Drizzle over cooled cakes.
🌈 Colorful Fun
Add 1–2 drops of orange food coloring to the batter for vibrant hue — perfect for Halloween!
How to Serve Like a Pro
Presentation matters — especially when you’re posting on social media or impressing guests.
- Plating: Arrange on a wooden board with dried orange slices, cinnamon sticks, and fresh rosemary.
- Garnish: Light dusting of powdered sugar, flaky sea salt, or a single candied ginger piece.
- Pairings:
- Hot spiced chai latte
- Vanilla bean ice cream
- Apple cider (warm or sparkling)
- Dark roast coffee
- Serving Tip: Let pies sit at room temperature for 30 minutes before serving — the filling softens beautifully.
Perfect for:
- Thanksgiving dessert table
- Halloween parties
- Baby showers
- Office potlucks
- Holiday cookie exchanges
- Sunday afternoon tea
Frequently Asked Questions (FAQs)
Q: Can I use canned pumpkin pie filling?
A: No — it contains added sugar, spices, and thickeners that alter texture and flavor. Use 100% pure pumpkin puree only.
Q: My cakes cracked on top. Why?
A: Oven too hot or batter overmixed. Lower heat slightly next time and mix gently.
Q: Can I make the filling ahead?
A: Yes! Store in an airtight container in the fridge for up to 5 days. Re-whip before using.
Q: Why is my filling too runny?
A: Cream cheese or butter was too warm. Chill the filling for 20–30 minutes, then rewhip.
Q: Do I need a piping bag?
A: Not mandatory — you can spread with a knife. But a star tip gives that professional swirl look.
Q: Are these gluten-free?
A: Only if you use gluten-free flour. Otherwise, they contain wheat.
Q: Can I make these vegan?
A: Yes — see our vegan adaptation above. Texture will differ slightly but still delicious.
Q: How long do they last?
A: Up to 3 days at room temp, 7 days refrigerated, 3 months frozen.
Final Thoughts: More Than a Treat — A Memory in a Bite
These Pumpkin Whoopie Pies aren’t just dessert.
They’re childhood memories. They’re laughter around the kitchen counter. They’re the reason your kids beg for “the orange ones” every fall.
They’re the centerpiece of your holiday table — the one everyone asks for the recipe.
You didn’t need fancy tools. You didn’t need hours. Just a few pantry staples, patience, and the courage to make something truly special.
And now, you know the secret.
So go ahead. Light a candle. Pour a cup of tea. Turn on some jazz.
Bake a batch. Share it with someone you love.
Because fall doesn’t last forever.
But memories made over a soft, spiced pumpkin whoopie pie with creamy, dreamy filling? Those last a lifetime.
Print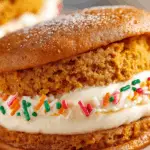
Pumpkin Whoopie Pies: The Ultimate Cozy Fall Treat
Ingredients
• 1 cup pumpkin puree (unsweetened)
• ⅓ cup pure maple syrup or honey
• ¼ cup melted coconut oil or butter
• 1 egg
• 1 tsp vanilla extract
• 1 cup almond flour
• ½ cup oat flour (gluten-free if needed)
• ½ tsp baking soda
• ½ tsp cinnamon
• ¼ tsp nutmeg
• ¼ tsp ginger
• ¼ tsp salt
For the filling:
• 4 oz cream cheese, softened (or dairy-free alternative)
• 2 tbsp butter or coconut oil, softened
• ½ cup powdered sugar or erythritol
• ½ tsp vanilla extract
• 1–2 tbsp almond milk (as needed for creaminess)
Instructions
- Preheat oven to 350°F (175°C). Line two baking sheets with parchment paper.
- In a large bowl, whisk together pumpkin, maple syrup, melted oil, egg, and vanilla until smooth.
- Add almond flour, oat flour, baking soda, cinnamon, nutmeg, ginger, and salt. Stir until a thick, cookie-like batter forms.
- Scoop 12 mounds of dough onto baking sheets (about 1 tbsp each), spacing them 2 inches apart. Flatten slightly.
- Bake 10–12 minutes, until edges are firm and tops spring back when touched.
- Let cool completely on a wire rack before assembling.
To make the filling:
7. Beat cream cheese and butter until creamy. Add powdered sugar and vanilla. Beat until light and fluffy. Add almond milk 1 tsp at a time if too thick.
8. Spread or pipe a generous layer onto the flat side of one cookie. Sandwich with another.
💡 Chill for 30 minutes to set the filling and enhance flavor!
PREP TIME & NUTRITION :
Prep Time : 15 mins , Cook Time : 12 mins , Total Time : 30 mins (plus cooling) , Servings : 6 whoopie pies , Calories : 150 , Net Carbs: 11g , Fats: 9g , Protein: 4g