Introduction
Welcome to the ultimate comfort-baking adventure.
As a professional food writer I’m drawn to desserts that deliver both drama and ease — the kind of recipe that arrives at the table with personality and keeps people reaching for another square. This particular creation is the kind of bake that transforms weeknight ovens into the stage for gooey, marbled magic.
I approach this cake as a celebration of contrasts: dense and tender crumb meeting pockets of silky tang, with occasional bursts of candy crunch. It’s intentionally theatrical — you don’t need to aim for perfection in the surface because the dramatic swirls and studded pieces are what make each slice visually irresistible.
In the following sections I’ll walk you through why this dessert works, what to gather before you begin, a clear overview of the technique, and step-by-step assembly instructions. Along the way I’ll share pro tips for texture balance, cooling, slicing, and keeping the bars at their best.
Whether you’re baking for a crowd or hiding a forkful for yourself, expect a lush, satisfying result that tastes indulgent but comes together without high-fuss pastry techniques.
Why You’ll Love This Recipe
This is the kind of dessert that checks multiple joy boxes at once.
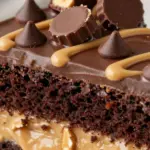
Imagine a treat that feels indulgent yet approachable, perfect for potlucks, celebrations, or a cozy night-in dessert. What makes it so lovable is the way textures interplay: ribboned creamy pockets tucked into a substantial cake base, occasional candy fragments that add toothsome contrast, and a glossy drizzle that visually signals richness.
As a recipe developer I value projects that are forgiving. This one is resilient — the marbling hides minor swirls that are less than perfect, and the structure is intentionally forgiving so slices remain moist rather than dry. It’s also versatile: you can scale to bake in different pans, switch toppings for seasonal flair, or take it on the road to gatherings where portability matters.
Finally, the emotional pull is undeniable. Desserts that combine familiar nostalgic flavors with a slight textural surprise create the most memorable bites. The overall experience — from the crackle of a lightly crisped edge to the yielding, velvety interior — makes this cake a repeat request in many households. Enjoy the spectacle as much as the flavor; baking should be both a craft and a treat.
Flavor & Texture Profile
This dessert is all about balance and pleasurable contrasts.
On the palate you’ll notice a deep, comforting richness from the base, complemented by bright pockets of creamy, slightly tangy filling that cut through the sweetness. Scattered throughout are chewy and crunchy notes that pop against the softer crumb, keeping each bite interesting and layered. There’s a harmonious sweet–salty interplay that prevents the overall profile from becoming cloying; the occasional toasted crunch introduces a savory echo that enhances the dessert’s depth.
Texturally, the ideal outcome is a cake that holds its shape when sliced but still yields moistly under the fork. The filling should remain scoopable and silky rather than fully set; these tender pockets deliver a luscious contrast to the surrounding structure. Tiny pockets of candy or chip fragments provide bursts of concentrated flavor and a satisfying break in the otherwise tender matrix.
When serving, aim for a sensory experience: a slight crisp at the edge for contrast, a tender center that nearly melts in the mouth, and intermittent crunchy hits to punctuate each bite. These deliberate textural differences are what elevate the dessert from simple to memorable.
Gathering Ingredients
Before you begin, assemble everything so the process feels calm and organized.
Use this checklist to stage your mise en place. Having measured containers and bowls ready will keep the bake moving smoothly and reduce the chance of overmixing or missed additions.
- 1 (15.25 oz) box chocolate cake mix
- Eggs (as directed on box)
- Vegetable oil (as directed on box)
- Water (as directed on box)
- 1/2 cup semi-sweet chocolate chips
- 1 cup chopped Reese’s Peanut Butter Cups
- 1/2 cup creamy peanut butter (for drizzling)
- 8 oz cream cheese, softened
- 1/2 cup creamy peanut butter (for cream layer)
- 1/2 cup unsalted butter, melted
- 2 cups powdered sugar (confectioners’ sugar)
- 1 teaspoon vanilla extract
- Optional: 1/4 cup chopped peanuts
- Optional: extra chocolate chips for topping
A few staging tips: keep the cream cheese at room temperature in a shallow dish to speed up softening; have your chopped candy measured in a small bowl so you can fold it in quickly; and place the powdered sugar in a sifter or fine-mesh strainer if you prefer a smoother blending of the filling. These small preparations make the assembly faster and reduce handling that could overwork the batter.
Preparation Overview
A clear assembly plan keeps this recipe relaxed and enjoyable.
Begin by preheating and preparing your chosen pan so that once the batter is mixed the transition to baking is effortless. The technique centers on layered assembly rather than complex baking chemistry, so attention to staging — bowls, spatulas, and measured ingredients — is where your time is best invested.
The process is largely about texture management: create a base that will bake through without drying out, and craft dollops of a creamy filling that remain distinct after baking. Avoid aggressive stirring once the filling is dropped into the batter; gentle placement preserves visible pockets that are the hallmark of this dessert.
For the visual earthquake effect, a light hand with the swirling motion is more effective than heavy marbling. Use a narrow offset spatula or butter knife and make a few deliberate, shallow sweeps so the filling ribbons through the top without blending into uniform swirls.
Cooling strategy matters: allow adequate time to cool in the pan to let the internal pockets settle; chilling for a short period before slicing yields cleaner squares. I’ll cover step-by-step assembly and baking notes in the cooking section so you can follow a structured, calm workflow from start to finish.
Cooking / Assembly Process
Follow these steps in order for reliable results — stage everything first, then assemble.
- Preheat your oven to 350°F (175°C) and grease a 9×13-inch baking dish or line it with parchment paper for easier removal.
- Prepare the chocolate cake batter according to the package directions, mixing the required eggs, oil, and water until smooth.
- Fold the semi-sweet chocolate chips and chopped candy pieces into the batter, reserving a few pieces for the top.
- Pour the batter evenly into the prepared baking dish, smoothing the surface gently with a spatula; do not bake yet.
- In a separate bowl, beat the softened cream cheese until smooth and fluffy, then mix in the specified amount of creamy peanut butter until silky.
- Stir in the melted butter, then gradually add the powdered sugar until the filling is thick and scoopable; fold in the vanilla.
- Drop spoonfuls of the cream filling evenly over the chocolate batter in dollops; avoid spreading them flat to preserve pockets.
- Drizzle the reserved creamy peanut butter in a thin stream across the top, then use a knife to gently swirl the drizzled peanut butter and cream dollops to create a marbled, ‘earthquake’ effect — be careful not to over-swirl.
- Sprinkle the remaining chopped candy, extra chocolate chips, and optional chopped peanuts over the top for texture and visual appeal.
- Bake until the edges are set and a toothpick inserted into a chocolate-only area comes out with moist crumbs; the cream pockets should remain soft. Allow the pan to cool on a wire rack and chill briefly if firmer slices are desired before slicing into squares.
A few pro pointers while assembling: work quickly when folding mix-ins into the batter to avoid heat from your hands affecting texture; when dropping dollops of filling, use a cookie scoop for even portions; and keep a light touch when swirling — too many passes will homogenize the surface and reduce the striking marbled look. These practical steps ensure each bar has the signature pockets and visible candy studs that define this dessert.
Serving Suggestions
Presentation and pairing ideas to elevate each square.
This dessert shines when served simply, letting its marbled surface and studded pieces do the visual heavy lifting. For an unfussy presentation, cut squares and arrange them on a rustic wooden board or a clean white platter, spacing pieces so the dramatic swirls are visible from above. Add a few extra chopped candy pieces scattered around the platter for texture contrast and a playful touch.
If you want to step up the experience for guests, consider a light dusting of powdered sugar through a fine sieve to give a frosted look without altering texture. For those who enjoy temperature contrasts, serve a warm square with a small scoop of plain vanilla ice cream or a lightly whipped neutral cream; the cream tempers richness and highlights the tender pockets.
Beverage pairings should complement without overwhelming: a robust coffee, a nut-forward milk, or a lightly bitter tea can help balance the dessert’s sweetness. For gatherings, offer napkins and small plates — these bars are rich and designed to be enjoyed in small, satisfying bites. Also, remind guests that chilled slices tend to slice cleaner, while room-temperature squares are softer and more yielding.
Storage & Make-Ahead Tips
Keep these storage strategies in mind to preserve texture and flavor.
After baking and cooling, store leftovers covered in the refrigerator to maintain the integrity of the creamy pockets and prevent the candy pieces from softening. When chilled, slices will firm up and cut cleaner, which is helpful if you need tidy servings for a party tray. If you prefer a softer bite, remove squares from the fridge about 15–20 minutes before serving to take the chill off and allow the filling to relax.
For make-ahead needs, the assembled, unbaked pan can be prepared and covered tightly, then refrigerated overnight; allow it to come to room temperature briefly before baking, and extend baking time by a few minutes as needed. Fully baked bars freeze well: wrap individual slices or the entire pan tightly in plastic wrap and foil, then freeze for up to one month. Thaw overnight in the refrigerator and bring to room temperature before serving.
Avoid storing at room temperature for extended periods because the creamy pockets contain dairy components that keep best chilled. For travel, place slices in a shallow cooler with an ice pack to protect texture during transit. These techniques keep the dessert tasting freshly baked while offering flexibility for entertaining and gifting.
Frequently Asked Questions
Common concerns and quick fixes for reliable results.
Will the filling melt into the cake? The filling is meant to remain as soft pockets; with careful placement and minimal swirling it will hold its identity after baking while still staying tender.
Can I make substitutions? Swap preferences carefully — subbing flavors or textures is possible but be mindful of structural changes that might affect bake time or mouthfeel.
How do I get clean slices? Chill the baked pan briefly, then use a sharp knife warmed under hot water and wiped dry between cuts to achieve neat edges.
Can I scale the recipe to other pans? Yes, adjust baking time accordingly and watch for the same visual cues in the edges and chocolate-only toothpick test.
What’s the best way to transport the bars? Chill completely and place in a shallow, lined container; use ice packs for longer trips.
If you encounter a common hiccup — overbrowned edges with a soft center — tent loosely with foil for the final minutes and check doneness in a chocolate-only area until moist crumbs appear.
Final paragraph: If you have any specific questions about technique, substitutions, or troubleshooting your own batch, ask away — I’m happy to walk through adjustments for altitude, oven quirks, or dietary swaps to help you get the perfect batch.
Reese’s Peanut Butter Earthquake Cake
Ingredients
- 1 (15.25 oz) box chocolate cake mix 🍫
- Eggs, oil and water as directed on box 🥚🛢️💧
- 1/2 cup semi-sweet chocolate chips 🍫
- 1 cup chopped Reese’s Peanut Butter Cups 🥜🍬
- 1/2 cup creamy peanut butter (for drizzling) 🥜
- 8 oz cream cheese, softened 🧀
- 1/2 cup creamy peanut butter (for cream layer) 🥜
- 1/2 cup unsalted butter, melted 🧈
- 2 cups powdered sugar (confectioners’ sugar) 🍚
- 1 teaspoon vanilla extract 🌿
- Optional: 1/4 cup chopped peanuts for crunch 🥜
- Optional: extra chocolate chips for topping 🍫
Instructions
- Preheat oven to 350°F (175°C). Grease a 9×13-inch baking dish well or line it with parchment paper for easy removal.
- Prepare the chocolate cake batter according to the package directions (add the eggs, oil and water) and mix until smooth.
- Fold 1/2 cup semi-sweet chocolate chips and 1 cup chopped Reese’s into the batter, reserving a few pieces for the top.
- Pour the chocolate batter evenly into the prepared 9×13 baking dish — do not bake yet.
- In a separate bowl, beat the softened cream cheese until smooth and fluffy with an electric mixer.
- Add 1/2 cup creamy peanut butter to the cream cheese and mix until well combined and silky.
- Stir in the melted butter, then gradually add the powdered sugar until the mixture is thick, smooth and scoopable. Mix in the vanilla.
- Drop spoonfuls of the peanut butter cream cheese mixture evenly over the chocolate batter in dollops — don’t spread them flat; you want pockets.
- Drizzle 1/2 cup creamy peanut butter over the top in a thin stream. Use a knife to gently swirl the peanut butter and cream cheese dollops into the batter to create the ‘earthquake’ marbled effect—be careful not to over-swirl.
- Sprinkle the remaining chopped Reese’s and any extra chocolate chips or chopped peanuts over the top for texture and appearance.
- Bake in the preheated oven for 30–40 minutes, or until the edges are set and a toothpick inserted into a chocolate-only area comes out with moist crumbs (the cream cheese pockets will stay soft).
- Allow the cake to cool completely in the pan on a wire rack. Chill for at least 1 hour if you prefer firmer slices (optional).
- Slice into squares and serve. Store leftovers covered in the refrigerator for up to 4–5 days.