Sweet & Sour Chicken is one of the most beloved takeout dishes worldwide — featuring crispy battered chicken tossed in a glossy, tangy sauce balanced with sweetness and acidity. With juicy pineapple, colorful bell peppers, and that signature sticky glaze, this dish delivers bold flavor and satisfying texture in every bite.
Inspired by Chinese-American cuisine and commonly found in restaurants like Panda Express, this homemade version gives you full control over crispiness, sweetness, and ingredients — and it’s surprisingly easy to make.
In this comprehensive guide, you’ll learn how to make authentic-style sweet and sour chicken from scratch, including sauce technique, frying tips, baking options, air fryer variations, and pro-level flavor adjustments.
Why You’ll Love This Recipe
- Ultra-crispy chicken pieces
- Perfect sweet-to-tangy balance
- Vibrant bell peppers and pineapple
- Better than takeout
- Freezer and meal-prep friendly
It’s a complete comfort dish with bright flavor contrast.
What Is Sweet & Sour Chicken?
Sweet and sour chicken consists of:
- Bite-sized chicken pieces coated in batter
- Deep-fried until golden and crispy
- Tossed in a glossy sweet and tangy sauce
- Combined with vegetables and pineapple
The hallmark of the dish is its balanced sauce, typically made with sugar, vinegar, ketchup, and soy sauce.
The result:
Crispy texture + sticky glaze + bright acidity + subtle umami.
Ingredients
For the Chicken
- 2 pounds boneless, skinless chicken breast or thighs
- 1 cup cornstarch
- ½ cup all-purpose flour
- 2 eggs, beaten
- ½ teaspoon salt
- ½ teaspoon white pepper
- Oil for frying
For the Sweet & Sour Sauce
- ¾ cup granulated sugar
- ½ cup rice vinegar
- ¼ cup ketchup
- 1 tablespoon soy sauce
- 1 tablespoon cornstarch + 2 tablespoons water (slurry)
- ½ cup pineapple juice (optional but recommended)
Vegetables & Add-Ins
- 1 red bell pepper, chopped
- 1 green bell pepper, chopped
- 1 cup pineapple chunks
- 1 small onion, sliced
Step-by-Step Instructions
Step 1: Prepare the Chicken
Cut chicken into bite-sized chunks.
Season lightly with salt and white pepper.
Step 2: Coat the Chicken
Set up breading station:
- Bowl 1: Cornstarch + flour
- Bowl 2: Beaten eggs
Dip chicken in egg, then dredge in cornstarch-flour mixture.
Press coating firmly for maximum crispiness.
Step 3: Fry Until Golden
Heat oil to 350°F (175°C).
Fry in batches 4–5 minutes until golden and cooked through (internal temp 165°F / 74°C).
Transfer to wire rack (not paper towels — prevents sogginess).
Step 4: Make the Sauce
In a saucepan over medium heat, combine:
- Sugar
- Vinegar
- Ketchup
- Soy sauce
- Pineapple juice
Bring to gentle simmer.
Stir in cornstarch slurry and cook until thick and glossy.
The sauce should coat the back of a spoon.
Step 5: Stir-Fry Vegetables
In a large skillet or wok:
- Sauté bell peppers and onions 2–3 minutes.
- Add pineapple chunks.
Vegetables should remain slightly crisp.
Step 6: Combine Everything
Add crispy chicken to skillet.
Pour sauce over and toss quickly to coat.
Serve immediately for best texture.
Flavor Profile
This dish delivers:
- Sweetness from sugar and pineapple
- Tang from vinegar
- Savory depth from soy sauce
- Slight fruitiness
- Crisp texture contrast
The balance between acid and sugar is critical — neither should overpower the other.
Why This Recipe Works
- Cornstarch creates ultra-light crisp coating
- Double dredging improves crunch
- Sauce thickens properly with slurry
- Quick toss preserves texture
Timing is essential. Toss just before serving.
Baked Version (Healthier Option)
- Preheat oven to 400°F.
- Place breaded chicken on lined baking sheet.
- Spray lightly with oil.
- Bake 20–25 minutes until crispy and cooked through.
Toss with sauce before serving.
Texture will be slightly less crisp than fried but still delicious.
Air Fryer Version
- Preheat to 390°F.
- Spray chicken lightly with oil.
- Air fry 12–15 minutes, shaking halfway.
Coat with sauce just before serving.
Professional Tips for Crispy Results
1. Use Thighs for Extra Juiciness
Chicken thighs remain moist even after frying.
2. Fry in Small Batches
Prevents oil temperature drop.
3. Keep Sauce Separate Until Serving
Maintains crisp texture.
4. Double Fry for Extra Crunch
Fry once, rest 5 minutes, fry again briefly.
Customization Ideas
Make It Spicy
Add chili flakes or sriracha.
Add Garlic & Ginger
Sauté fresh minced garlic and ginger before adding sauce.
Honey Version
Replace part of sugar with honey.
Low-Sugar Version
Reduce sugar and increase pineapple juice slightly.
What to Serve With Sweet & Sour Chicken
- Steamed jasmine rice
- Fried rice
- Lo mein
- Stir-fried vegetables
Garnish with sesame seeds and green onions for presentation.
Nutritional Overview (Approximate Per Serving)
- Calories: 500–650
- Protein: 35g
- Carbohydrates: 60g
- Fat: 20g
Baked or air-fried versions reduce fat content.
Common Mistakes to Avoid
- Overcrowding fryer
- Not thickening sauce enough
- Letting chicken sit in sauce too long
- Under-seasoning chicken
- Using cold oil
Crispness depends on heat control.
Storage & Reheating
Refrigerate:
Store up to 4 days.
Reheat:
Use oven or air fryer for best crispness.
Freezing:
Freeze chicken and sauce separately for best results.
Frequently Asked Questions
Is this authentic Chinese cuisine?
Sweet & sour chicken is primarily Chinese-American in origin, though sweet-and-sour flavors exist in traditional Cantonese cooking.
Can I make it gluten-free?
Yes — use gluten-free flour and tamari instead of soy sauce.
Why is my sauce too thin?
Increase slurry or simmer longer.
Why is my coating soggy?
Sauce added too early or oil not hot enough.
Restaurant-Style Presentation Tips
- Serve in shallow bowl over rice
- Garnish with scallions
- Add sesame seeds
- Use vibrant bell peppers for color contrast
Visual appeal enhances dining experience.
Final Thoughts
This homemade Sweet & Sour Chicken delivers everything you love about takeout — crispy chicken, glossy tangy sauce, and vibrant vegetables — but fresher and customizable.
With proper frying technique and a well-balanced sauce, you can achieve restaurant-quality results right in your own kitchen. Whether fried, baked, or air-fried, this dish remains a family favorite for good reason.
Print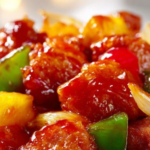
Sweet & Sour Chicken (Crispy, Tangy, Restaurant-Style at Home)
Ingredients
For the chicken:
- 1½ lbs (680g) boneless, skinless chicken breasts or thighs, cut into 1” pieces
- ½ cup cornstarch
- 2 large eggs, beaten
- Salt & black pepper to taste
- Oil for frying (or bake option below)
For the sweet & sour sauce:
- ½ cup granulated sugar
- ¼ cup ketchup
- ¼ cup rice vinegar or apple cider vinegar
- 2 tbsp soy sauce
- 1 tbsp tomato paste
- 1 garlic clove, minced
- 1 tsp grated ginger
- ½ cup water
- 1 tbsp cornstarch + 2 tbsp water (slurry)
For stir-fry:
- 1 tbsp oil
- 1 red bell pepper, chopped
- 1 green bell pepper, chopped
- ½ onion, chopped
- ¾ cup pineapple chunks (fresh or canned)
Instructions
Option 1: Crispy Fried Chicken (Classic)
- Bread chicken: Toss chicken in beaten eggs, then coat in cornstarch.
- Fry: Heat 1″ oil in a skillet to 350°F (175°C). Fry chicken in batches 3–4 min per side until golden and cooked through. Drain on paper towels.
Option 2: Baked (Healthier)
- Toss chicken in cornstarch, then spray with oil.
- Bake at 425°F (220°C) for 20–25 min, flipping halfway, until crispy.
Make sauce & finish:
- Sauce: In a saucepan, whisk sugar, ketchup, vinegar, soy sauce, tomato paste, garlic, ginger, and water. Bring to a simmer. Stir in cornstarch slurry; cook 1–2 min until thickened.
- Stir-fry veggies: In a large skillet, heat oil over medium-high. Sauté bell peppers and onion 4–5 min until crisp-tender. Add pineapple; cook 1 min.
- Combine: Add crispy chicken and sauce to skillet. Toss to coat. Heat through 2–3 min.
💡 Pro Tips:
– For extra crunch, double-coat chicken: egg → cornstarch → egg → cornstarch.
– Add a splash of fish sauce to the sauce for umami depth.
– Serve over steamed rice or cauliflower rice!
Prep Time & Nutrition (per serving, serves 4):
Servings: 4 | Calories: 420 | Net Carbs: 42g | Fats: 14g | Protein: 32g