If you’re looking to add a touch of whimsy and creativity to your baking, then Teddy Bear Buns are your answer. These delightful, bear-shaped buns combine the softness of homemade bread with playful designs that are sure to bring smiles to everyone’s faces. Perfect for breakfast, lunchboxes, or themed parties, Teddy Bear Buns are as fun to make as they are delicious to eat. In this article, we’ll explore everything you need to know about Teddy Bear Buns—from their pillowy texture to step-by-step instructions on how to make them at home. Let’s dive into this charming creation!
What Are Teddy Bear Buns?
Teddy Bear Buns are soft, fluffy bread rolls shaped like adorable teddy bears. The dough is typically made from simple ingredients like flour, yeast, milk, sugar, and butter, creating a tender and slightly sweet base. Once baked, the buns are decorated with raisins, chocolate chips, or edible markers to create the bear’s eyes, nose, and mouth. You can also use colored dough or fondant to add details like bows, scarves, or other accessories.
This recipe is ideal for anyone who loves creative, themed food but doesn’t want to spend hours in the kitchen. Their simplicity makes them perfect for family baking projects, holiday treats, or classroom snacks.
Why You’ll Love Teddy Bear Buns
There are countless reasons why these adorable buns have become a favorite among families and bakers:
- Fun and Creative : Transforming plain buns into teddy bears adds an element of surprise and joy to any meal.
- Kid-Friendly : Kids love the cute shapes and will enjoy helping shape and decorate the buns.
- Soft and Fluffy Texture : The bread is light, airy, and slightly sweet, making it irresistible to both kids and adults.
- Customizable : Add your own creative touches with different decorations or flavors like cinnamon, cheese, or herbs.
- Perfect for Themes : These buns are great for birthday parties, school events, picnics, or holiday celebrations.
- Homemade Goodness : Skip store-bought bread and enjoy fresh, homemade buns with wholesome ingredients.
Health Benefits of Teddy Bear Buns
While these buns are indulgent in appearance, they offer several health-conscious advantages when made with wholesome ingredients:
- Rich in Carbohydrates : Provides energy to fuel your day, especially for active kids and adults.
- Packed with Nutrients : Using whole wheat flour, milk, and eggs adds protein, fiber, and essential vitamins.
- Low in Added Sugars : Adjust the sweetness to your preference, keeping it healthier than many store-bought options.
- Versatile Ingredients : You can incorporate healthy additions like seeds, nuts, or dried fruits for extra nutrients.
To make this recipe even healthier, consider using whole wheat or almond flour, reducing sugar, or serving alongside protein-rich spreads like peanut butter or cream cheese.
Ingredients You’ll Need
Here’s what you’ll need to create adorable Teddy Bear Buns:
For the Dough:
- All-Purpose Flour (or Whole Wheat Flour) : Provides structure and softness.
- Milk : Adds moisture and richness; use dairy-free milk for a vegan option.
- Sugar : Adds sweetness; adjust to taste or use a sugar substitute.
- Yeast : Helps the dough rise for a fluffy texture.
- Eggs : Act as a binder and add richness.
- Butter (or Coconut Oil) : Adds flavor and enhances the soft texture.
- Salt : Balances the sweetness.
For Decorating:
- Raisins or Chocolate Chips : For the bear’s eyes, nose, and mouth.
- Colored Dough (Optional) : Use beet juice, spinach powder, or turmeric to tint small portions of dough for accessories.
- Edible Markers : For adding fine details like facial expressions or patterns.
Step-by-Step Recipe Guide
Preparing the Dough
- Activate the Yeast : Warm the milk slightly (about 110°F/43°C) and mix in the sugar. Sprinkle the yeast over the milk and let it sit for 5–10 minutes until frothy.
- Mix Wet Ingredients : In a large bowl, whisk together the melted butter (or coconut oil), eggs, and activated yeast mixture.
- Add Dry Ingredients : Gradually stir in the flour and salt until a soft dough forms. Knead the dough on a floured surface for 8–10 minutes until smooth and elastic.
Letting the Dough Rise
- First Rise : Place the dough in a lightly oiled bowl, cover with a damp cloth, and let it rise in a warm place for 1–2 hours, or until doubled in size.
- Punch Down : Gently punch down the dough to release air bubbles.
Shaping the Teddy Bears
- Divide the Dough : Divide the dough into equal portions (about golf-ball-sized).
- Shape the Body : Roll one portion into a round ball for the body.
- Create the Head and Ears : Use smaller portions of dough to shape a head (slightly smaller than the body) and two small oval shapes for the ears. Attach the head and ears to the body by pinching the edges together.
- Optional Accessories : Use colored dough to create bows, scarves, or other decorative elements.
Second Rise and Baking
- Second Rise : Place the shaped buns on a baking sheet lined with parchment paper. Cover and let them rise for 30–45 minutes until puffy.
- Preheat Your Oven : Set your oven to 350°F (175°C).
- Bake Until Golden : Bake the buns for 15–20 minutes, or until golden brown.
Decorating the Buns
- Cool Completely : Let the buns cool on a wire rack before decorating.
- Add Features : Use raisins, chocolate chips, or edible markers to draw the bear’s eyes, nose, and mouth. Add any additional details like bows or patterns.
Creative Variations
The beauty of Teddy Bear Buns lies in their versatility. Here are some fun ideas to try:
- Savory Version : Skip the sugar and add cheese, herbs, or ham for a savory twist.
- Mini Buns : Make smaller buns for bite-sized treats or party favors.
- Themed Designs : Shape the dough into other animals like rabbits, pandas, or cats for variety.
- Holiday Touches : Add festive colors or decorations for occasions like Christmas, Easter, or Valentine’s Day.
- Gluten-Free Option : Use gluten-free flour blends to make the buns safe for those avoiding gluten.
Tips for Perfect Results
- Use Fresh Yeast : Fresh yeast ensures the dough rises properly and creates a light, fluffy texture.
- Don’t Skip the Rising Time : Allowing the dough to rise fully is key to achieving soft, airy buns.
- Experiment with Decorations : Use edible flowers, sprinkles, or spices for unique designs.
- Make Ahead : Prepare the dough ahead of time and refrigerate overnight for a quick morning bake.
Serving Suggestions
Teddy Bear Buns pair wonderfully with a variety of accompaniments:
- Jam or Honey : Serve with your favorite spread for a sweet treat.
- Soup or Stew : Pair with hearty soups or stews for a comforting meal.
- Cheese Platter : Include the buns on a charcuterie board with cheeses, olives, and nuts.
- Breakfast Spread : Feature them alongside scrambled eggs, bacon, and fresh fruit for a fun breakfast.
For a fun presentation, arrange the buns on a platter with themed decorations like honey pots, teddy bear napkins, or floral accents.
Common Mistakes to Avoid
Even simple recipes can go awry if you’re not careful. Here are some pitfalls to watch out for:
- Skipping the Yeast Activation : Not activating the yeast properly can result in dense, flat buns. Always check for frothiness.
- Overmixing the Dough : Overmixing can make the buns tough. Knead just until smooth and elastic.
- Not Shaping Properly : Pinch the edges securely when attaching the head and ears to prevent them from separating during baking.
- Overbaking the Buns : Overbaking can dry out the buns. Remove them from the oven when golden brown.
FAQs About Teddy Bear Buns
Q: Can I freeze the buns? A: Yes! Freeze the baked and cooled buns in an airtight container for up to 1 month. Reheat in the oven or microwave before serving.
Q: Can I make these buns vegan? A: Yes! Substitute plant-based milk, vegan butter, and flax eggs for a vegan version.
Q: How do I store leftovers? A: Store the buns in an airtight container at room temperature for up to 2 days or in the refrigerator for up to 5 days.
Q: Why didn’t my dough rise? A: Dough may not rise due to expired yeast, incorrect water temperature, or insufficient rising time. Ensure all conditions are optimal.
Conclusion
Teddy Bear Buns are a playful, wholesome treat—a perfect way to bring joy to the table while delivering soft, pillowy goodness. Whether you’re hosting a themed party, surprising your kids, or simply looking to add a bit of whimsy to your day, these buns are sure to impress. Best of all, they’re easy to make, requiring just a few pantry staples and your creativity.
Ready to give them a try? Gather your ingredients, follow our foolproof guide, and prepare to delight your family and friends with these adorable creations. Don’t forget to share your Teddy Bear Buns with us—we’d love to see how they turned out!
By incorporating relevant keywords such as “fun bread recipes,” “homemade buns,” and “creative baking ideas” throughout the article, this piece is optimized for search engines while remaining engaging and informative for readers. Happy baking!
Print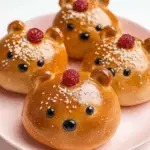
Teddy Bear Buns: A Wholesome and Adorable Treat for Kids and Adults Alike
- Total Time: 33 mins
Description
Cute, soft, and slightly sweet — these adorable teddy bear buns are perfect for Easter, kids’ lunches, or a fun weekend breakfast! Easy to make with simple ingredients.
Ingredients
4 cups all-purpose flour (or bread flour)
¼ cup sugar (or powdered erythritol for low-carb version)
1 tsp salt
2 tsp instant yeast
1 cup warm milk (dairy or plant-based)
¼ cup unsalted butter, melted
1 egg
Optional: Raisins or chocolate chips for eyes and nose
INGREDIENTS FOR KETO/LOW CARB VERSION:
Use 3 cups almond flour + ½ cup psyllium husk powder
Replace sugar with ¼ cup powdered erythritol
Use heavy cream or coconut cream instead of milk
Add ½ tsp baking powder (optional, for rise)
Instructions
In a large bowl, mix flour, sugar, salt, and yeast.
Add warm milk, melted butter, and egg. Mix until dough forms.
Knead the dough on a floured surface for 8–10 minutes until smooth and elastic.
Let dough rise in a warm place for 1 hour or until doubled in size.
Divide into small balls. Shape each into a teddy bear form using shaping techniques or cookie cutters.
Let rest for 15 minutes, then bake at 350°F (175°C) for 15–18 minutes until golden.
Cool and add raisins or chocolate chips for facial features if desired.
- Prep Time: 15 mins
- Cook Time: 18 mins
Nutrition
- Serving Size: 6–8 teddy buns
- Calories: 180
- Fat: 6g
- Carbohydrates: 25g (varies with flour choice)
- Protein: 5g