Introduction
A quick, soulful loaf
Warm, crusty and unapologetically simple, traditional Irish soda bread is a back-pocket recipe every home baker should know. This loaf celebrates basic pantry ingredients and the quiet alchemy that happens when an acid like buttermilk meets baking soda: there’s no waiting on yeast, no folding or long proofs, just an honest, fast-baked bread that yields a dense yet tender crumb and a robust, golden crust.
As a food writer who bakes often, I find soda bread to be one of the most satisfying projects for busy evenings or a slow weekend morning. It rewards minimal fuss with maximum comfort — the kind of loaf that smells like home the moment it comes free from heat. The technique favors good hands-on rhythm over complicated steps: gentle mixing, measured shaping, and a confident score across the top so the loaf bakes evenly.
In this piece I’ll walk you through why the method works, how to sense dough readiness, and simple ways to coax the best texture and color from the oven. Expect practical notes on mixing, shaping, and avoiding the common pitfalls that turn a promising dough into a tough crumb. By the end, you’ll feel ready to bake a classic soda bread that sings with a crisp crust and a tender, slightly open interior — perfect for butter, jam, or a bowl of stew.
Why You’ll Love This Recipe
Comfort without complication
This recipe is beloved because it offers all the comfort of homemade bread with a fraction of the effort required by yeast-based loaves. There’s a certain satisfaction in whisking together dry ingredients, cutting in butter until the mixture resembles coarse crumbs, and stirring in a lively splash of buttermilk. The result is a bread that’s rustic in character yet reliable in outcome.
What to expect:
- Immediate gratification: the dough comes together quickly and bakes within the hour.
- Versatility: serve it warm with butter, jam, or alongside savory dishes like stews and soups.
- Texture balance: a crackly crust around a slightly tender, denser crumb that holds spreads well.
As a home baker, you’ll also appreciate how forgiving this loaf can be. Minor variations in mixing or flour amount won’t ruin the final loaf; they’ll simply shift the texture slightly. That forgiving nature makes soda bread an excellent recipe to customize — mix-ins, glazing, or different dairies can be explored without fear. Finally, because it doesn’t rely on rising time, soda bread is an ideal last-minute bread that still delivers a purposeful, nostalgic result.
Flavor & Texture Profile
Flavor notes
Traditional soda bread has a clean, slightly tangy backbone from the buttermilk that balances the gentle sweetness of any dried fruit added. The butter imparts a subtle richness, while a touch of sugar can help gently caramelize the crust and deepen the loaf’s flavor. When raisins or currants are folded in, they lend bursts of concentrated fruitiness, which contrasts beautifully with the bread’s mineral edges.
Texture details
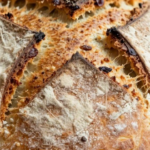
The hallmark of a great soda bread lies in its crust-to-crumb contrast. The exterior should be proudly browned — rustic, cigar-like fissures and a firm shell that crackles under the knife. Inside, the crumb is denser than yeasted loaves but should remain tender and slightly open, with a moistness that comes from the acid-base reaction and the addition of butter. Overworking the dough collapses that tender profile, so gentle handling is essential.
When sliced warm, the loaf offers an immediate lick of heat and aroma; the interior will steam slightly, making for the perfect canvas for butter or preserves. As the loaf cools, the crumb firms and the flavors knit together, producing a satisfying mouthfeel that’s both hearty and nuanced.
Gathering Ingredients
Ingredients you’ll collect before you begin
Getting the mise en place right is the easiest step toward a successful loaf. Before you mix anything, arrange the core components and make sure your buttermilk is cold and your butter is at a cool room temperature so it cuts into the flour cleanly. It helps to have a small bowl for dry leaveners so they distribute evenly when whisked into the flour.
If you plan to include dried fruit, rinse and pat it dry or toss it in a tablespoon of flour to keep it from sinking to the bottom of the loaf during baking. Have extra flour for dusting your work surface and a shallow dish of buttermilk on hand if you prefer to brush the top for a glossy finish. Lastly, a sharp knife will give you a clean, confident score across the top that helps the loaf open and bake evenly.
Full ingredient list (structured):
- All-purpose flour
- Granulated sugar
- Salt
- Baking powder
- Baking soda
- Salted butter, cubed
- Raisins or currants
- Buttermilk
- Extra flour for dusting
- Extra buttermilk for brushing (optional)
Preparation Overview
The simple workflow
Making soda bread is deceptively straightforward, but a few intentional choices make the difference between a so-so loaf and one that is truly memorable. Start by combining your dry ingredients thoroughly; this creates uniform lift and avoids pockets of baking soda or powder which can cause uneven flavor or textural problems. When you work in the butter, aim for pea-sized bits so the fat distributes in pockets that melt in the oven and contribute to tender crumb.
Key moments to watch:
- Cutting in the butter: stop when the mixture looks crumbly with pea-size pieces.
- Folding in liquid: gentle, minimal mixing preserves tenderness.
- Shaping: knead only a few times; overworking glues the gluten and yields toughness.
- Scoring the top: a deep X encourages even oven spring and a dramatic crust.
Temperature control also matters. A hot oven upfront helps set the crust quickly and builds lift, while tenting with foil toward the end prevents over-browning. Finally, cooling on a rack is essential: slicing too soon traps steam and makes the crumb gummy, while waiting allows the interior to finish setting and the flavors to balance.
Cooking / Assembly Process
Step-by-step instructions
Follow these steps for a dependable traditional soda bread. Begin by preheating your oven and preparing your baking vessel so the loaf has a hot surface to meet. Whisk the dry ingredients thoroughly to ensure even distribution of the leaveners. Use a pastry cutter, two forks, or your fingertips to work cold butter into the flour mixture until the texture resembles coarse crumbs with small pea-sized bits.
Stir in the dried fruit evenly through the dough, then pour in the buttermilk and fold gently until the dough just comes together; it should be sticky and shaggy. Turn the dough onto a well-floured surface, dust the top lightly, and knead only a small number of times while shaping into a round. Place the shaped loaf on the prepared baking sheet, Dutch oven, or cast-iron skillet. Using a sharp knife, cut a deep X in the top of the loaf about two centimeters deep; optionally brush the surface with a little extra buttermilk to encourage browning. Bake until the loaf is deeply golden and sounds hollow when tapped on the bottom. If the top is browning too quickly, tent loosely with foil and continue baking until done. Remove the loaf and cool on a wire rack until it reaches the right texture for slicing; this cooling time allows the crumb to finish setting and prevents a gummy interior.
Serving Suggestions
How to enjoy your loaf
Soda bread pairs beautifully with both sweet and savory accompaniments. Serve slices warm so the crumb is still slightly yielding and perfect for absorbing butter or a glossy jam. For breakfasts and brunch, thick slices are lovely with cultured butter and seasonal preserves; for savory meals, the bread’s sturdy profile stands up well to hearty stews, soups, and braises.
Creative serving ideas
- Grilled toast with melted sharp cheddar and a smear of mustard for a rustic open-faced sandwich.
- Slices lightly toasted and rubbed with a clove of garlic then drizzled with olive oil — a quick, peasant-style accompaniment to soups.
- Turn thick slices into French toast for a textured, less-spongy variation that’s great with maple syrup.
When presenting at the table, keep the loaf whole and tear or slice it to highlight its rustic character. If you’re serving for a crowd, offer a simple board with cultured butter, salted butter, a bright jam, and a savory option like aged cheese or smoked fish. This contrast between soft interior and crisp crust makes the bread a versatile anchor for many courses and occasions.
Storage & Make-Ahead Tips
Keeping the loaf fresh
Soda bread is best the day it’s baked, when the crust is at its crispiest and the crumb is tender. For short-term storage, wrap the cooled loaf in a clean tea towel and keep it at room temperature for up to two days; this maintains some crust integrity while keeping the interior from drying too quickly. If you expect leftover slices, store them in a breathable container so they don’t become sodden.
Freezing and reheating
- Freeze: Slice the cooled loaf, wrap individual slices tightly in plastic wrap, and place them in a sealed freezer bag for up to three months.
- Reheat from frozen: Toast or warm slices directly under a broiler or in a toaster oven until edges re-crisp and the interior is heated through.
For make-ahead planning, you can mix the dry ingredients and cube the butter in advance, keeping them chilled and covered in the fridge for a day. Combine the wet and dry components when ready to bake to ensure the chemical reaction between acid and base remains vigorous. Avoid refrigerating a fully mixed dough: the cold will slow the leavening action and can yield a denser result. With these approaches, you can enjoy fresh-tasting soda bread with minimal day-of work.
Frequently Asked Questions
Answers to common soda bread questions
Why does my soda bread turn out dense?
Dense soda bread usually comes from overmixing or over-kneading. Work the dough just until it holds together; overworked dough develops too much gluten and becomes tough. Also ensure your leaveners are fresh — old baking soda or powder can fail to provide lift.
Can I omit the raisins or currants?
Absolutely. The dried fruit is optional and primarily for sweetness and texture contrast. The loaf is equally traditional without them, leaning more toward a savory profile.
Can I substitute milk for buttermilk?
You can, but the acid in buttermilk is what activates the baking soda and provides the characteristic tang. If you don’t have cultured buttermilk, make a quick substitute by adding a tablespoon of lemon juice or white vinegar to a cup of milk and letting it sit briefly.
How do I know when it’s done?
A well-baked loaf will be deeply golden, and when tapped on the bottom it should sound hollow. If uncertain, an instant-read thermometer inserted into the center should register a warm interior indicating doneness. Allow the loaf to cool adequately before slicing to let the crumb set.
If you have more questions about technique, substitutions, or pairing ideas, I’ll be happy to help — whether you’re troubleshooting a specific batch or looking to adapt the loaf.
Traditional Irish Soda Bread
Ingredients
- 4 cups all-purpose flour, spooned and leveled 🍞
- 3 tablespoons granulated sugar 🍬
- 1 teaspoon salt 🧂
- 1½ teaspoons baking powder 🧁
- ½ teaspoon baking soda ⚗️
- 3 tablespoons salted butter, room temperature, cubed 🧈
- 1 cup raisins or currants 🍇
- 1¾ cups buttermilk (shaken) 🥛
- Extra flour for dusting 🌾
- Extra buttermilk for brushing (optional) 🥛
Instructions
- Preheat the oven to 375°F (190°C). Line a baking sheet or Dutch oven with parchment paper or lightly grease a cast-iron skillet 🍳.
- In a large bowl, whisk together the flour, sugar, salt, baking powder and baking soda until evenly combined 🥣.
- Use a pastry cutter, two forks, or your fingertips to work the butter into the dry ingredients until the pieces are no larger than peas — the mixture should be crumbly 🧈.
- Stir in the raisins or currants so they’re evenly distributed through the flour mixture 🍇.
- Pour in the buttermilk and fold gently with a wooden spoon until the dough just comes together — it will be sticky. Do not overmix 🥛.
- Turn the dough out onto a generously floured surface, sprinkle a little extra flour on top, and knead only 10–12 times while shaping into a round loaf. Overworking makes the bread tough 🌾.
- Transfer the shaped loaf to the prepared baking sheet, Dutch oven, or skillet. Using a sharp knife, cut a deep “X” about 3/4″ (2 cm) into the top of the loaf. Optionally brush the top with a little extra buttermilk for color 🥛.
- Bake for 45–55 minutes, until the crust is golden brown and the loaf sounds hollow when tapped on the bottom. If the top browns too quickly, tent loosely with foil 🍞.
- Remove from the oven and let cool to room temperature on a wire rack before slicing — about 30 minutes for best texture. Serve plain or with butter, jam or honey. Enjoy! 🧈🍯