When the moon is high and the bats are out, there’s only one dessert dark enough to match the mood: Vampire Fudge. This chillingly delicious, no-bake confection is a Halloween favorite—rich, creamy, and dripping with a “bloody” red swirl that oozes like a vampire’s last sip. Perfect for haunted houses, school parties, trick-or-treat goodie bags, or a gory centerpiece at your Halloween bash, this fudge is as fun to make as it is to eat.
Inspired by classic horror themes, Vampire Fudge combines a smooth chocolate or white chocolate base with a shocking red raspberry or cherry filling that bursts through like a bite mark on the neck. It’s a playful, slightly macabre twist on traditional fudge—ideal for kids who love a little fright with their sweet.
In this comprehensive, SEO-optimized guide of over 1,500 words, we’ll explore:
- What makes Vampire Fudge so uniquely spooky
- A step-by-step recipe with a gooey “blood” center
- Creative variations (chocolate, white chocolate, layered, and adult versions)
- Tips for perfect texture and presentation
- How to serve, store, and gift
- And why this recipe is a must-have for food bloggers, parents, and seasonal content creators
Get ready to sink your teeth into a treat that’s frightfully delicious.
What Is Vampire Fudge?
Vampire Fudge is a two-layer no-bake fudge that mimics the look of a vampire’s bite—typically made with a dark chocolate or black cocoa base and a vibrant red fruit filling that oozes when cut. The red layer represents “blood,” often made from raspberry jam, cherry syrup, or flavored gelatin, and is swirled or layered to create a dramatic, gory effect.
Common versions include:
- White Chocolate Vampire Fudge with red jam “wounds”
- Chocolate Vampire Bite Fudge with cherry filling
- Layered Red & Black Fudge for a “bloody” marbled look
- Gelatin Blood Pockets that burst when bitten
It’s a no-bake, make-ahead dessert that’s perfect for:
- Halloween parties
- Classroom treats
- DIY gift boxes
- Haunted dessert tables
And because it’s so easy to customize, it’s a hit with kids and adults alike—especially those who love a little theatrical horror with their sugar.
Why Vampire Fudge Is a Halloween Must-Have
1. Spooky & Shareable
The “bloody” red swirl makes it instantly eye-catching and perfect for themed parties.
2. No-Bake Convenience
No oven needed—ideal for busy parents, classrooms, or hot kitchens.
3. Kid-Friendly & Fun to Make
Let kids help swirl the “blood” or press candy teeth into the top.
4. Affordable & Scalable
Ingredients are inexpensive, and one batch feeds a crowd.
5. Highly Customizable
Switch up colors, flavors, and decorations to match any vampire theme.
Vampire Fudge Recipe (No-Bake, Two-Layered “Bite” Style)
Prep Time: 20 minutes
Chill Time: 3–4 hours
Total Time: ~4.5 hours
Servings: 36 small squares
Difficulty: Easy
Dietary Note: Vegetarian (can be made gluten-free or vegan with substitutions)
Ingredients:
For the Chocolate Base (Vampire Skin):
- 3 cups white chocolate chips (for pale “skin”)
OR - 2 cups dark chocolate chips + 1 tbsp black cocoa powder (for a gothic look)
- 1 can (14 oz) sweetened condensed milk
- 2 tbsp unsalted butter
- 1 tsp vanilla extract
For the “Blood” Filling:
- ½ cup seedless raspberry jam, cherry preserves, or strawberry syrup
- 1–2 drops red food coloring (optional, for intensity)
- 1 tsp lemon juice (to enhance tartness)
Optional Decorations:
- Candy vampire teeth (available at party stores)
- Edible black food coloring (for dark accents)
- Crushed cookies (for “dirt” or texture)
- Plastic fangs or spiderwebs (for display only)
Step-by-Step Instructions:
1. Prepare the Pan
- Line an 8×8-inch baking pan with parchment paper, leaving overhang for easy removal.
- Lightly grease if needed.
2. Melt the Chocolate Base Choose your version:
White Chocolate Vampire Fudge (Classic)
- In a microwave-safe bowl, combine white chocolate chips, sweetened condensed milk, butter, and vanilla.
- Heat in 30-second intervals, stirring between each, until smooth (about 1.5–2 minutes).
- Pour into the prepared pan and spread evenly.
- Refrigerate for 30–45 minutes until set but still slightly soft.
Dark Chocolate Vampire Fudge (Gothic Version)
- Melt dark chocolate, condensed milk, butter, and black cocoa powder using the same method.
- Pour and chill as above.
3. Add the “Blood” Layer
- In a small bowl, warm the jam or preserves with lemon juice and red food coloring (if using) until runny.
- Pour over the chilled chocolate base.
- Use a knife or skewer to swirl the red layer into the white or dark chocolate—creating a “bite mark” or blood-splatter effect.
- For a clean bite look, press two candy vampire teeth into the top before chilling.
4. Chill to Set
- Refrigerate for 2–3 hours, or until firm and easily cut.
5. Cut & Serve
- Lift fudge out using parchment overhang.
- Cut into 1-inch squares with a sharp knife.
- Wipe the knife between cuts for clean edges.
- Press a set of candy teeth into each square for extra drama (optional).
Tips for Perfect Vampire Fudge
- Use high-quality chocolate chips: They melt smoother and taste better.
- Don’t overheat: Microwave in short bursts to avoid grainy texture.
- Chill the base before adding blood: Prevents the layers from blending too much.
- Warm the jam slightly: Ensures it drizzles easily and creates a gooey effect.
- Add food coloring carefully: A little goes a long way—start with 1 drop.
- Use candy teeth: Available at Halloween stores or online—press in before the fudge fully sets.
Creative Variations to Try
Make your fudge uniquely terrifying:
1. Bloody Brain Fudge
- Use white chocolate base.
- After chilling, score the top with a knife in a brain-like pattern.
- Drizzle with red syrup or raspberry jam “blood.”
2. Vegan Vampire Fudge
- Use dairy-free white chocolate chips and vegan sweetened condensed milk (or homemade coconut version).
- Choose fruit-based jam and plant-based food coloring.
3. Gluten-Free Vampire Fudge
- Ensure chocolate chips and candies are certified gluten-free.
- Use GF jam and decorations.
4. Layered Vampire Bite Fudge
- Pour half the chocolate base, chill, add blood layer, then top with remaining chocolate.
- Creates a clean “bite” when sliced.
5. Adult Vampire Fudge
- Add 1–2 tbsp of chambord, grenadine, or vodka to the red layer for a boozy twist.
- Label clearly for adult-only events.
6. Black & Red Swirl Fudge
- Mix black cocoa into half the white chocolate for a dark swirl.
- Swirl with red jam for a dramatic marbled effect.
7. Mini Vampire Fudge Bites
- Use a mini muffin tin lined with paper liners.
- Bake time: chill 2 hours.
- Perfect for treat bags.
Why This Recipe Is Perfect for Food Bloggers & SEO
If you’re a food blogger, recipe developer, or content creator, Vampire Fudge is a high-traffic, seasonal SEO goldmine. Here’s why:
1. High Seasonal Search Volume
Keywords like “vampire fudge recipe,” “bloody Halloween fudge,” and “no-bake vampire treats” spike every August through October. Ranking for these can bring thousands of visitors.
2. Long-Tail Keyword Opportunities
Target low-competition, high-intent phrases:
- “Easy vampire bite fudge with candy teeth”
- “No-bake bloody fudge for kids”
- “White chocolate vampire fudge recipe”
- “Gluten-free Halloween fudge with jam”
- “DIY vampire party desserts”
3. Pinterest & Social Media Magnet
This fudge is incredibly photogenic—white or dark fudge with red swirls is perfect for:
- Pinterest pins
- Instagram Reels (show the swirling and “bite” effect)
- TikTok “Halloween treat hack” videos
- YouTube shorts for party planners
4. Affiliate Marketing Potential
Promote:
- Quality chocolate chips
- Halloween jam or syrups
- Candy vampire teeth
- Baking pans and parchment paper
5. Link-Worthy for Roundups
This recipe is likely to be featured in:
- “Top 20 Spooky Halloween Treats”
- “Best No-Bake Desserts for Kids”
- “DIY Halloween Party Favors” Earning you valuable backlinks and authority.
Serving & Packaging Ideas
Make your fudge unforgettable:
- Treat Bags: Place 2–3 squares in cellophane with a bat sticker or spider ring.
- Gift Boxes: Layer in a coffin-shaped tin with a “Beware: May Cause Cackling” tag.
- Dessert Table: Arrange on a black tray with dry ice (for fog effect—use safely).
- Label It: Use a sign:
“Warning: Contains 100% Real Blood (Flavor)”
Storage & Make-Ahead Tips
- Refrigerator: Store in an airtight container for up to 2 weeks.
- Freezer: Wrap tightly and freeze for up to 3 months. Thaw in the fridge.
- Make Ahead: Prepare 3–5 days in advance—fudge keeps well.
- Room Temperature: Only for 1–2 days (in cool weather).
Safety & Allergy Tips
- Choking Hazard: Candy teeth are not edible—remove before eating or use edible versions.
- Check Labels: Some jams contain allergens or gelatin.
- Food Coloring: Use plant-based dyes if needed.
- Supervise Kids: Especially when using non-edible decorations.
Conclusion: A Sweet, Spooky Staple
Vampire Fudge is more than just a dessert—it’s a fun, festive, and flavorful tradition that brings Halloween magic to life. With its creamy texture, dramatic red swirl, and playful presentation, it’s the kind of treat that makes kids giggle and adults reach for seconds.
Whether you’re making it with your kids, handing it out at a party, or using it as a centerpiece, this fudge is guaranteed to impress.
And for content creators, it’s a seasonal SEO powerhouse—easy to rank for, highly shareable, and endlessly customizable.
So grab your chocolate, warm the jam, and get ready to create a dessert that’s truly to die for.
Recipe Summary: Vampire Fudge
Prep Time: 20 mins
Chill Time: 3–4 hours
Total Time: ~4.5 hours
Servings: 36 squares
Calories: ~110 per square (varies by base)
Ingredients:
- 3 cups white or dark chocolate chips
- 1 can sweetened condensed milk
- 2 tbsp butter
- ½ cup red jam (raspberry, cherry)
- Optional: candy vampire teeth
Instructions:
- Melt chocolate base and pour into pan.
- Chill 30 mins.
- Swirl in warmed red jam.
- Chill, cut, and decorate.
Pro Tip: Add a drop of almond extract to the chocolate for a deeper, mysterious flavor!
Print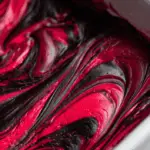
Vampire Fudge: A Spooktacular, No-Bake Halloween Treat with a Bloody Twist
Ingredients
• 3 cups semi-sweet chocolate chips • 1 can (14oz) sweetened condensed milk • ¼ cup butter • 1 tsp vanilla extract • Red food coloring • White chocolate chips • Candy eyeballs • Red licorice strings • Black decorating gel • Halloween sprinkles
Instructions
- Line 8×8 inch pan with parchment paper
- In medium saucepan, combine chocolate chips, condensed milk, and butter
- Cook over low heat, stirring constantly until smooth
- Remove from heat and stir in vanilla extract
- Add red food coloring until desired “bloody” color
- Pour fudge into prepared pan
- Refrigerate 30 minutes until partially set
- Melt white chocolate chips for decoration
- Add candy eyeballs and Halloween sprinkles
- Cut red licorice into small pieces for “blood”
- Use black decorating gel to draw vampire faces
- Refrigerate 2 hours until completely set
- Remove from pan and cut into squares
- Store covered in refrigerator
PREP TIME & NUTRITION: Prep Time: 20 mins, Cook Time: 10 mins, Total Time: 2 hours 30 mins, Servings: 16, Calories: 180, Net Carbs: 22g, Fats: 12g, Protein: 3g