Introduction
A warm, nostalgic dinner that brings everyone to the table.
- This recipe channels the soul of rustic home cooking, offering a satisfying balance of savory richness and silky comfort.
- It’s the kind of dish that’s part memory, part ritual — the sort you serve when you want both nourishment and a gentle dose of culinary reassurance.
Why this piece of home-cooking stands out.
- There’s an approachable technique at its heart: building a robust filling and crowning it with a cloud of mashed topping that browns beautifully in the oven.
- It’s forgiving to cooks of all levels — a forgiving structure that rewards attention to seasoning and texture more than precision.
How I write about it as a food writer.
- I focus on the contrasts: the deep, savory base versus the tender, pillowy topping, and how simple techniques amplify flavor.
- Throughout this article you’ll find guidance on technique, texture, and small adjustments that elevate an everyday casserole into a memorable family centerpiece.
What to expect as you read on.
- Clear, experience-driven notes on cooking methods.
- Practical serving and make-ahead strategies for busy nights.
- Answers to the most common questions I get from readers recreating this kind of dish at home.
Why You’ll Love This Recipe
Comfort without fuss.
- The structure of the dish is inherently comforting: a deeply flavored base topped with a tender, golden crust. It satisfies cravings for warmth, umami, and creamy texture in one bite.
- It’s versatile — it adapts to seasonal produce, pantry staples, and small ingredient swaps while maintaining the signature profile that makes it beloved.
Family friendly and crowd-pleasing.
- It’s a generous, shareable format that scales easily for extra mouths without adding complexity.
- The dish holds well: it stays cozy and comforting on the table, making it ideal for casual dinners and potlucks where folks serve themselves from a central dish.
Technique-forward but approachable.
- The most important wins come from mastering a few simple techniques — building fond, reducing a sauce, and getting the mash silky — rather than from complicated steps.
- I’ll share small ideas for boosting flavor and texture without creating barriers for home cooks.
Emotional payoff.
- It’s the kind of recipe that becomes a staple: a dish you instinctively reach for when you want to comfort someone or celebrate the simple joy of a cozy meal.
Flavor & Texture Profile
A study in contrast and balance.
- Expect a savory, slightly caramelized base that carries deep, meaty notes framed by bright, aromatic accents. That contrast keeps each bite interesting.
- The topping provides a creamy, airy counterpoint that also delivers a satisfying browned surface — a pleasant textural interplay that’s essential for comfort dishes.
Texture dynamics to aim for.
- A filling with discernible pieces gives the dish body; you want soft vegetable bites and tender fragments rather than a completely uniform purée.
- The mashed layer should be smooth but not gluey — lightened enough to create a cloud-like mouthfeel, with edges that crisp under heat.
How seasoning and finish influence perception.
- Seasoning at multiple stages ensures depth: a well-seasoned base is the backbone; a final adjustment at the end lifts the whole assembly.
- A finishing touch — grated cheese, a scattering of fresh herb, or a knob of butter before baking — introduces a final layer of aroma and a gilded texture that makes the top irresistible.
A sensory snapshot.
- On the plate you get gentle steam and herb aromatic notes, a savory mouth-coating sauce, pops of sweet vegetable texture and the soft, buttery finish from the mashed layer.
Gathering Ingredients
Organize before you start: mise en place makes a smooth cook.
- Measure and arrange everything so each step flows without interruption.
- Place perishable items in the coolest place of your prep area until used; this helps maintain texture and flavor.
Ingredient list (complete and exact).
- 500g ground lamb
- 1 large onion, finely chopped
- 2 carrots, diced
- 150g frozen peas
- 2 cloves garlic, minced
- 2 tbsp tomato paste
- 1 tbsp Worcestershire sauce
- 1 cup beef or lamb stock
- 1 tbsp flour
- 2 tbsp olive oil
- 1 sprig rosemary, chopped
- Salt and black pepper
- 900g potatoes, peeled and chopped
- 50g butter
- 100ml milk
- 50g grated cheddar (optional)
Practical shopping and prep notes.
- Choose a cut of ground meat with a bit of fat — it carries flavor into the sauce. If you prefer leaner protein, be ready to adjust seasoning and add a splash of stock to keep the filling glossy.
- For the potatoes, starchy varieties produce a lighter mash; waxy types yield a denser texture. Your choice affects the mouthfeel of the top layer.
- If using grated cheese, have it finely shredded so it melts evenly into the mash during baking.
Preparation Overview
A clear roadmap keeps the assembly calm and confident.
- Start by cooking the topping component until tender and mash-ready; meanwhile, build a deeply flavored base in a roomy skillet.
- The sequence is designed so that both components are hot and ready to assemble together — timing and temperature alignment matter for texture and browning.
Key technique checkpoints.
- Develop fond: allow the base to brown in the pan to create caramelized bits that dissolve into flavor as you deglaze and reduce.
- Thicken judiciously: the sauce should coat a spoon without being gluey; it will continue to set beneath the topping during baking.
- Mash texture: aim for a creamy but aerated mash; overworking can produce a pasty finish, while under-seasoning will yield a flat top layer.
Timing and multitasking tips.
- Use the potato simmer time to sweat aromatics and cook vegetables for the base; this parallel work shortens active time and keeps ingredients hot for assembly.
- If short on hands, prepare the mash slightly ahead and keep it warm in a covered bowl, then revive its silkiness with a small splash of warmed milk before assembly.
Equipment that helps.
- A large, heavy skillet for even browning.
- A sturdy baking dish with enough surface area for an even mash layer.
- An offset spatula or spoon for neat topping and textural finishing.
Cooking / Assembly Process
Step-by-step instructions for confident execution.
- Preheat the oven to the temperature specified and prepare a suitable baking dish so it’s ready when the components are finished.
- Cook the potatoes in salted water until tender; drain thoroughly and return to the pot. Mash with the specified amount of butter and milk until smooth, then season to taste. If using cheese, fold or sprinkle as directed before topping.
- While the potatoes cook, heat the olive oil in a large skillet over medium heat. Add the chopped aromatics and diced vegetables and soften until they release their sweetness. Add the minced aromatic and cook briefly until fragrant.
- Increase the heat and add the ground protein; brown thoroughly, breaking it up so it develops color and texture. Stir in the flour and cook briefly, then mix in the concentrated tomato element and the savory sauce component.
- Pour in the stock and add the chopped herb. Simmer gently until the liquid reduces and the mixture thickens to a sauce-like consistency. Stir in the frozen peas to heat through, then remove from the heat and adjust seasoning.
- Spoon the hot meat mixture into the prepared baking dish. Using a spoon or an offset spatula, evenly spread the mashed topping over the filling so it seals to the edges; if desired, create texture or ridges that will brown attractively.
- If a cheese finish is chosen, sprinkle it evenly over the mashed surface. Bake in the preheated oven until the topping is golden and the filling is bubbling at the edges. Allow the assembled dish to rest briefly before serving so the layers settle for neater portions.
Process-focused tips as you cook.
- Don’t rush browning — color translates directly into flavor. Take a moment to let the pan develop those flavorful bits before deglazing and simmering.
- When thickening, cook the flour briefly to lose any raw edge; this improves mouthfeel and prevents pasty flour notes.
- Spread the topping while both components are hot; this ensures cohesion between layers and promotes a pleasing golden finish.
Serving Suggestions
Simple accompaniments for maximal comfort.
- A crisp, lightly dressed green salad offers a bright, acidic counterpoint that cuts through the dish’s richness.
- Steamed seasonal greens tossed with a splash of lemon and a pat of butter provide color and a gentle bitter contrast.
- Crusty bread is useful for sopping up any juices and makes the meal feel even more communal.
Plating and portion tips.
- Let the dish rest briefly after baking to allow the filling to set slightly; this yields cleaner serving slices and a better textural experience.
- Serve in generous family-style portions from the baking dish so guests can choose the ratio of topping to filling they prefer.
Flavor finishing ideas.
- A scattering of finely chopped fresh herb right before serving adds bright aroma that livens each bite.
- A small drizzle of a good-quality finishing oil or a tiny knob of butter on top of the hot mash amplifies shine and mouthfeel.
Storage & Make-Ahead Tips
Plan ahead to save time without sacrificing flavor.
- You can prepare the filling a day ahead and chill it; reheat gently before assembly to remove excess moisture and concentrate flavor again.
- The mashed topping also stores well in the refrigerator for a day; revive its silkiness with a splash of warmed milk or a little melted butter before using.
Freezing and reheating advice.
- Fully assembled pies freeze well when wrapped tightly; to reheat from frozen, allow extra time in the oven at moderate temperature until heated through and the top is golden.
- If reheating individual portions, cover loosely to prevent the mash from drying and reintroduce a splash of liquid if the filling seems reduced.
Make-ahead workflow that preserves texture.
- Cook and cool components quickly to limit time in the temperature danger zone; chill promptly if not using the same day.
- Assemble just before baking when possible to preserve the contrast between a crisped top and a moist filling.
Safety and quality notes.
- Store leftovers in airtight containers and consume within a few days for best flavor and texture.
Frequently Asked Questions
Q: Can I make substitutions for dietary preferences?
- A: Yes — swap to a preferred ground protein or use a plant-based meat alternative following the same method. Adjust seasoning and fat levels to match the new ingredient’s profile.
Q: How do I prevent a watery filling?
- A: Reduce the sauce until it coats a spoon and avoid adding extra liquid at the end. If the vegetables release water, cook a little longer to evaporate excess moisture before assembly.
Q: What’s the best potato for topping?
- A: Starchy potatoes usually produce fluffier mash; waxy potatoes create a denser finish. Choose according to your textural preference.
Q: Can I prepare this in advance?
- A: Absolutely — components can be made ahead and assembled before baking; freezing assembled pies is also an excellent option for longer storage.
Q: How do I get a golden, textured top?
- A: Use an offset spatula to create ridges in the mash that catch heat and brown; a sprinkle of grated cheese or a light butter brush can enhance browning.
Q: Any final tips for success?
- A: Focus on seasoning in layers, allow the base to develop color, and take care with the mash texture — these small attentions yield disproportionately good results.
Q: Still have a question?
- A: If there’s anything else you’d like to tweak — ingredient swaps, oven differences, or portion scaling — ask away and I’ll share practical adjustments drawn from testing in a home kitchen.
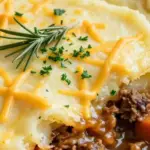
Classic Shepherd’s Pie
Ingredients
- 500g ground lamb 🐑
- 1 large onion, finely chopped 🧅
- 2 carrots, diced 🥕
- 150g frozen peas 🟢
- 2 cloves garlic, minced 🧄
- 2 tbsp tomato paste 🍅
- 1 tbsp Worcestershire sauce 🍶
- 1 cup beef or lamb stock 🥣
- 1 tbsp flour 🌾
- 2 tbsp olive oil 🫒
- 1 sprig rosemary, chopped 🌿
- Salt 🧂 and black pepper 🌶️
- 900g potatoes, peeled and chopped 🥔
- 50g butter 🧈
- 100ml milk 🥛
- 50g grated cheddar (optional) 🧀
Instructions
- Preheat the oven to 200°C (390°F).
- Boil the potatoes in salted water until tender, about 15–20 minutes.
- Meanwhile, heat olive oil in a large skillet over medium heat. Add the chopped onion and diced carrots; cook until softened, about 6–8 minutes.
- Add the minced garlic and cook 1 minute until fragrant.
- Increase heat to medium-high and add the ground lamb. Brown the meat, breaking it up with a spoon, until no longer pink.
- Stir in the flour and cook 1 minute, then mix in the tomato paste and Worcestershire sauce.
- Pour in the stock, add chopped rosemary, salt and pepper. Simmer gently for 8–10 minutes until the sauce thickens. Stir in the frozen peas and remove from heat.
- Drain the potatoes and mash with butter and milk until smooth. Season with salt and pepper to taste.
- Spoon the meat filling into a baking dish and spread the mashed potatoes evenly on top. If using, sprinkle grated cheddar over the mash.
- Bake in the preheated oven for 20–25 minutes, or until the top is golden and filling is bubbling.
- Let rest 5 minutes before serving. Garnish with a little chopped parsley or extra rosemary if desired.