Few things rival the aroma of freshly baked bread filling the kitchen—especially when that bread is a crusty no-knead olive bread with a crackling crust, airy interior, and bursts of briny olive flavor in every bite. This rustic loaf delivers bakery-quality results with minimal effort, no kneading, and simple pantry ingredients.
Perfect for beginners and experienced bakers alike, no-knead olive bread proves that exceptional bread doesn’t require special equipment or complicated techniques. Time does the work, allowing gluten to develop naturally and flavor to deepen beautifully.
This guide walks you through everything you need to know to make perfect crusty olive bread at home, including ingredients, step-by-step instructions, expert tips, variations, serving ideas, and storage advice.
Why No-Knead Olive Bread Is So Popular
No-knead bread has revolutionized home baking because it offers:
- Crisp, crackly artisan crust
- Soft, airy interior with open crumb
- Minimal hands-on time
- No mixer or kneading required
- Foolproof results
- Deep, slow-fermented flavor
Adding olives elevates the loaf with savory complexity, making it ideal for appetizers, sandwiches, and Mediterranean meals.
What Is No-Knead Bread?
No-knead bread relies on high hydration and long fermentation rather than physical kneading. Over time, gluten forms naturally, producing a strong dough structure without effort.
This method was popularized by artisan bakers and adapted for home kitchens, often baked in a covered Dutch oven to trap steam and create a professional-quality crust.
Why Olives Are Perfect for Rustic Bread
Olives add:
- Salty, savory depth
- Moisture to the crumb
- Mediterranean character
- Visual appeal
- Pairing versatility
Kalamata, Castelvetrano, or green olives all work beautifully, depending on your flavor preference.
Ingredients for Crusty No-Knead Olive Bread
Basic Ingredients
- 3 cups all-purpose flour (or bread flour)
- 1½ teaspoons salt
- ½ teaspoon instant or active dry yeast
- 1½ cups warm water
- ¾ cup olives, pitted and roughly chopped
- 1 tablespoon olive oil (optional)
Optional Add-Ins
- Fresh rosemary or thyme
- Roasted garlic
- Lemon zest
- Cracked black pepper
Best Olives for Olive Bread
- Kalamata: Rich, briny, bold
- Green olives: Mild, buttery
- Castelvetrano: Sweet and delicate
- Mixed olives: Complex flavor profile
Drain olives well and pat dry to prevent excess moisture.
Step-by-Step Instructions
Step 1: Mix the Dough
In a large bowl, combine flour, salt, and yeast. Add warm water and mix with a spoon or spatula until a shaggy dough forms. Fold in chopped olives.
The dough will be sticky and rough—this is exactly what you want.
Step 2: First Rise (Long Fermentation)
Cover the bowl loosely with plastic wrap or a towel. Let the dough rest at room temperature for 12–18 hours.
During this time, the dough will rise, bubble, and develop complex flavor.
Step 3: Shape the Dough
Turn the dough onto a floured surface. With floured hands, gently fold it over itself once or twice to form a loose ball. Do not knead.
Let rest for 30–45 minutes on parchment paper.
Step 4: Preheat the Oven and Dutch Oven
Place a Dutch oven (with lid) into the oven and preheat to 450°F (230°C) for at least 30 minutes.
The hot vessel creates steam, essential for a crusty loaf.
Step 5: Bake the Bread
Carefully transfer the dough (on parchment) into the hot Dutch oven. Cover and bake for 30 minutes.
Remove the lid and bake an additional 10–15 minutes, until deeply golden and crusty.
Step 6: Cool Completely
Transfer bread to a wire rack and cool for at least 1 hour before slicing. Cutting too early can result in a gummy crumb.
What Makes the Crust So Crispy?
The secret lies in:
- High hydration dough
- Steam trapped by the Dutch oven
- High baking temperature
- Proper cooling time
These factors mimic professional steam-injected ovens.
Texture and Flavor Profile
Perfect no-knead olive bread should be:
- Crackly, blistered crust
- Light, airy interior
- Open crumb with irregular holes
- Balanced saltiness
- Fragrant with olive aroma
Expert Tips for Perfect Olive Bread
- Weigh flour for accuracy if possible
- Use room-temperature fermentation
- Don’t rush the rise
- Handle dough gently
- Bake until deeply golden
Flavor Variations to Try
Rosemary Olive Bread
Add 1–2 tablespoons chopped fresh rosemary.
Garlic Olive Bread
Fold in roasted garlic cloves.
Cheese Olive Bread
Add grated parmesan or pecorino.
Spicy Olive Bread
Add chili flakes or chopped chili olives.
Whole Wheat Olive Bread
Replace up to 30% of flour with whole wheat.
How to Serve Crusty Olive Bread
This bread shines in many ways:
- Dipped in olive oil and balsamic
- Served with cheese boards
- Paired with soups and stews
- Used for sandwiches or panini
- Toasted with butter or hummus
- Alongside Mediterranean dishes
Storage and Make-Ahead Tips
Room Temperature
Store loosely wrapped for 2 days.
Freezing
Freeze whole or sliced bread for up to 3 months.
Reheating
Recrisp in a 375°F oven for 8–10 minutes.
Avoid refrigeration—it dries the bread.
Common Mistakes and How to Avoid Them
Dense crumb: Dough didn’t ferment long enough
Flat loaf: Over-proofed or weak flour
Burned bottom: Oven too hot or pan too thin
Gummy interior: Sliced too soon
Nutritional Notes
Olive bread provides carbohydrates for energy and healthy fats from olives and olive oil. It’s naturally dairy-free and can easily be made vegan.
Frequently Asked Questions
Q1: Can I shorten the rise time?
Long fermentation is essential for texture and flavor.
Q2: Can I make this without a Dutch oven?
Yes, but crust quality will be reduced. Use a covered oven-safe pot if possible.
Q3: Can I use sourdough starter?
Yes—replace yeast with starter and adjust hydration.
Q4: Why is my dough so sticky?
High hydration is necessary for an open crumb.
Q5: Can I add herbs or cheese?
Absolutely—fold them in during mixing.
Why This Recipe Works
- Long fermentation builds flavor
- No kneading simplifies the process
- High heat creates artisan crust
- Olives add moisture and depth
- Foolproof method with consistent results
This recipe delivers professional-quality bread with minimal effort.
Conclusion
Crusty No-Knead Olive Bread is proof that incredible artisan bread is achievable at home—no kneading, no mixer, no stress. With its crackling crust, airy crumb, and savory olive flavor, this loaf belongs at the center of any table.
Once you try it, it will become a staple in your baking rotation.
Print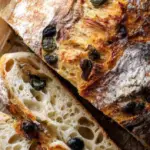
Crusty No-Knead Olive Bread: Artisan Bakery Bread Made Effortlessly at Home
Ingredients
• 3 cups (375g) bread flour (or 2¾ cups all-purpose + ¼ cup whole wheat for depth)
• 1½ tsp (5g) instant yeast
• 1¼ tsp sea salt
• 1¼ cups (300ml) cool water
• ¾ cup pitted Kalamata or mixed olives, chopped (pat dry!)
• 1 tbsp fresh rosemary, finely chopped
• 1 tbsp olive oil (for bowl)
• Cornmeal or semolina (for dusting)
Instructions
- Mix (5 min): In a large bowl, whisk flour, yeast, and salt. Stir in water until shaggy dough forms. Cover with plastic; rest 30 min (autolyse—boosts rise & flavor).
- Fold in olives & herbs: Sprinkle olives and rosemary over dough. With wet hands, fold dough over itself 4–5 times to incorporate—don’t overmix; streaks are fine!
- First rise: Drizzle bowl with oil. Place dough in, turning to coat. Cover; rest at room temp 1–2 hours.
- Cold ferment (flavor secret!): Refrigerate 12–48 hours. (The longer, the more complex and easier to digest!)
- Shape & second rise: Turn dough onto floured surface. Gently shape into a round or oval. Place seam-side up in a floured proofing basket or bowl lined with a floured towel. Cover; rest at room temp 1.5–2 hours until puffy.
- Bake:
• Preheat Dutch oven (lid on) at 450°F (230°C) for 30 min.
• Turn dough onto parchment. Score top with a sharp knife or razor.
• Lower into hot pot (use parchment to lift). Cover; bake 25 min.
• Remove lid; bake 15–20 min more until deep golden and hollow-sounding when tapped. - Cool completely on a rack—crust crisps as it cools!
PREP TIME & NUTRITION :
Prep Time: 10 min (+16–50 hr ferment/rest) | Cook Time: 45 min | Total Time: ~24 hrs (mostly hands-off!)
Servings: 10 slices
Calories: 170 | Net Carbs: 28g | Fats: 4g | Protein: 6g