Introduction
An approachable weeknight classic
As a professional food writer who cooks for real life, I love recipes that deliver maximum comfort with minimal fuss. This pan-fried chicken is exactly that: a simple skillet technique that turns everyday chicken breasts into a buttery, garlicky centerpiece with a bright finish. The method emphasizes crisp exterior, tender interior, and an aromatic butter sauce that you spoon over the meat for instant flavor elevation.
I’ll walk you through my favorite practical touches — from why even thickness matters to the small timing and heat-management steps that help anyone get consistent results. Expect honest observations, sensory cues to watch for while cooking, and easy ways to tweak the recipe to your pantry or mood. This introduction sets the scene: think sizzling butter, fragrant garlic, a hit of lemon, and parsley for freshness. The tone is relaxed, helpful, and focused on making this feel like a restaurant-quality dish you can plate at home without fuss.
What I love most about this preparation is its adaptability: it pairs beautifully with grains, greens, or potatoes, and scales up for guests. Read on for a clear ingredient list, a step-by-step guide, and tips to keep the meat juicy and perfectly seared every time.
Why You’ll Love This Recipe
Straightforward technique, big payoff
This recipe is a weeknight hero because it balances speed with a striking flavor profile. The method focuses on three pillars: an even sear, aromatic butter and garlic, and a bright finish that cuts through richness. These elements combine to create a dish that feels indulgent without a long ingredient list or complex steps.
Beyond the flavor, the recipe excels at producing consistent texture: the exterior develops a caramelized crust while the interior remains tender when the meat is handled properly. For busy cooks, the technique is forgiving — small adjustments to heat and basting deliver reliable results — and it translates well to different serving styles. I also appreciate how this approach highlights pantry staples: butter, garlic, olive oil, lemon, and parsley transform plain chicken into something special.
From a practical standpoint, this dish:
- Uses common ingredients found in most kitchens
- Requires only one skillet for minimal cleanup
- Adapts to quick side dishes for a complete meal
These strengths make it ideal for both casual family dinners and a low-effort date-night plate. Follow the instructions in the dedicated section for exact steps; here I’ll only emphasize the sensory cues — look for a deep golden crust, fragrant garlic turning translucent (but not burnt), and butter that foams pleasantly while you baste.
Flavor & Texture Profile
What to expect on the plate
The primary flavor profile is rich and savory, anchored by browned chicken and nutty butter. When garlic is gently cooked in butter it releases a sweet, aromatic quality that becomes the dish’s signature. A squeeze of lemon at the end brightens the richness and lifts the palate, while parsley brings a fresh, herbaceous note that complements rather than competes.
Texture is equally important: the ideal bite pairs a golden, slightly crisp exterior with a juicy, tender interior. That contrast makes each mouthful interesting — the crust provides a bit of resistance before yielding to melt-in-your-mouth meat. If a light dredge of flour is used, it adds a whisper-thin crust and helps the butter cling to the surface as you baste, intensifying flavor with every spoonful.
When tasting, expect layered sensations:
- Top notes: bright lemon and fresh parsley
- Core: savory, garlicky butter and the meaty, seasoned chicken
- Finish: lingering butter richness with a hint of toasted aromatics
These components work together to create a balanced, crowd-pleasing dish that feels more elevated than the time invested.
Gathering Ingredients
Shop and prep checklist
Below is the precise ingredient list used in the recipe. Gather everything before you start to ensure a smooth, uninterrupted cooking process.
- Chicken breasts — 2 (about 500g)
- Salt — 1 tsp
- Black pepper — 1/2 tsp
- All-purpose flour — 3 tbsp (optional)
- Unsalted butter — 3 tbsp
- Olive oil — 2 tbsp
- Garlic cloves — 4, minced
- Fresh parsley — 2 tbsp, chopped
- Lemon — 1/2, juiced
- Paprika — 1/2 tsp (optional)
Pro tip: have your butter measured and ready, garlic minced, and parsley chopped before you heat the skillet — butter can go from pleasantly foaming to browned quickly, and having mise en place keeps you in control. If you choose to use the optional flour or paprika, set them in small bowls for quick access during the dredging and seasoning steps. A clean towel and a meat mallet (or heavy skillet) for gently flattening breasts to even thickness will help the chicken cook evenly. Finally, use a heavy-bottomed skillet for the best sear and consistent heat retention.
Preparation Overview
Techniques and timing mindset
Before you even heat the pan, the preparation choices you make determine the final texture. Striking the right balance between surface dryness and fat content is key: patting the meat dry and using a combination of oil and butter sets the stage for an excellent sear without burning the butter. Gentle pounding to even thickness is about uniform cooking rather than flattening — aim for consistent thickness so the meat finishes at the same time across the piece.
Work in stages: mise en place -> sear -> low-and-slow finish with basting. This flow lets the chicken develop color first, then receive the aromatics and butter for flavor inward penetration. Use visual cues instead of strict timers: look for a deep golden crust, and when you add aromatics to the pan, watch for the garlic to turn fragrant and slightly translucent rather than dark brown. Basting is more than a flourish — it bathes the exterior with flavored fat, helping the surface deepen in color and taste while keeping the interior moist.
If you opt to dredge lightly in flour, it will encourage browning and create a subtle coating that holds the butter. Maintain a steady medium-to-medium-high heat and be ready to adjust. These preparation choices are what elevate the dish from good to exceptional, and they’re simple to implement with a bit of attention.
Cooking / Assembly Process
Step-by-step instructions
- Pound chicken to even thickness and pat dry.
- Season both sides with salt, pepper and paprika.
- Lightly dredge chicken in flour, shaking off excess.
- Heat olive oil and 1 tbsp butter in a large skillet over medium-high heat.
- Add chicken and cook 4–6 minutes per side until golden and almost cooked through.
- Reduce heat to medium, push chicken to the side and add remaining butter and minced garlic.
- Spoon melted garlic butter over the chicken for 1–2 minutes until fragrant.
- Squeeze lemon juice over the chicken and sprinkle with chopped parsley.
- Remove from pan and let rest 3 minutes before serving.
Notes on execution: use a heavy skillet to maintain an even sear and keep a spoon handy for continuous basting when the butter is added. Aim for fragrant, lightly translucent garlic during the basting stage to avoid bitterness. Resting the chicken is essential to allow juices to redistribute — treat it like a brief pause that completes the cooking process rather than an optional step.
Serving Suggestions
Plating and pairing ideas
This chicken is versatile — it pairs beautifully with a range of sides depending on the mood you want to set. For a cozy, comforting plate, serve alongside buttery mashed potatoes or creamy polenta, letting the pan butter mingle with starch. For a lighter approach, pair with a crisp green salad dressed in a simple lemon vinaigrette so the brightness echoes the squeeze of lemon on the chicken.
Other great companions include roasted seasonal vegetables, herbed couscous, or a simple pilaf. If you want to create a restaurant-style plate, spoon extra garlic butter over the meat just before serving and garnish with a scatter of chopped parsley and a thin lemon wedge for a pop of color and aroma. Consider texture contrasts when composing the dish: something creamy on the plate balances the crisped exterior, while pickled or acidic elements help cut through the richness.
For beverages, a crisp white wine with citrus notes or a light-bodied rosé complements the garlic-butter profile. Non-alcoholic options like sparkling water with lemon or an herbal iced tea provide refreshing counterpoints. Ultimately, the best pairing is the one you enjoy; the chicken’s flavor profile is broad enough to support many directions, from rustic to refined.
Storage & Make-Ahead Tips
Keep it juicy and ready
If you plan to make the chicken ahead, timing and storage choices will preserve texture and flavor. Store fully cooled chicken in an airtight container in the refrigerator. To retain juiciness, tuck a small pat of butter on top before sealing — that little extra fat helps keep the meat from drying out. Reheat gently using a low oven or a covered skillet over low heat with a splash of water or broth to recreate a moist environment; avoid high heat which will toughen the meat.
For longer storage, freeze cooled chicken in a vacuum-sealed bag or tightly wrapped foil and plastic wrap. When thawing, move it to the refrigerator overnight and reheat following the gentle method above. If you plan to meal-prep components, cook the chicken and store it separately from delicate garnishes like lemon wedges and fresh herbs; add those just before serving to maintain vibrancy.
When prepping in advance, consider partial steps you can do earlier: mince garlic and chop parsley up to a day ahead, measure butter and oil, and zest or halve lemon. These small pre-prep actions shrink actual cooking time without compromising quality. Always label containers with dates and use refrigerated chicken within a few days for best texture and food safety.
Frequently Asked Questions
Common reader questions, answered
- Can I use bone-in chicken?
Yes, but bone-in pieces require longer, gentler cooking to reach a safe internal temperature without burning the exterior. Adjust heat and time accordingly and consider finishing in a lower oven. - What if I don’t have parsley?
You can substitute other fresh herbs such as chives, basil, or cilantro depending on your flavor preference; each will alter the final note slightly. - Is the flour necessary?
The flour is optional. It provides a light crust and helps the butter adhere, but skipping it results in a cleaner, lighter sear focused on the seasoned meat. - How do I avoid burning the garlic?
Add garlic when the pan is at a moderate temperature and watch closely — remove from direct high heat if it begins to brown too quickly. Basting gently while cooking helps control the contact time. - Can I make this dairy-free?
Yes, substitute a plant-based butter alternative with a high smoke point or increase olive oil and finish with a drizzle of extra virgin olive oil and lemon for richness.
Final note
If you have more questions about technique, timing, or substitutions, I’m happy to help troubleshoot — small adjustments make big differences, and I love guiding readers to exactly the texture and flavor they want.
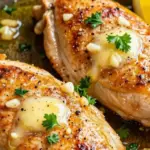
Garlic Butter Pan-Fried Chicken
Ingredients
- Chicken breasts, 2 (about 500g) 🐔
- Salt, 1 tsp 🧂
- Black pepper, 1/2 tsp 🌶️
- All-purpose flour, 3 tbsp (optional) 🌾
- Unsalted butter, 3 tbsp 🧈
- Olive oil, 2 tbsp 🫒
- Garlic cloves, 4 minced 🧄
- Fresh parsley, 2 tbsp chopped 🌿
- Lemon, 1/2 juiced 🍋
- Paprika, 1/2 tsp (optional) 🌶️
Instructions
- Pound chicken to even thickness and pat dry.
- Season both sides with salt, pepper and paprika.
- Lightly dredge chicken in flour, shaking off excess.
- Heat olive oil and 1 tbsp butter in a large skillet over medium-high heat.
- Add chicken and cook 4–6 minutes per side until golden and almost cooked through.
- Reduce heat to medium, push chicken to the side and add remaining butter and minced garlic.
- Spoon melted garlic butter over the chicken for 1–2 minutes until fragrant.
- Squeeze lemon juice over the chicken and sprinkle with chopped parsley.
- Remove from pan and let rest 3 minutes before serving.