If you’re looking for a way to reinvent the classic cheeseburger into something more portable, fun, and equally delicious, then Grilled Cheeseburger Wraps are your answer. These wraps combine all the savory, cheesy goodness of a traditional burger—ground beef, melty cheese, crisp lettuce, juicy tomatoes, and tangy pickles—but wrap it all up in a soft tortilla for an easy-to-eat handheld meal. Perfect for busy weeknights, outdoor gatherings, or even lunchboxes, these wraps bring the flavors of a cheeseburger to a convenient and customizable format. In this article, we’ll explore everything you need to know about Grilled Cheeseburger Wraps—from their flavor-packed appeal to step-by-step instructions on how to make them at home. Let’s dive into this creative twist on a timeless classic!
What Are Grilled Cheeseburger Wraps?
Grilled Cheeseburger Wraps are a hybrid dish that combines the elements of a cheeseburger with the convenience of a wrap. The filling typically consists of seasoned ground beef cooked to perfection, topped with melted cheese, fresh veggies like lettuce, tomatoes, and pickles, and finished with a drizzle of ketchup, mustard, or a special sauce. The entire mixture is wrapped in a large flour tortilla and lightly grilled or toasted until warm and slightly crispy.
This dish is perfect for those who love the flavors of a classic cheeseburger but want something easier to eat without the mess of buns. It’s also highly customizable, making it suitable for kids, adults, and anyone with dietary preferences.
Why You’ll Love Grilled Cheeseburger Wraps
There are countless reasons why this dish has become a favorite among home cooks and food lovers:
- Portable and Mess-Free : No need for plates or utensils—just grab and go.
- Customizable : Add your favorite toppings like onions, jalapeños, bacon, or avocado for a personalized touch.
- Quick and Easy : With simple ingredients and minimal prep time, this recipe is perfect for busy days or last-minute meals.
- Kid-Friendly : Kids love the familiar flavors of a cheeseburger in a fun, wrap format.
- Great for Meal Prep : Assemble the wraps ahead of time and grill or toast them just before serving.
- Versatile : Serve as a main dish, appetizer, or even cut into slices for party-friendly pinwheels.
Health Benefits of Grilled Cheeseburger Wraps
While these wraps are indulgent, there are ways to incorporate nutritious elements without sacrificing flavor:
- Lean Ground Beef : Opt for lean or extra-lean ground beef to reduce saturated fat while maintaining protein content.
- Whole Grain Tortillas : Use whole wheat or grain-free tortillas to boost fiber and nutrients.
- Load Up on Veggies : Add nutrient-rich vegetables like spinach, bell peppers, or shredded carrots for added vitamins and fiber.
- Portion Control : Serve smaller wraps or pair them with a side salad for a balanced meal.
To make this recipe healthier, consider using reduced-fat cheese, adding Greek yogurt to the sauce, or skipping the grilling step for a lighter option.
Ingredients You’ll Need
Here’s what you’ll need to create mouthwatering Grilled Cheeseburger Wraps:
For the Filling:
- Ground Beef : Lean ground beef works best for a healthier option.
- Cheese : Slices of cheddar, American, or pepper jack for gooey goodness.
- Lettuce : Crisp iceberg or romaine for freshness.
- Tomatoes : Sliced for juiciness.
- Pickles : Dill or sweet pickles for tangy crunch.
- Onions (Optional) : Sautéed or raw for extra flavor.
For the Sauce:
- Ketchup and Mustard : Classic cheeseburger condiments.
- Special Sauce : Mix mayo, ketchup, relish, and a splash of vinegar for a creamy, tangy topping.
For the Wrap:
- Large Flour Tortillas : Soft and pliable for easy rolling.
- Butter or Olive Oil : For grilling or toasting the wraps.
Step-by-Step Recipe Guide
Cooking the Beef
- Season the Beef : In a skillet over medium heat, cook the ground beef until browned, breaking it into small pieces with a spatula. Season with salt, pepper, garlic powder, and onion powder.
- Drain Excess Fat : Remove excess grease from the skillet to keep the wraps lighter.
Preparing the Wraps
- Warm the Tortillas : Heat the tortillas in a dry skillet or microwave to make them pliable and prevent cracking.
- Layer the Ingredients : Spread a spoonful of sauce onto each tortilla. Layer with cooked beef, cheese slices, lettuce, tomatoes, pickles, and onions (if using).
Rolling the Wraps
- Fold and Roll : Fold the sides of the tortilla inward, then roll tightly from the bottom to form a compact wrap.
- Secure the Wraps : If needed, use toothpicks to hold the wraps together during grilling.
Grilling the Wraps
- Heat the Skillet : Heat a skillet or griddle over medium heat and lightly grease with butter or oil.
- Toast Until Crispy : Place the wraps seam-side down on the skillet and cook for 2–3 minutes per side, or until golden brown and crispy.
Creative Variations
The beauty of Grilled Cheeseburger Wraps lies in their versatility. Here are some fun ideas to try:
- Spicy Kick : Add sliced jalapeños or a dash of hot sauce for extra heat.
- Bacon Lovers : Layer cooked bacon strips inside the wrap for a smoky twist.
- Veggie-Packed : Add sautéed mushrooms, zucchini, or roasted red peppers for extra nutrition.
- Gluten-Free Option : Use gluten-free tortillas to make the wraps suitable for those with dietary restrictions.
- Breakfast Version : Swap the ground beef for scrambled eggs and add breakfast sausage or hash browns for a morning-friendly twist.
Tips for Perfect Results
- Use Large Tortillas : Larger tortillas make rolling easier and ensure all the fillings stay tucked inside.
- Don’t Overfill : Too much filling can make the wraps difficult to roll and cause them to fall apart.
- Warm the Tortillas : Cold tortillas are more likely to crack. Always warm them before assembling.
- Experiment with Sauces : Try BBQ sauce, ranch dressing, or sriracha mayo for unique flavor combinations.
- Cut into Pinwheels : Slice the wraps into bite-sized pinwheels for a fun appetizer or snack option.
Serving Suggestions
Grilled Cheeseburger Wraps pair wonderfully with a variety of accompaniments:
- French Fries or Sweet Potato Fries : Serve alongside crispy fries for a classic combo.
- Side Salad : Pair with a simple green salad or coleslaw for added freshness.
- Soup or Chili : Serve with a bowl of tomato soup or chili for a hearty meal.
- Dipping Sauces : Offer extra ketchup, BBQ sauce, or cheese sauce on the side for dipping.
For a fun presentation, arrange the wraps on a platter and garnish with sesame seeds, chopped parsley, or a drizzle of sauce.
Common Mistakes to Avoid
Even simple recipes can go awry if you’re not careful. Here are some pitfalls to watch out for:
- Skipping the Warming Step : Cold tortillas are prone to cracking. Always warm them before rolling.
- Overloading the Fillings : Too much filling can make the wraps difficult to roll or cause them to burst open.
- Not Draining the Beef : Excess grease can make the wraps soggy. Drain the beef thoroughly after cooking.
- Overcooking the Wraps : Overcooking can make the tortillas too crispy and brittle. Toast just until golden.
FAQs About Grilled Cheeseburger Wraps
Q: Can I make these wraps ahead of time? A: Yes! Assemble the wraps, wrap them tightly in foil or plastic wrap, and refrigerate for up to 24 hours. Grill or toast just before serving.
Q: Can I freeze these wraps? A: Absolutely! Freeze the assembled (ungrilled) wraps in individual portions. Reheat directly from frozen in a skillet or oven.
Q: What can I use instead of ground beef? A: Substitute with ground turkey, chicken, plant-based meat alternatives, or even black beans for a vegetarian option.
Q: How do I prevent the wraps from falling apart? A: Use large, pliable tortillas, don’t overfill, and fold the sides tightly before rolling.
Conclusion
Grilled Cheeseburger Wraps are a fun, portable, and customizable twist on the classic cheeseburger—a dish that’s as easy to make as it is delicious. Whether you’re feeding a family, hosting a casual gathering, or simply craving something satisfying yet convenient, these wraps deliver on all fronts. Best of all, they’re highly adaptable, requiring just a few pantry staples and your creativity.
Ready to give them a try? Gather your ingredients, follow our foolproof guide, and prepare to wow your taste buds with this innovative take on a beloved classic. Don’t forget to share your creations with us—we’d love to hear how your Grilled Cheeseburger Wraps turned out!
By incorporating relevant keywords such as “cheeseburger wraps,” “grilled wraps,” and “portable meals” throughout the article, this piece is optimized for search engines while remaining engaging and informative for readers. Happy cooking!
Print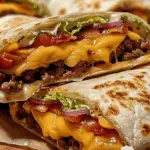
Grilled Cheeseburger Wraps: A Fun and Portable Twist on a Classic Favorite
- Total Time: 25 mins
Description
Cheesy, beefy, and loaded with classic burger flavors — these wraps are a fun, handheld twist on the all-American cheeseburger!
Ingredients
1 lb lean ground beef
4 large whole wheat or low-carb tortillas
1 cup shredded cheddar cheese
1/2 cup lettuce, shredded
1/2 cup tomato, diced
1/4 cup red onion, sliced
2 tbsp ketchup
1 tbsp mustard
1 tsp Worcestershire sauce (optional)
Salt and pepper to taste
Cooking spray or oil (for cooking)
Instructions
In a skillet over medium heat, cook ground beef until browned and cooked through. Drain excess fat.
Stir in ketchup, mustard, Worcestershire sauce (if using), salt, and pepper. Cook for 2–3 more minutes.
Remove from heat and stir in half of the cheese until melted into the beef mixture.
Warm the tortillas in a dry skillet or microwave.
Spoon equal amounts of the cheesy beef mixture onto each tortilla. Top with lettuce, tomato, onion, and a sprinkle of remaining cheese.
Fold in the sides of the tortilla and roll up tightly to form a wrap.
Optional: Grill the wraps in a pan with a little oil for a crispy finish.
- Prep Time: 10 mins
- Cook Time: 15 mins
Nutrition
- Serving Size: 4 wraps
- Calories: 320
- Fat: 14g
- Carbohydrates: 18g
- Protein: 28g