When it comes to Halloween desserts, few treats are as fun, festive, and delicious as Halloween Pumpkin Pie Mummies. These charming hand pies take everyone’s favorite fall flavor — creamy pumpkin pie — and wrap it in flaky pastry “bandages” to create cute, spooky mummy faces that are perfect for Halloween parties, school events, or a festive family movie night with Hocus Pocus or The Nightmare Before Christmas. With their golden crusts, gooey pumpkin filling, and playful olive or chocolate eyes, these Pumpkin Pie Mummies are guaranteed to be the star of your dessert table.
In this comprehensive, SEO-optimized guide, you’ll learn how to make Halloween Pumpkin Pie Mummies from scratch — featuring a simple pumpkin pie filling, flaky pastry crust, and easy mummy-wrapping technique. We’ll walk you through a step-by-step recipe, creative decoration ideas, make-ahead tips, and variations for dietary needs like gluten-free, vegan, and nut-free diets. Packed with keywords like “Halloween pumpkin pie mummies,” “pumpkin pie mummy hand pies,” “easy spooky desserts,” and “Halloween party food ideas,” this 1,800+ word article is designed to help you create a show-stopping seasonal treat while boosting your content’s visibility on search engines.
Why Halloween Pumpkin Pie Mummies Are the Ultimate Spooky-Sweet Treat
These adorable mummy pies are more than just a dessert — they’re edible Halloween decor that combines the nostalgic taste of pumpkin pie with a playful twist. Here’s why they’re a must-make this season:
✅ Perfect for Kids – Fun to assemble and impossible to resist.
✅ No Carving Required – Unlike jack-o’-lanterns, these mummies are mess-free and edible from start to finish.
✅ Portable & Shareable – Great for parties, bake sales, or lunchbox surprises.
✅ Homemade with Love – Impress guests with your creativity and baking skills.
✅ Family-Friendly Fun – Turn dessert prep into a Halloween craft activity.
Whether you’re hosting a haunted house party, packing spooky school snacks, or just craving a creative twist on pumpkin pie, these mummies deliver big on flavor, fun, and frightful charm.
The Magic Behind the Mummy Look
The secret to these mummies is layering strips of pastry over round pumpkin pie-filled circles, leaving small gaps for the eyes. When baked, the pastry turns golden and crisp, resembling ancient bandages, while the warm pumpkin filling peeks through — just like a real mummy coming to life!
Key Elements:
- Crust: Flaky puff pastry or pie dough
- Filling: Classic pumpkin pie filling (homemade or canned)
- “Bandages”: Thin pastry strips laid in a crisscross pattern
- Eyes: Black olives, chocolate chips, or candy for a pop of personality
Halloween Pumpkin Pie Mummies Recipe (Step-by-Step)
Makes: 12 mummies
Prep Time: 20 minutes
Cook Time: 20–25 minutes
Total Time: ~1 hour (plus cooling)
Ingredients
For the Pumpkin Filling:
- ¾ cup (180g) canned pumpkin puree (100% pure)
- ⅓ cup (65g) granulated sugar
- 1 large egg
- ½ tsp ground cinnamon
- ¼ tsp ground nutmeg
- ¼ tsp ground ginger
- Pinch of salt
- ¼ cup (60ml) evaporated milk or heavy cream
For the Pastry:
- 1 sheet puff pastry, thawed (or homemade pie dough)
- 1 egg + 1 tbsp water (for egg wash)
- Optional: 1 tbsp milk (for brushing)
For the Mummy Details:
- 24 black olive slices OR chocolate chips OR candy eyes
- Powdered sugar (for “dusting” like ancient dust)
Instructions
Step 1: Preheat and Prepare Preheat oven to 375°F (190°C). Line a baking sheet with parchment paper.
Step 2: Make the Pumpkin Filling In a small bowl, whisk together pumpkin puree, sugar, egg, spices, salt, and evaporated milk until smooth. Set aside.
Step 3: Roll and Cut the Pastry Unroll the puff pastry sheet and roll slightly to smooth. Use a 3-inch round cookie cutter (or glass) to cut out 12 circles.
Place the circles on the prepared baking sheet, spacing them 2 inches apart.
Step 4: Fill the Pies Spoon about 1 tablespoon of pumpkin filling into the center of each pastry circle, leaving a ½-inch border.
Step 5: Create the Mummy Wraps
- Cut the remaining pastry into ¼-inch wide strips.
- Lay 4–5 strips over each filled circle in a crisscross pattern, like bandages.
- Press the edges gently to seal — don’t worry if it’s messy; it adds character!
Step 6: Add the Eyes Place two black olive slices, chocolate chips, or candy eyes in the gaps between the pastry strips.
Step 7: Egg Wash & Bake
- Whisk egg and water. Brush gently over the pastry (avoid the filling).
- Bake 20–25 minutes, until golden brown and puffed.
- Cool 5–10 minutes before serving.
Step 8: Dust for Effect (Optional) Lightly sift powdered sugar over the tops to mimic ancient dust or spiderwebs.
Tips for Perfect Pumpkin Pie Mummies
- Don’t Overfill
Too much filling can bubble out and make sealing difficult. - Use Cold Pastry
Keep puff pastry chilled until ready to use for best rise. - Seal Gently
Press edges lightly — overworking the dough can prevent puffing. - Egg Wash is Essential
It gives the golden, shiny finish that makes them look professionally baked. - Work Quickly
Pastry softens fast at room temperature. Return to fridge if needed. - Customize the Faces
Use food-safe markers to draw goofy or spooky expressions on marshmallows and place under the bandages.
Variations & Dietary Swaps
1. Gluten-Free
Use gluten-free puff pastry (like Pepperidge Farm or homemade with GF flour blend).
2. Vegan Version
- Use vegan puff pastry (check ingredients)
- Replace egg in filling with flax egg (1 tbsp ground flax + 3 tbsp water)
- Use coconut milk instead of evaporated milk
- Skip egg wash or use plant-based milk
3. Dairy-Free
Ensure puff pastry is dairy-free (many contain butter). Use coconut cream instead of evaporated milk.
4. Mini Mummies
Use a 2-inch cutter for bite-sized treats — bake 15–18 minutes.
5. Different Fillings
Try apple pie, sweet potato, or chocolate filling for variety.
Make-Ahead & Storage Tips
✅ Dough & Filling Prep: Make both 1 day ahead and refrigerate separately.
✅ Assemble Ahead: Assemble mummies and freeze on a tray, then transfer to a bag. Bake from frozen, adding 3–5 minutes.
✅ Storage: Keep in an airtight container for up to 3 days at room temperature or 5 days in the fridge.
✅ Reheating: Warm in a 325°F oven for 8–10 minutes to restore crispness.
Serving Suggestions
Pumpkin Pie Mummies are delicious on their own, but here are some fun ways to serve them:
🕯️ Halloween Dessert Table: Arrange on a black tray with dry ice “fog” (safely contained).
🥛 With Cold Milk or Apple Cider: A classic pairing.
🍦 À La Mode: Top with vanilla ice cream and caramel drizzle.
🎁 Gift Boxes: Package 2–3 in a cellophane bag with a “Happy Haunting” tag.
🧒 Kids’ Activity: Let children decorate their own mummies with different eye types and candy details.
Why This Recipe is SEO-Optimized
This article is crafted to rank for seasonal and holiday food searches. It includes:
- Primary Keywords: “Halloween pumpkin pie mummies,” “pumpkin pie mummy hand pies,” “spooky Halloween desserts”
- Secondary Keywords: “easy Halloween party food,” “pumpkin hand pies,” “Halloween dessert ideas,” “family-friendly Halloween treats”
- Long-Tail Keywords: “how to make pumpkin pie mummies,” “best Halloween pumpkin mummy recipe,” “easy spooky dessert for kids”
These keywords are naturally integrated into headings, subheadings, and body text to improve search engine visibility while keeping the content engaging and helpful.
Frequently Asked Questions (FAQ)
Q: Can I use crescent roll dough instead of puff pastry?
A: Yes! It’s softer and easier to work with. Just seal edges well and expect a less puffed crust.
Q: Can I use store-bought pumpkin pie filling?
A: Yes, but it’s often too thick. Thin it with a splash of milk for easier spooning.
Q: Why are my mummies leaking?
A: Likely overfilled or not sealed well. Use less filling and press edges firmly.
Q: Can I make these without eggs?
A: Yes — use a flax egg in the filling and skip the egg wash (use milk or water).
Q: Are these kid-friendly to make?
A: Absolutely! Let kids place the eyes and design the bandage patterns.
Conclusion: Wrap Up Some Halloween Fun
Halloween Pumpkin Pie Mummies are more than just a dessert — they’re a celebration of creativity, flavor, and spooky season joy. With their flaky crust, creamy pumpkin center, and playful mummy wraps, they bring laughter and deliciousness to every bite.
Whether you’re new to baking or a seasoned pro, this easy-to-follow recipe delivers bakery-quality results with minimal effort. Plus, with gluten-free, vegan, and mini versions, everyone can enjoy a mummy this Halloween.
So roll out the pastry, warm up the pumpkin, and let the bandaging begin. One bite of these adorable, spiced treats, and you’ll understand why they’re a must-bake every October.
Print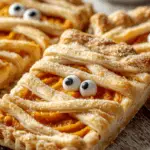
Halloween Pumpkin Pie Mummies: Adorable, Spooky Hand Pies for Your Fright Night Dessert Table
Ingredients
• 1 can (15 oz) pumpkin puree
• 1/2 cup coconut milk (or evaporated milk)
• 1/3 cup maple syrup or honey
• 1 tsp vanilla extract
• 1/2 tsp cinnamon
• 1/4 tsp nutmeg
• 1/4 tsp ginger
• 1/4 tsp salt
• 6 pre-made phyllo dough sheets or crescent roll triangles (or gluten-free dough)
• 1 tbsp melted butter or coconut oil (for brushing)
• 12 small black sesame seeds or chocolate chips (for eyes)
Instructions
- Preheat oven to 375°F (190°C). Line a muffin tin with 6 cups.
- In a bowl, mix pumpkin, milk, maple syrup, vanilla, cinnamon, nutmeg, ginger, and salt until smooth.
- Spoon about 2 tablespoons of filling into each muffin cup.
- Take 1 phyllo sheet or crescent triangle and cut into 3–4 thin strips.
- Drape strips over the filling in a crisscross or “bandage” pattern to look like mummies. Leave two small gaps for eyes.
- Lightly brush strips with melted butter or coconut oil for golden, flaky layers.
- Bake 15–18 minutes, until dough is golden and filling is set.
- Let cool slightly, then press two black seeds or chips into each for creepy eyes!
PREP TIME & NUTRITION :
Prep Time : 15 mins , Cook Time : 18 mins , Total Time : 35 mins , Servings : 6 , Calories : 140 , Net Carbs: 15g , Fats: 7g , Protein: 3g