Introduction
Bright, balanced, and effortless.
As a creator who loves bowls that travel well and make weekdays feel a little more special, I consider this recipe an everyday winner. The assembly brings together a variety of textures and contrasts that read like a small tasting menu in a single vessel. The experience is about the interplay of bright acidity, a subtle herbaceous lift, a satisfying crunch, and a creamy, salty counterpoint that brings everything together.
This bowl is designed to be approachable: it suits hurried afternoons, relaxed weekend lunches, and simple meal-prep plans. I often write recipes that prioritize technique over fuss; here you’ll find that minimal techniques yield maximum flavor. Think of this as a template that celebrates freshness and restraint — a way to enjoy layered mouthfeel without an onerous list of steps.
What you’ll notice first is the brightness of the dressing and the vibrant color contrast that makes each forkful visually inviting. The bowl also adapts well to texture swaps and pantry finds, making it useful for cooks who prefer to tweak rather than follow dogma. Throughout this article you’ll find guidance on timings, assembly mindset, and options to adapt the recipe for different meals and seasons.
Why You’ll Love This Recipe
Simple, versatile, and crowd-pleasing.
This recipe is engineered to hit several common goals: it’s quick enough for a busy day, flexible enough for weeklong rotations, and composed so each bite feels intentional. The composition balances a hearty base with lighter, more refreshing components so the bowl never feels heavy or one-note. It’s ideal for anyone who wants a single-dish meal that still manages to feel composed and nourishing.
From a practical standpoint, the strategy behind the bowl is adaptable: a neutral grain foundation supports more assertive elements, while a bright dressing ties disparate components into a cohesive whole. The contrast of textures — a tender base, crisp bites, soft creamy morsels, and a toasted crunch — keeps the palate engaged. For cooks who meal-prep, this format separates elements when needed so that textures and temperature stay optimal through the week.
Why it works on repeat: it’s easy to scale, forgiving with substitutions, and rewarding for creative cooks who like to riff. The balance of freshness and satisfying mouthfeel makes it perfect for warmer months as well as year-round when you crave something light but substantial.
Flavor & Texture Profile
A study in contrasts.
This bowl’s appeal comes from how well contrasting elements play together. There’s a bright acidic lift that cuts through richer notes, a briny component that provides savory depth, and a creamy, salty element that softens and rounds every mouthful. Layered atop a gentle, toothsome base, these flavors create a balanced profile that feels both fresh and satisfyingly complete.
Texture is equally crucial: you’ll experience a resilient base that gives just enough bite, crisp vegetal shards that add tension, tender soft components that soothe the palate, and an occasional toasty crunch for punctuation. When those textures are combined in a single forkful, the result is dynamic and engaging — every bite offers a slightly different balance depending on how you compose it.
How to read the bowl: think about bites rather than scoops. Aim to include at least two textural elements in each spoonful for interest. The dressing’s viscosity matters here — it should cling lightly so it ties components together without making the bowl soggy. Temperature contrasts also play well; a warm base against cool, crisp elements feels especially satisfying. These small details transform a simple combination into something that feels deliberate and restaurant-worthy, even when it’s prepared quickly at home.
Gathering Ingredients
Complete ingredient list for the recipe.
Below is the exact, structured list to follow when shopping or prepping. Use this list as your checklist so nothing is overlooked at assembly time.
- 1 cup cooked quinoa
- 2 cups mixed salad greens
- 1 cup cherry tomatoes, halved
- 1/2 cucumber, diced
- 1/2 red bell pepper, sliced
- 1/4 red onion, thinly sliced
- 1 cup canned chickpeas, rinsed and drained
- 1/4 cup Kalamata olives, pitted
- 50g feta cheese, crumbled
- 2 tbsp extra virgin olive oil
- Juice of 1 lemon
- 1 garlic clove, minced
- 1 tsp dried oregano
- Salt and freshly ground black pepper
- Optional: fresh parsley, chopped
- Optional: toasted pine nuts or walnuts
Shop and prep notes
When you gather these items, prioritize the freshest greens and firm tomatoes for the best texture. If you prefer extra crunch, select medium-firm produce rather than overripe varieties. For the salty, crumbly component, choose a block you can crumble by hand to preserve texture. If you’re choosing nuts for toasting, raw nuts allow you to develop that warm, fragrant note in a dry pan or oven. Store the dressing elements together if you’ll be dressing at the last minute to keep components bright and crisp.
Preparation Overview
A concise plan to streamline work at the counter.
Approach this recipe as a sequence of small tasks rather than one long chore. Organize your workspace so that all washing, chopping, and basic warm components are completed first; then move into building and dressing. When you adopt a mise en place mindset — arranging tools and elements in the order they will be used — the assembly feels swift and pleasurable rather than frantic.
Start with temperature-sensitive items: cool the warm base slightly before combining with cooler components to preserve texture. Use separate bowls for chopped colors so you can artfully arrange them during assembly rather than having to search through the fridge. If you plan to roast any items for added crunch, get that step started early so they have resting time while you prep the rest.
Tools and timing tips
A medium saucepan or rice cooker for the base, a rimmed baking sheet if you want to crisp legumes, a small bowl for the dressing, and a pair of sturdy tongs are the basics. Keep a microplane or fine grater handy for zesting if you want an extra citrus lift. These small workflow considerations make the build phase quick and ensure textures remain distinct at the moment of serving.
Cooking / Assembly Process
Step-by-step instructions for cooking and assembling the bowls.
- Prepare the base ingredient according to package or package-equivalent instructions, then allow it to cool slightly so it remains fluffy rather than clumping.
- If you prefer a toasted legume element, toss the drained legumes with a small amount of oil, season lightly, and roast on a rimmed baking sheet until golden and crisp; let them rest to retain texture.
- While warm elements cool, wash and prepare the fresh components, arranging them in separate containers for ease of assembly.
- Whisk together the dressing components in a small bowl until emulsified; taste and adjust seasoning as needed.
- To assemble, portion the base into bowls, then arrange the fresh elements in visually distinct sections before adding the roasted legume element and briny component.
- Scatter the crumbly salty component and any toasted nuts over the bowls, then finish by drizzling the dressing evenly to taste.
- Garnish with fresh herbs if using and serve immediately, or pack components separately for later assembly if meal-prepping.
Practical assembly advice
When plating for one or many, use visual contrast to guide placement — darker elements next to lighter ones create a pleasing pattern and help diners identify flavors by sight. Aim to include at least one creamy element and one crunchy element per bowl so each bite feels balanced. If you are transporting bowls, keep the dressing chilled and separate until the moment of eating to maintain crispness.
Serving Suggestions
Ways to present and pair the bowl for different occasions.
These bowls are versatile and can be dressed up or down depending on the occasion. For a casual lunch, keep everything in individual bowls and serve with a wedge of citrus on the side for an optional fresh squeeze. For a more composed dinner, arrange components neatly in wider bowls or shallow plates to emphasize color and contrast; add toasted nuts at the last second so they remain crunchy.
Consider pairing the bowls with light, complementary sides: a crisp, simple vegetable-forward starter or a modest grain-based side can round out a larger meal without overwhelming the primary dish. Wine pairings lean toward bright, acidic whites or lighter reds with moderate tannin if offering wine, while sparkling water with a slice of citrus makes an excellent non-alcoholic match.
Garnish and finishing touches
A final scattering of fresh herbs adds an aromatic lift and visual freshness. If you like a touch of heat, a small pinch of red pepper flakes or a light drizzle of a chili-infused oil can be offered on the side so diners control the intensity. For a richer finish, a small spoonful of a creamy condiment can be placed alongside to provide additional depth for those who prefer it.
Storage & Make-Ahead Tips
How to keep components fresh and textures intact.
If you plan to prepare elements ahead of time, store wet and dry components separately. Keep the dressing chilled in a sealed container to prevent wilting of crisp components. The heartier base can be prepared in advance and refreshed with a quick fluff before serving; if it tightens during storage, a splash of warm water or a brief reheat helps restore texture without overcooking.
For roasted elements meant to retain crunch, cool them completely on a wire rack before storing in an airtight container; this prevents steam from softening the exterior. Fresh components last best when kept cold and dry — line storage containers with absorbent paper if you expect moisture. Toasted nuts should be cooled fully and stored separately to prevent their oils from softening other components.
Packing for transport
When assembling bowls for lunch on the go, keep the base and fresh elements layered to avoid sogginess, and pack the dressing in a small leakproof container. Assemble only at the point of eating for the crispiest results, or toss everything together just before serving if immediate consumption is guaranteed. These small separations of components maximize quality and make weekday meal prep feel organized rather than restrictive.
Frequently Asked Questions
Common reader questions and helpful clarifications.
How adaptable is this bowl to dietary needs? The format is intentionally flexible so you can swap or omit components to suit allergies, intolerances, or preferences while retaining the overall balance of texture and acidity. If you’re avoiding dairy, choose a crumbly plant-based alternative or omit the creamy element and add a few extra toasted nuts for richness.
Can the bowl be scaled for entertaining? Yes — scale preparation by multiplying components and using wide platters to let guests build their own bowls. Keep dressings and fragile toppings separate and offer small bowls for finishing touches.
What are the best make-ahead strategies? Prepare sturdier components in advance and keep delicate items chilled and separate. Toast nuts and crisp legumes shortly before serving for the best contrast. Reheat grains gently if needed and always dress just before serving to preserve crunch.
Final note: these FAQs are intended to address practical variations and timing considerations while leaving the core technique flexible. If you have a specific concern not covered here — for instance, ingredient substitutions for medical diets or storage at scale — message with those details and I’ll offer tailored guidance. Thank you for cooking along and for supporting thoughtful, flavor-forward home cooking.
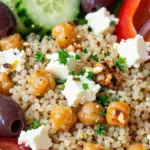
Mediterranean Veggie Bowls
Ingredients
- 1 cup cooked quinoa 🍚
- 2 cups mixed salad greens 🥬
- 1 cup cherry tomatoes, halved 🍅
- 1/2 cucumber, diced 🥒
- 1/2 red bell pepper, sliced 🌶️
- 1/4 red onion, thinly sliced 🧅
- 1 cup canned chickpeas, rinsed and drained 🥫
- 1/4 cup Kalamata olives, pitted 🫒
- 50g feta cheese, crumbled 🧀
- 2 tbsp extra virgin olive oil 🫒
- Juice of 1 lemon 🍋
- 1 garlic clove, minced 🧄
- 1 tsp dried oregano 🌿
- Salt 🧂 and freshly ground black pepper 🌶️
- Optional: fresh parsley, chopped 🌱
- Optional: toasted pine nuts or walnuts 🌰
Instructions
- Prepare the quinoa according to package instructions, then let it cool slightly.
- If using canned chickpeas and you prefer them crispy: toss chickpeas with a little olive oil, salt and pepper, and roast at 200°C (390°F) for 15–20 minutes until golden.
- While quinoa (and chickpeas) are cooling, wash and chop the salad greens, halve the cherry tomatoes, dice the cucumber, slice the red pepper and red onion.
- Make the dressing: whisk together olive oil, lemon juice, minced garlic, dried oregano, a pinch of salt and pepper.
- Assemble the bowls: divide quinoa between bowls, arrange mixed greens, tomatoes, cucumber, bell pepper, red onion and chickpeas on top.
- Add Kalamata olives and sprinkle crumbled feta over each bowl.
- Drizzle the lemon-oregano dressing evenly over the bowls.
- Finish with chopped parsley and a sprinkle of toasted pine nuts or walnuts if using.
- Serve immediately as a light lunch or refrigerate dressing separately and assemble later for meal prep.