Introduction
A cookie that combines comfort and showmanship.
As a recipe developer who leans toward both texture and clean flavors, I adore desserts that feel effortless yet appear crafted. These cookies bring that balance: a tender, soft crumb with playful pops of crunch. They arrive at gatherings with a gentle, pale green hue and a familiar, cozy aroma that invites conversation. What makes these bites special is how approachable the method is while still delivering a bakery-quality result.
When I test recipes, I look for forgiving doughs that play nicely with small tweaks and still reward patience. These cookies are exactly that kind of recipe: they respond beautifully to simple techniques that most home bakers already own. Expect a dough that’s easy to scoop, a bake that finishes without drama, and a finish that encourages you to reach for another one.
In this piece I’ll walk you through everything you need to gather and how to assemble and bake with confidence. Along the way I’ll share sensory notes, practical tips for keeping the texture reliably soft, and suggestions for serving and storing so your treats stay at their best across the week. Read on for a reliable, crowd-pleasing cookie you’ll return to again and again.
Why You’ll Love This Recipe
Shelf-stable style with homey comfort.
These cookies win hearts because they offer a familiar, tender bite with minimal fuss. Whether you’re baking for a holiday cookie swap, a casual coffee morning, or an after-school snack, the recipe is designed to be straightforward while still producing a cookie that feels intentionally crafted. The dough is forgiving in handling, which means you can shape, chill, and bake without worrying about precision.
I love that this formula rewards small adjustments: a brief chill firms the dough for thicker cookies, while a slightly longer bake time gently tightens the edges if you prefer a firmer chew. The visual appeal is an added bonus — the cookies take on a light tint that makes them stand out on a platter without feeling gimmicky. They’re also easy to scale when you need a few dozen fast.
Practical reasons to try them include how well they travel, how easily they pair with beverages, and how little equipment is required. For busy bakers, they’re a reliable once-and-done treat: a single mixing bowl and standard bakeware produce consistent results. If you like approachable cookies that look special and keep their soft texture, this one’s a keeper.
Flavor & Texture Profile
Soft center, gentle sweetness, and a delicate nutty finish.
These cookies are built around contrast: the dough stays soft and tender, while small crunchy elements add textural interest in every bite. The overall sweetness is designed to be balanced — enough to feel indulgent but not so much that it overwhelms the nutty notes.
In the oven the dough develops a barely set surface with soft interiors. When you bite in, you’ll notice a plush, almost cakey softness that yields easily under the teeth. Scattered crunchy pieces cut through that softness, creating satisfying variety without interrupting the cookie’s cohesive mouthfeel. The inclusion of a pale tint gives the cookie a visual cue to its flavor, enhancing the eating experience.
A few practical sensory notes I share with readers:
- Texture balance: aim for a short, gentle bake to preserve interior tenderness.
- Crunch distribution: folding the crunchy bits gently prevents overly dense patches.
- Flavor layering: subtle background notes round out the sweetness so the cookie never tastes flat.
These qualities make the cookie universally appealing: they satisfy a craving for something soft and cozy while still offering a bright, textural finish that keeps each bite interesting.
Gathering Ingredients
Collect everything before you begin for smooth, focused baking.
Lining up ingredients and small equipment first keeps the process calm and predictable. Below is the exact, structured ingredient list you’ll need for this recipe. Having each component measured and ready will streamline mixing and make it easier to control texture and final results.
- 1 2/3 cups all-purpose flour (about 210 g)
- 3.4 oz instant pistachio pudding mix (1 box)
- 1 teaspoon baking soda
- 1/2 teaspoon salt
- 1/4 cup light brown sugar
- 3/4 cup granulated sugar
- 3/4 cup unsalted butter, softened
- 1 teaspoon clear vanilla extract
- 1 large egg, room temperature
- 1 cup white chocolate chips
- 1/2 cup chopped pistachios
- Green or blue food coloring (optional)
Before you start, take a moment to:
- Bring the egg to room temperature so it incorporates evenly.
- Soften the butter until it yields to gentle pressure; it should not be oily or melted.
- If you prefer a subtler hue, plan to add food coloring sparingly—just a drop or two will make a difference.
Having everything at hand saves time and keeps you focused on the textures and rhythm of the bake rather than scrambling for a missing item.
Preparation Overview
A clear roadmap before you mix.
Understanding the rhythm of a recipe helps you avoid mistakes and fosters better results. Think of preparation as three simple phases: dry component assembly, wet component creaming, and gentle combining with a final rest. Each phase has its purpose: the first creates an even distribution of raising agents and powdered flavor, the second builds air and structure, and the third brings everything together without overworking.
When you approach this recipe, trust subtlety. Mixing speed and timing influence texture far more than heroic stirring. Aeration created during creaming provides lift, but excessive mixing after adding dry components can tighten the crumb. Similarly, incorporating crunchy elements late ensures they remain distinct in the final cookie rather than disappearing into the dough.
I recommend a measured pace: set your mixer to a comfortable medium when creaming, then switch to manual folding for the final combining. If you choose to tint the dough, add dye conservatively so you can control shade without overworking. Finally, let the dough rest briefly if it feels loose; a short rest firms it enough to scoop and shape more predictably while preserving tenderness.
This overview prepares you to move through steps confidently and anticipate small adjustments to deliver consistently pleasing cookies.
Cooking / Assembly Process
Step-by-step cooking and assembly instructions to follow precisely.
- Preheat oven to 325°F (163°C). Line a baking sheet with parchment paper or lightly grease it.
- In a medium bowl, whisk together the all-purpose flour, instant pistachio pudding mix, baking soda, and salt until evenly combined.
- In a separate large bowl, cream the softened butter with the light brown sugar and granulated sugar using a hand mixer or stand mixer on medium speed until light and fluffy, about 3–5 minutes.
- Add the egg and clear vanilla extract to the creamed mixture and beat until well blended and smooth.
- Gradually add the dry ingredients to the wet ingredients, stirring just until combined. If using, add a few drops of green or blue food coloring and mix until the dough is evenly tinted.
- Fold in the white chocolate chips and chopped pistachios with a spatula, reserving a few chips and pistachio pieces to press on top before baking if desired.
- Cover the dough and refrigerate for at least 30 minutes to firm up — this helps the cookies keep a thick, soft texture.
- Scoop rounded tablespoons of dough (about 1 tbsp per cookie) and place them on the prepared baking sheet about 2 inches apart.
- Bake for 12–14 minutes, or until the cookies are set but not browned. If edges or bottoms begin to brown, remove immediately to prevent overbaking.
- Remove the baking sheet from the oven and gently press a few extra white chocolate chips and pistachio pieces into the tops of the warm cookies. Let cool on the baking sheet for several minutes, then transfer to a wire rack to cool completely.
These precise steps are written to be followed as presented; they contain the specific measurements and timings required to achieve the intended texture and appearance.
Serving Suggestions
Presentation ideas that elevate simple cookies.
These cookies are delightful served casually or arranged for a special occasion. Their soft texture and subtle color let them pair well with a variety of beverages and complementary flavors. For a cozy coffee break, place a few on a small plate alongside a mug of something warm. For gatherings, arrange them on a tiered platter with small labels to invite curiosity.
Textural contrasts work wonders: pair the cookies with a crisp companion such as biscotti or a nut brittle to highlight their tenderness. If you’re serving them at a party, a small bowl of extra chopped crunchy garnish nearby encourages guests to personalize their bite. For holiday or themed gatherings, nest the cookies among cookies of contrasting colors and shapes to create visual interest.
If gifting, stack them in parchment-lined tins with a sheet of wax paper between layers to keep surfaces from sticking. A short handwritten note that mentions the treat’s tender character and suggesting a gentle rewarm in a low oven or microwave can make the gift feel thoughtful and professional. These small presentation choices turn a humble cookie into a memorable offering.
Storage & Make-Ahead Tips
Keep them soft and fresh with a few simple habits.
Storing cookies properly is as important as baking them well. To preserve tenderness, let cookies cool completely on a wire rack before storing — trapping residual heat creates moisture that softens edges undesirably. Once cooled, an airtight container is your best friend: a single layer keeps surfaces intact, while layering with thin sheets of parchment prevents sticking.
For short-term storage, keep cookies at room temperature in a sealed container with a small slice of bread or a single marshmallow to maintain softness. For longer storage, cookies freeze beautifully: flash-freeze in a single layer and then transfer to a freezer-safe bag; thaw at room temperature when needed. Dough can also be made ahead and refrigerated or frozen; firm dough slices work well when you want freshly baked cookies without the full prep time on the day of serving.
- Room temp: store in an airtight container in a cool spot.
- Freezing: flash-freeze before bagging to prevent sticking.
- Make-ahead: shape dough and refrigerate or freeze to bake later for maximum freshness.
These small storage techniques keep the cookies tasting as if they were just baked, preserving texture and flavor across multiple days or weeks.
Frequently Asked Questions
Answers to common concerns and troubleshooting tips.
- Can I make the dough ahead of time?
Yes — the dough benefits from a firm chill for shaping. Refrigerate or freeze as needed and bake from chilled for consistent thickness. - Why are my cookies spreading too much?
Overly warm dough or an over-softened fat can cause spreading. Chill the dough and ensure the butter is softened but not melted before creaming. - How do I keep the centers soft while getting set edges?
A moderate oven temperature and a watchful eye at the end of the bake achieve the best balance. Remove cookies when centers look just set and allow carryover heat to finish them. - Can I swap mix-ins?
Yes — choose mix-ins that offer contrast without changing moisture dramatically. Chop additions uniformly so the dough bakes evenly.
If you have a question that’s not covered here, feel free to ask. I regularly update my troubleshooting notes with reader-submitted issues, so your specific oven, altitude, or ingredient brand can be addressed with a tailored suggestion. Happy baking!
Print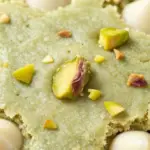
Pistachio Pudding Cookies
Ingredients
- 1 2/3 cups all-purpose flour (about 210 g) 🥣
- 3.4 oz instant pistachio pudding mix (1 box) 🌰
- 1 teaspoon baking soda 🧂
- 1/2 teaspoon salt 🧂
- 1/4 cup light brown sugar 🍯
- 3/4 cup granulated sugar 🍬
- 3/4 cup unsalted butter, softened 🧈
- 1 teaspoon clear vanilla extract 🍦
- 1 large egg, room temperature 🥚
- 1 cup white chocolate chips 🤍
- 1/2 cup chopped pistachios 🥜
- Green or blue food coloring (optional) 🎨
Instructions
- Preheat oven to 325°F (163°C). Line a baking sheet with parchment paper or lightly grease it.
- In a medium bowl, whisk together the all-purpose flour, instant pistachio pudding mix, baking soda, and salt until evenly combined.
- In a separate large bowl, cream the softened butter with the light brown sugar and granulated sugar using a hand mixer or stand mixer on medium speed until light and fluffy, about 3–5 minutes.
- Add the egg and clear vanilla extract to the creamed mixture and beat until well blended and smooth.
- Gradually add the dry ingredients to the wet ingredients, stirring just until combined. If using, add a few drops of green or blue food coloring and mix until the dough is evenly tinted.
- Fold in the white chocolate chips and chopped pistachios with a spatula, reserving a few chips and pistachio pieces to press on top before baking if desired.
- Cover the dough and refrigerate for at least 30 minutes to firm up — this helps the cookies keep a thick, soft texture.
- Scoop rounded tablespoons of dough (about 1 tbsp per cookie) and place them on the prepared baking sheet about 2 inches apart.
- Bake for 12–14 minutes, or until the cookies are set but not browned. If edges or bottoms begin to brown, remove immediately to prevent overbaking.
- Remove the baking sheet from the oven and gently press a few extra white chocolate chips and pistachio pieces into the tops of the warm cookies. Let cool on the baking sheet for several minutes, then transfer to a wire rack to cool completely.