Introduction
A short, joyful welcome to mint jelly lovers.
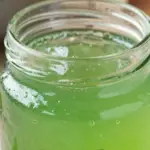
As a professional food writer I adore small condiments that transform everyday plates into something memorable. This mint jelly is one of those pantry treasures that reads like sunshine in a jar: bright herbal perfume, a clean lemon lift, and a clear, jewel-like set that catches the light when you reach for it. I write about food because of these little moments—when a simple spread elevates a cheese board or when a humble slice of toast becomes unexpectedly elegant.
What this post brings:
- A thoughtful introduction to the flavor and texture of homemade mint jelly.
- Professional tips for clear setting, bright color, and aroma retention.
- Practical advice on storing, serving, and making ahead to maximize convenience.
I aim to share both the heart and the craft: the sensory reasons you’ll reach for this jar, and the little techniques that make the jar glossy, aromatic, and dependable. Expect candid, approachable guidance that boosts confidence in the kitchen without fuss. The tone here is friendly and practical—consider this a short conversation at the counter where we trade techniques, small adjustments, and the kinds of little observations that only come from making something several times. Let’s celebrate a condiment that’s simple to make and endlessly useful.
Why You’ll Love This Recipe
A compact case for keeping a jar of mint jelly in your fridge.
This recipe is built for people who want big flavor without complicated steps. The result is an herb-forward, gently sweet preserve that functions as both condiment and accent—use it to brighten rich proteins, cut through the salt of aged cheeses, or introduce a fresh herbal note on morning bread. The pleasure of this recipe comes from its immediacy: you capture the volatile oils of fresh mint in a short steep, then use a straightforward setting method to preserve that brightness in a spoonable form.
What makes it special:
- It emphasizes fresh mint aroma, not just sweetness—so the herb remains the star.
- Acidity from vinegar and lemon lifts the profile, ensuring the jelly doesn’t taste cloying.
- A clear set and glossy finish make it attractive on any board or breakfast plate.
From a practical point of view, this is a low-barrier preserve: approachable techniques, easily sourced ingredients, and a short turnaround from stove to jar. For cooks who appreciate texture as much as taste, the clarity and glassy mouthfeel of a well-made jelly are deeply satisfying. For hosts, the jar is a quick way to impress—an elegant accent that reads as thoughtful and homemade. Expect balance: bright herbal notes, a gentle sweet backbone, and a clean finish that complements rather than overpowers.
Flavor & Texture Profile
How the ingredients translate into sensory experience.
When you taste this mint jelly you’ll notice three clear components working together: aromatic lift, bright acidity, and a clean, gelatinous texture. The mint contributes top notes—freshly crushed leaves release essential oils that smell almost floral while staying decidedly green. Those notes arrive first, bright and immediate. Beneath them, the sweet element rounds the edges without masking herbal clarity. The vinegar and lemon play a crucial supporting role: they sharpen the profile, keep sweetness from becoming syrupy, and help the herbal character linger on the palate rather than disappear.
On texture:
- A good jelly sets firm enough to hold its shape yet yields easily to a knife.
- The mouthfeel should be smooth and slightly slippery—glossy rather than grainy.
- Skimming foam during processing ensures a clear appearance and pure texture.
For serving, these elements create delightful contrasts: the bright, slightly astringent herbs against creamy cheeses; the glossy jelly cutting through the fattiness of roasted lamb; or the invigorating lift it gives to breakfast toast. Texture-wise, a clean set allows the jelly to sit elegantly on a cheese wedge or slice of toast without sinking in, while still melting softly across the palate. Throughout the process, small technique choices—gentle skimming, brisk stirring during activation, and cooling at room temperature—preserve both clarity and silkiness.
Gathering Ingredients
Complete ingredient list with exact measures for clarity.
Use this list as your shopping and prep checklist. Having everything measured and ready will make the cook stage seamless and will help you capture the freshest herbal aroma from the mint.
- 2 cups fresh mint leaves, packed
- 2 cups granulated sugar
- 1 cup water
- 1/2 cup white wine vinegar or apple cider vinegar
- 1 package (approx. 1.75 oz) powdered fruit pectin
- 1 tablespoon fresh lemon juice
- Pinch of salt
- 2 small sterilized jars (or more)
- Optional: a drop of green food coloring (if desired)
Pro prep notes:
- Choose mint leaves that are bright and fragrant—avoid yellowing or limp stems.
- Measure sugar accurately; its ratio to liquid affects both sweetness and set.
- If you plan to color the jelly, keep the dropper bottle within reach so you can add a tiny amount at the end.
Having everything laid out and ready is more than efficiency; it’s about preserving aroma. The fresh mint begins to lose volatile oils as soon as it’s bruised and exposed, so rinse and pat leaves dry just before steeping. The vinegar and lemon will act as brighteners—measure them carefully and add them at the stage recommended in the instructions to retain their elevating qualities. Proper jar sterilization is essential for safe, long-lasting storage, so prepare those vessels while your mint is steeping to maintain heat and prevent contamination.
Preparation Overview
A strategic, technique-focused walkthrough before you turn on the stove.
Before you begin the cook stage, it’s helpful to visualize the flow: gentle steeping to extract aromatic oils, careful straining to capture a clear infusion, and a focused boiling step to activate pectin and develop the proper set. Each micro-step supports clarity, aroma retention, and mouthfeel.
Key technique points to hold in mind:
- Steep mint briefly and covered to trap fragrant oils without over-extracting bitter compounds.
- Press the leaves lightly when straining—enough to release liquid, not enough to squeeze out green particulates that could cloud the jelly.
- Bring the sugar-infused liquid to a true rolling boil before adding pectin—this helps the gelling agent activate evenly.
- Stir briskly, but continuously, when incorporating pectin to prevent lumps and ensure an even set.
Temperature control and timing matter in small ways that yield big differences. A short, hot boil activates pectin effectively, but overcooking can dull fresh aromatics. Likewise, skimming foam while the jelly is still hot produces a more attractive final product. Finally, cool the jars at room temperature before refrigeration to allow the gel network to settle without thermal shock. These preparation decisions—gentle handling of aromatic herbs, accurate boiling, and careful skimming—will give you a glossy jar with lively mint character and a clean, smooth texture.
Cooking / Assembly Process
Step-by-step instructions for stove-to-jar assembly.
Follow these steps in sequence; I’ve written them to be precise and dependable so you can replicate success each time. Measure ingredients first and have sterilized jars ready to receive hot jelly. Keep a spoon and ladle on a towel nearby for safe handling.
- Sterilize jars and lids using boiling water or a hot dishwasher cycle; keep warm.
- Rinse and lightly chop the mint leaves to release oils. In a saucepan, combine water and the chopped mint; bring to a gentle simmer, cover, and remove from heat to steep for the prescribed time.
- Strain the mint infusion through a fine mesh sieve or cheesecloth into a clean saucepan, pressing gently to extract liquid and discarding solids.
- Add sugar, vinegar, and salt to the strained liquid; return mixture to a rolling boil over medium-high heat.
- Once boiling, stir in powdered pectin quickly and continuously; boil hard for the recommended activation time while stirring constantly to prevent scorching and encourage even setting.
- Remove from heat and stir in fresh lemon juice and food coloring if using; skim any foam for a clear finish.
- Ladle hot jelly into warm sterilized jars, leaving a small headspace; wipe rims, seal with lids, and cool to room temperature before refrigerating.
Timing and monitoring tips:
Maintain a vigilant eye during the boiling and pectin-activation phase—this is when both texture and clarity are determined. Use a steady, even stirring motion and a heat that keeps the boil rolling without boiling over. Skim foam promptly; foam contains denatured proteins and air that can mar clarity. When transferring hot jelly to jars, work on a heatproof surface and consider a jar funnel to minimize spills. Let jars cool undisturbed at room temperature so the gel network can set uniformly before chilling. These small details will make the difference between a cloudy preserve and one with a glossy, appetizing finish.
Serving Suggestions
Simple, elegant ways to showcase mint jelly.
This jelly sings when paired with rich, savory flavors and simple baked goods. Think of it as a bright counterpoint: a spoonful on a small cheese wedge provides a lively contrast to creamy textures, while a smear on warm toast or a scone gives a fresh, herbaceous lift to breakfast or teatime. On roasted meats, the sweetness and acid work together to cut richness and highlight browned surfaces.
Pairing ideas to inspire:
- Cheese boards: pair with mild cheddars, tangy goat cheeses, or creamy brie to introduce a herbal brightness.
- Roasted or grilled lamb: a small dollop adds contrast and refreshes the palate between bites.
- Breakfast and tea: spread thinly on warm toast, scones, or biscuits for a grown-up, aromatic sweetness.
For entertaining, place the jar with a small spreader beside composed bites so guests can customize their portions. If you enjoy layered flavor, use the jelly as a component in a glaze: add a spoonful to warm pan juices for a glossy, lightly sweet finish that clings beautifully. To vary presentation, chill briefly so the jelly firms slightly before serving; it will hold shape on a cheese knife and look particularly elegant on a grazing board. Above all, serve it in small amounts to allow the herbaceous character to remain distinct and refreshing.
Storage & Make-Ahead Tips
How to keep your mint jelly fresh and stable.
Proper storage preserves both safety and sensory quality. Once sealed and cooled, refrigerated jars will retain their bright flavor for several weeks; the acidity and sugar help slow spoilage, but cool, consistent refrigeration is still important. If you prepare jars as gifts or for longer pantry storage, ensure you used appropriate sterilization and hot-filling techniques, then refrigerate as recommended. Freezing is an option for longer preservation, but note that the texture may soften slightly upon thawing—use frozen jelly primarily for spreading or mixing rather than for display.
Make-ahead strategies:
- Prepare the jelly a day ahead to allow flavors to meld; chilling overnight can deepen the aromatic profile.
- If gifting, fill sterilized jars while the jelly is hot, seal, and cool; label with a date and a brief serving suggestion.
- For larger batches, process jars in a water bath if you want shelf-stable storage—follow tested canning guidelines for safety.
Avoid temperature swings in storage, which can encourage condensation and potential spoilage. If you notice any off-odors, mold, or unexpected bubbling, discard the jar—safety first. When scooping from a jar, always use a clean utensil to prevent contamination; this small habit extends shelf life and ensures each spoonful tastes fresh. With these practices, your homemade mint jelly can be a ready-made accent for several meals, bringing a consistent and lively herbal note whenever you reach for it.
Frequently Asked Questions
Answers to common queries from home cooks.
Q: Can I use dried mint instead of fresh?
Dried herbs lack the volatile oils and bright aromatics of fresh leaves; for a true mint-forward jelly, fresh is best. If you must substitute, use a much smaller amount and taste frequently—expect a different, more muted profile.
Q: Why did my jelly turn out cloudy?
Cloudiness can come from over-pressing solids during straining, insufficient skimming of foam, or undissolved sugar. Use gentle pressing when straining, skim foam while hot, and ensure sugar dissolves fully before the final boil.
Q: Can I reduce the sugar?
Sugar contributes both sweetness and structure in many pectin-based jellies. Reducing it will affect set and shelf-life; if you want less sweetness, consider keeping measured sugar but pairing the jelly with a richer or saltier component when serving to balance perception.
Q: Is the vinegar necessary?
The acid brightens flavor and supports the gel network in some contexts. If you prefer a different acid tone, choose between white wine vinegar and apple cider vinegar based on the flavor bridge you want: one will read cleaner, the other fruitier.
Q: How long does it keep?
Properly prepared and refrigerated jars maintain best quality for the suggested refrigerated storage period; always check for signs of spoilage before use.
Final note:
If you’d like help adapting this recipe—such as making a low-sugar version, scaling for larger batches, or converting to shelf-stable canning—ask and I’ll provide tailored guidance with tested techniques. Happy preserving!
Quick & Easy Homemade Mint Jelly
Ingredients
- 2 cups fresh mint leaves, packed 🍃
- 2 cups granulated sugar 🍚
- 1 cup water 💧
- 1/2 cup white wine vinegar or apple cider vinegar 🍾
- 1 package (approx. 1.75 oz) powdered fruit pectin 🧪
- 1 tablespoon fresh lemon juice 🍋
- Pinch of salt 🧂
- 2 small sterilized jars (or more) 🫙
- Optional: a drop of green food coloring (if desired) 🎨
- Kitchen tools: saucepan, fine mesh sieve, ladle, spoon 🍲🥄
Instructions
- Sterilize jars and lids by boiling or running through a hot dishwasher cycle and set aside to keep warm 🫙.
- Rinse the mint leaves and gently pat dry. Remove any discolored leaves and lightly chop the mint to release oils 🍃.
- In a medium saucepan combine water and chopped mint. Bring to a gentle simmer, cover, and remove from heat. Let steep for 15 minutes to extract mint flavor 💧🍃.
- Strain the mint infusion through a fine mesh sieve or cheesecloth into a clean saucepan, pressing gently to extract liquid. Discard solids 🧺.
- Add the sugar, vinegar and a pinch of salt to the strained liquid. Stir to combine, then return to a rolling boil over medium-high heat 🍚🍾.
- Once boiling, stir in the powdered pectin quickly and continuously. Boil hard for 1–2 minutes (follow pectin package timing if different), stirring constantly to activate the pectin 🧪🥄.
- Remove from heat and stir in the lemon juice and food coloring if using. Skim any foam from the surface with a spoon for a clear jelly 🍋🎨.
- Carefully ladle the hot jelly into the warm sterilized jars, leaving about 1/4 inch headspace. Wipe rims, seal with lids, and let cool to room temperature 🫙🥄.
- Refrigerate for at least 4 hours (overnight preferred) until fully set. Jelly will thicken as it chills. Store in the refrigerator for up to 3 weeks 🍃❄️.
- Serve chilled with roast lamb, cheese boards, scones or spread on toast for a bright minty boost 🥖🧀.