When it comes to festive desserts, Lemon Mochi Chicks are a delightful and creative way to celebrate spring, Easter, or any occasion that calls for something cute and delicious. These bite-sized mochi treats combine the soft, chewy texture of traditional Japanese mochi with the bright, zesty flavor of lemon, shaped into adorable little chicks that are as fun to look at as they are to eat. Whether you’re hosting a themed party, making treats for kids, or simply craving something sweet and tangy, these Lemon Mochi Chicks are sure to bring smiles to everyone’s faces. In this article, we’ll guide you through everything you need to know about making these charming creations, including tips, variations, and serving suggestions. By the end, you’ll have a foolproof recipe for a dessert that’s as playful as it is tasty.
Why You’ll Love Lemon Mochi Chicks
1. Soft and Chewy Texture
Mochi is known for its unique, pillowy texture, which pairs perfectly with the bright citrusy flavor of lemon.
2. Adorable Presentation
Shaped like tiny chicks, these mochi treats are perfect for themed celebrations, especially Easter or springtime gatherings.
3. Customizable
Whether you prefer adding more zest for a stronger lemon flavor or experimenting with colors and decorations, these mochi chicks are easy to adapt to your preferences.
4. Quick and Easy
With just a few simple ingredients and minimal prep time, these mochi chicks come together quickly, even for beginner bakers.
Ingredients You’ll Need
Here’s what you’ll need to make Lemon Mochi Chicks:
For the Mochi:
- 1 cup glutinous rice flour (mochiko)
- ½ cup granulated sugar (or a keto-friendly sweetener like erythritol for low-carb options)
- Zest and juice of 1 large lemon
- 1 cup water
- 1–2 drops yellow food coloring (optional, for vibrant color)
- Cornstarch or potato starch, for dusting
For the Decorations:
- Black edible markers or mini chocolate chips (for eyes)
- Orange candy melts, fondant, or fruit leather (for beaks)
Step-by-Step Instructions
Step 1: Prepare the Dough
- In a mixing bowl, whisk together the glutinous rice flour, sugar, lemon zest, and lemon juice until well combined.
- Add water gradually, stirring until the mixture forms a smooth batter. If desired, add 1–2 drops of yellow food coloring to enhance the color.
- Transfer the batter to a microwave-safe bowl or a heatproof container.
Step 2: Cook the Mochi
- Microwave the batter in 30-second intervals, stirring between each interval, until the dough becomes translucent and pulls away from the sides of the bowl (about 1–2 minutes total). Alternatively, steam the dough in a steamer for 15–20 minutes.
- Once cooked, let the dough cool slightly until it’s safe to handle.
Step 3: Shape the Mochi Chicks
- Dust your hands and a clean work surface with cornstarch or potato starch to prevent sticking.
- Divide the dough into small portions (about 1–1.5 tablespoons each) and roll them into smooth balls.
- Flatten each ball slightly to create an oval shape resembling a chick’s body.
Step 4: Add the Features
- Use black edible markers to draw eyes on the mochi chicks, or press mini chocolate chips gently into the dough for eyes.
- Cut small triangles from orange candy melts, fondant, or fruit leather to create beaks. Attach the beaks by lightly pressing them onto the mochi.
Step 5: Serve
Arrange the Lemon Mochi Chicks on a plate and serve at room temperature. Store leftovers in an airtight container at room temperature or in the refrigerator.
Tips for the Best Lemon Mochi Chicks
- Use Fresh Ingredients : Fresh lemon zest and juice provide the best flavor and aroma.
- Work Quickly : Mochi dough can become sticky as it cools, so work efficiently when shaping and decorating.
- Experiment with Flavors : Swap lemon for other citrus fruits like lime or orange for a different twist.
- Dust Generously : Use plenty of cornstarch or potato starch to prevent the dough from sticking to your hands or tools.
- Make Ahead : These mochi chicks can be made a day in advance and stored in an airtight container.
Variations to Try
While the classic version is divine, here are some creative twists to try:
- Strawberry Mochi Chicks : Replace lemon with strawberry puree for a fruity, pink version.
- Matcha Mochi Chicks : Add matcha powder to the dough for a green tea-flavored treat.
- Mini Mochi Eggs : Shape the dough into small eggs instead of chicks for a simpler design.
- Chocolate Dipped Mochi : Dip half of each mochi chick in melted chocolate for an extra indulgent treat.
- Gluten-Free Option : This recipe is naturally gluten-free, but double-check your food coloring if serving to someone with sensitivities.
Serving Suggestions
Lemon Mochi Chicks are versatile enough to serve in a variety of settings:
- For Easter Brunch : Pair with other spring-themed treats like carrot cake or lemon tarts for a festive spread.
- At Parties : Arrange them on a platter for themed parties, baby showers, or holiday gatherings.
- For Kids’ Snacks : Pack them in lunchboxes or serve as a fun after-school treat.
- With Beverages : Serve alongside hot tea, coffee, or lemonade for a refreshing pairing.
Nutritional Information
Understanding the nutritional content of your treats helps you enjoy them mindfully. Here’s an approximate breakdown per mochi chick (assuming 12 servings):
- Calories: 80–100
- Fat: 0g
- Carbohydrates: 18g
- Protein: 1g
These numbers may vary slightly depending on the brands of ingredients used. Always check nutrition labels for accuracy.
Frequently Asked Questions (FAQs)
Q: Can I use regular rice flour instead of glutinous rice flour? A: No, glutinous rice flour is essential for achieving the chewy texture of mochi. Regular rice flour will not work.
Q: What can I use instead of food coloring? A: Natural alternatives like turmeric or beet powder can be used for color, though they may alter the flavor slightly.
Q: Can I make these mochi chicks ahead of time? A: Yes! Store them in an airtight container at room temperature for up to 2 days or in the refrigerator for up to a week.
Q: How do I prevent the mochi from sticking? A: Dust your hands, work surface, and tools generously with cornstarch or potato starch to prevent sticking.
Q: Can I freeze these mochi chicks? A: Mochi can be frozen, but the texture may change slightly after thawing. Wrap them individually in plastic wrap before freezing.
Conclusion
Lemon Mochi Chicks are proof that desserts don’t have to be boring—even when they’re healthy and homemade! With their soft, chewy texture, bright citrusy flavor, and adorable presentation, these treats are perfect for celebrating spring, Easter, or any occasion that calls for something sweet and festive. Whether you’re serving them for brunch, bringing them to a party, or surprising your kids with a fun snack, this recipe guarantees a result that’s as easy to make as it is delightful.
So gather your ingredients, dust your hands with cornstarch, and get ready to create a batch of mochi chicks that will leave everyone smiling. Happy cooking—and happy indulging!
Print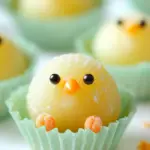
Lemon Mochi Chicks: Adorable, Chewy Treats Perfect for Spring and Easter
Ingredients
![]() 1 cup glutinous rice flour (Mochiko)
1 cup glutinous rice flour (Mochiko)![]() 1/4 cup sugar
1/4 cup sugar![]() 1 1/4 cups water (room temperature)
1 1/4 cups water (room temperature)![]() 1/4 teaspoon salt
1/4 teaspoon salt![]() 1 teaspoon lemon extract
1 teaspoon lemon extract![]() 1/4 teaspoon yellow gel food color
1/4 teaspoon yellow gel food color![]() 1/2 cup cornstarch
1/2 cup cornstarch![]() Light corn syrup
Light corn syrup![]() 10-12 orange mini chips
10-12 orange mini chips![]() 20-24 black nonpareils or black buttercream
20-24 black nonpareils or black buttercream![]() 20-24 orange flower sprinkles
20-24 orange flower sprinkles![]() 10-12 mini cupcake liners
10-12 mini cupcake liners
Instructions
1. In a medium microwave-safe bowl, mix all ingredients except cornstarch until smooth.
2. Microwave on high for 2 minutes, stir, then heat for another 2 minutes.
3. If the dough inflates, it’s ready; if not, microwave for 1 more minute.
4. Transfer hot dough to a cornstarch-dusted board, flatten, and cut into 10-12 pieces.
5. Shape into balls, place in cupcake liners, and decorate with eyes, beaks, and feet using corn syrup.
6. Enjoy immediately for the best taste!
PREP TIME & NUTRITION:
Prep Time: 15 minutes, Servings: 12, Calories: 80, Net Carbs: 15g, Fats: 0g, Protein: 1g