When it comes to baking with creativity and charm, Teddy Bear Buns are a delightful way to bring joy to the table. These adorable bread rolls are shaped like teddy bears, making them perfect for themed parties, kids’ lunches, or special occasions like birthdays and baby showers. Made with soft, fluffy dough and customizable features, these buns are as fun to make as they are to eat. Whether you’re a seasoned baker or a beginner, this recipe is easy to follow and guarantees smiles from everyone who sees (and tastes) these cute creations. In this article, we’ll guide you through everything you need to know about making these charming buns, including tips, variations, and serving suggestions. By the end, you’ll have a foolproof recipe for a treat that’s as playful as it is delicious.
Why You’ll Love Teddy Bear Buns
1. Soft and Fluffy Texture
Made with a simple enriched dough, these buns are light, airy, and perfect for pairing with sweet or savory fillings.
2. Adorable Presentation
Shaped like teddy bears, these buns are sure to delight kids and adults alike, making them ideal for themed celebrations or everyday fun.
3. Customizable
Whether you prefer adding raisins, chocolate chips, or colorful decorations, these buns are easy to adapt to your preferences or occasion.
4. Quick and Easy
With just a few simple ingredients and step-by-step instructions, these buns come together easily, even for beginner bakers.
Ingredients You’ll Need
Here’s what you’ll need to make Teddy Bear Buns:
For the Dough:
- 3 cups all-purpose flour (or bread flour for extra chewiness)
- 1 packet (2 ¼ teaspoons) active dry yeast
- ¼ cup granulated sugar
- ½ cup warm milk (about 110°F/45°C)
- 2 large eggs (1 for the dough, 1 for egg wash)
- 3 tablespoons unsalted butter, softened
- ½ teaspoon salt
For Shaping and Decorating:
- Raisins, chocolate chips, or candy eyes (for eyes and noses)
- Optional: Pink or brown food coloring for cheeks or ears
- Optional: Slivered almonds or small pieces of fruit for decoration
Step-by-Step Instructions
Step 1: Activate the Yeast
- In a small bowl, combine the warm milk and sugar. Sprinkle the yeast over the mixture and let it sit for 5–10 minutes, until frothy. This indicates that the yeast is active.
Step 2: Make the Dough
- In a large mixing bowl, whisk together the flour and salt.
- Add the activated yeast mixture, one egg, and softened butter to the bowl. Mix until a soft dough forms.
- Knead the dough on a floured surface for 5–7 minutes, until smooth and elastic. Alternatively, use a stand mixer with a dough hook.
Step 3: Let the Dough Rise
- Place the dough in a lightly oiled bowl, cover it with a clean kitchen towel or plastic wrap, and let it rise in a warm place for 1–1.5 hours, or until doubled in size.
Step 4: Shape the Teddy Bears
- Punch down the risen dough and divide it into equal portions (about golf ball-sized).
- Roll each portion into a smooth ball for the bear’s body.
- For the ears, pinch off small pieces of dough, roll them into smaller balls, and attach them to the top of the larger ball by pressing gently.
- Use raisins, chocolate chips, or candy eyes to create the bear’s face. Add slivered almonds or small fruit pieces for additional details if desired.
Step 5: Let the Buns Rise Again
Arrange the shaped buns on a baking sheet lined with parchment paper. Cover them loosely with a towel and let them rise for another 20–30 minutes, until puffy.
Step 6: Bake
- Preheat your oven to 350°F (175°C).
- Beat the remaining egg with a tablespoon of water to make an egg wash. Brush the egg wash gently over the buns to give them a golden finish.
- Bake the buns for 15–18 minutes, or until golden brown.
Step 7: Decorate and Serve
Once the buns are baked and cooled slightly, add any final decorative touches, such as pink food coloring for cheeks or additional candies for embellishments. Serve warm or at room temperature.
Tips for the Best Teddy Bear Buns
- Use Fresh Yeast : Ensure your yeast is not expired for optimal rising results.
- Work Gently : When shaping the buns, handle the dough gently to avoid deflating the air bubbles created during rising.
- Add Color Carefully : Use minimal food coloring to avoid staining the dough too much.
- Experiment with Features : Try different toppings like mini chocolate chips, dried cranberries, or edible markers for creative designs.
- Make Ahead : You can prepare the dough ahead of time and refrigerate it overnight. Let it come to room temperature before shaping and baking.
Variations to Try
While the classic version is divine, here are some creative twists to try:
- Chocolate-Filled Buns : Add a small piece of chocolate inside each bun before shaping for a gooey surprise.
- Savory Version : Skip the sugar and add herbs, cheese, or ham for a savory twist.
- Mini Teddy Bears : Make smaller buns for bite-sized treats or tea party snacks.
- Rainbow Buns : Divide the dough into portions and tint them with food coloring for colorful teddy bears.
- Gluten-Free Option : Use a gluten-free flour blend and xanthan gum for a gluten-free alternative.
Serving Suggestions
Teddy Bear Buns are versatile enough to serve in a variety of settings:
- For Breakfast : Pair with butter, jam, or honey for a sweet start to the day.
- At Parties : Arrange them on a platter for themed celebrations, baby showers, or birthday parties.
- For Kids’ Snacks : Pack them in lunchboxes or serve as a fun after-school treat.
- With Beverages : Serve alongside hot chocolate, tea, or coffee for a cozy pairing.
Nutritional Information
Understanding the nutritional content of your treats helps you enjoy them mindfully. Here’s an approximate breakdown per bun (assuming 12 servings):
- Calories: 150–180
- Fat: 4g
- Carbohydrates: 25g
- Protein: 4g
These numbers may vary slightly depending on the brands of ingredients used. Always check nutrition labels for accuracy.
Frequently Asked Questions (FAQs)
Q: Can I use instant yeast instead of active dry yeast? A: Yes! Instant yeast can be added directly to the dry ingredients without activating it first. Just skip the step of dissolving it in warm milk.
Q: What can I use instead of raisins for the eyes? A: Chocolate chips, candy eyes, or small pieces of dried fruit work well as alternatives.
Q: Can I freeze these buns? A: Absolutely! Store the buns in an airtight container or freezer-safe bag for up to 3 months. Thaw at room temperature before serving.
Q: How do I prevent the buns from sticking to the baking sheet? A: Line the baking sheet with parchment paper or lightly grease it with butter or cooking spray.
Q: Can I make these buns dairy-free? A: Yes! Substitute the butter with coconut oil or vegan butter, and use plant-based milk for the dough.
Conclusion
Teddy Bear Buns are proof that baking doesn’t have to be boring—even when it’s healthy and homemade! With their soft, fluffy texture, adorable shapes, and endless customization options, these buns are perfect for celebrating any occasion or simply brightening someone’s day. Whether you’re serving them for breakfast, bringing them to a party, or surprising your kids with a fun snack, this recipe guarantees a result that’s as easy to make as it is delightful.
So gather your ingredients, preheat your oven, and get ready to create a batch of teddy bear buns that will leave everyone smiling. Happy baking—and happy indulging!
Print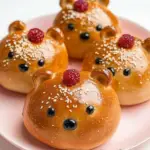
Teddy Bear Buns: Adorable, Soft, and Perfect for Any Occasion
Ingredients
![]() 300 g wholewheat flour (2 ⅓ cups)
300 g wholewheat flour (2 ⅓ cups)![]() 14 g instant dry yeast (2 satchels)
14 g instant dry yeast (2 satchels)![]() 100 g warm milk (⅓ cup)
100 g warm milk (⅓ cup)![]() 30 g melted butter (6 ½ tsp)
30 g melted butter (6 ½ tsp)![]() 10 g salt (2 tsp)
10 g salt (2 tsp)![]() 15 g sugar (3 ½ tsp)
15 g sugar (3 ½ tsp)![]() 1 egg
1 egg![]() 1-2 drops food coloring (black & red)
1-2 drops food coloring (black & red)![]() 1 egg (for brushing)
1 egg (for brushing)![]() 2 tsp sesame seeds
2 tsp sesame seeds
Instructions
1. In a bowl, mix warm milk and yeast; let it bloom for 5-10 minutes.
2. Combine flour, salt, melted butter, egg, and the yeast mixture in a large bowl.
3. Knead until the dough is smooth and not sticky.
4. Let the dough rise in an oiled bowl for 1 hour until doubled.
5. Set aside a small ball for ears, nose, and eyes.
6. Shape the remaining dough into bear heads and place on a lined tray.
7. Form smaller balls for features and attach them with water.
8. Let the buns rise for 15-20 minutes, then brush with egg wash and sprinkle sesame seeds.
9. Bake at 180°C (360°F) for 15 minutes until golden. Cool on a wire rack.
PREP TIME & NUTRITION:
Prep Time: 30 minutes, Cook Time: 15 minutes, Proofing Time: 1 hour, Total Time: 1 hour 45 minutes, Servings: 6 buns, Calories: 240 kcal, Net Carbs: N/A, Fats: N/A, Protein: N/A