Italian Easter Cookies are soft, lightly sweet cookies topped with a delicate vanilla glaze and colorful sprinkles. These traditional cookies are often shaped into rings, knots, or braided forms and sometimes decorated with a dyed Easter egg in the center. They are a classic holiday treat that brings warmth, tradition, and celebration to the Easter table.
These cookies are tender, slightly cake-like, and flavored with hints of vanilla and citrus. Unlike many cookies that rely on heavy sweetness, Italian Easter Cookies are subtle and balanced, making them perfect alongside coffee, tea, or a holiday brunch.
One of the best things about this recipe is how simple it is to make. The dough comes together quickly using pantry staples, and there is no need for complicated equipment. Even beginner bakers can create beautiful cookies that look festive and taste delicious.
In this guide, you’ll learn everything you need to know to make perfect Italian Easter Cookies, including ingredients, step-by-step instructions, tips for shaping, variations, and storage tips.
What Are Italian Easter Cookies?
Italian Easter Cookies, sometimes called Taralli Dolci or Italian Knot Cookies, are a traditional Italian sweet prepared during Easter celebrations. They are known for their soft texture, sweet glaze, and bright sprinkles.
Families often bake these cookies together before Easter Sunday. In many Italian households, the cookies are shaped into rings or braids and decorated with colorful eggs, symbolizing new life and renewal.
While recipes vary slightly depending on the region, most versions share common characteristics:
• Soft and tender texture
• Mild sweetness
• Simple vanilla glaze
• Festive sprinkles or colored eggs
Because the dough is easy to work with, these cookies are also fun to make with children.
Why You’ll Love These Italian Easter Cookies
There are many reasons this recipe has been loved for generations.
Soft and Tender Texture
These cookies are not crunchy. Instead, they have a soft, cake-like crumb that melts in your mouth.
Simple Ingredients
You likely already have everything needed in your kitchen: flour, eggs, sugar, butter, and baking powder.
Perfect Holiday Treat
With their pastel sprinkles and classic glaze, they look beautiful on any Easter dessert table.
Easy to Customize
You can flavor the dough with lemon, orange, almond, or anise to create different variations.
Great for Sharing
These cookies store well and make wonderful homemade gifts for family and friends.
Ingredients for Italian Easter Cookies
Here’s what you’ll need to make this classic recipe.
For the Cookies
2 ½ cups all-purpose flour
2 teaspoons baking powder
½ teaspoon salt
½ cup granulated sugar
½ cup unsalted butter, softened
3 large eggs
1 teaspoon vanilla extract
1 teaspoon lemon zest (optional)
For the Glaze
1 ½ cups powdered sugar
2–3 tablespoons milk
½ teaspoon vanilla extract
Decoration
Pastel sprinkles
Colored Easter candy eggs (optional)
How to Make Italian Easter Cookies
Follow these simple steps for perfect cookies every time.
Step 1: Preheat the Oven
Preheat your oven to 350°F (175°C) and line baking sheets with parchment paper.
Step 2: Mix the Dry Ingredients
In a medium bowl, whisk together:
• Flour
• Baking powder
• Salt
Set aside.
Step 3: Cream Butter and Sugar
In a large bowl, beat together the butter and sugar until light and fluffy. This step helps create a soft cookie texture.
Step 4: Add Eggs and Flavoring
Beat in the eggs one at a time. Then mix in the vanilla extract and lemon zest if using.
The mixture may look slightly curdled at this stage — that’s normal.
Step 5: Combine Wet and Dry Ingredients
Gradually add the flour mixture to the wet ingredients, mixing until a soft dough forms.
The dough should be slightly sticky but easy to handle.
Step 6: Shape the Cookies
Take about 1 tablespoon of dough and roll it into a rope about 6 inches long.
You can shape it in several traditional ways:
• Knots – tie the rope into a loose knot
• Rings – connect the ends to form a circle
• Braids – twist two ropes together
Place the shaped cookies onto the prepared baking sheet.
Leave about 2 inches of space between cookies.
Step 7: Add Decorative Eggs (Optional)
If using candy Easter eggs, gently press one into the center of each cookie before baking.
Step 8: Bake
Bake for 12–15 minutes, or until the bottoms are lightly golden.
The tops should remain pale.
Let the cookies cool completely on a wire rack before glazing.
How to Make the Vanilla Glaze
The glaze adds sweetness and gives the cookies their signature look.
Instructions
- In a small bowl, whisk together powdered sugar, milk, and vanilla.
- Mix until smooth and pourable.
If the glaze is too thick, add a little more milk.
If it’s too thin, add more powdered sugar.
Decorating the Cookies
Once the cookies have cooled:
- Dip the top of each cookie into the glaze.
- Place on a rack or parchment paper.
- Immediately add sprinkles.
Allow the glaze to set for about 20–30 minutes.
The finished cookies should have a glossy, sweet coating.
Tips for the Best Italian Easter Cookies
These tips will help ensure perfect results.
Don’t Overmix the Dough
Overmixing can make cookies dense instead of soft.
Chill if Necessary
If the dough feels sticky, refrigerate it for 20 minutes before shaping.
Use Fresh Baking Powder
Fresh baking powder ensures the cookies rise properly.
Bake Until Lightly Golden
These cookies should stay pale on top for the classic look.
Let Cookies Cool Before Glazing
Warm cookies will cause the glaze to melt and slide off.
Flavor Variations
You can easily customize Italian Easter Cookies with different flavors.
Lemon Easter Cookies
Add extra lemon zest and replace vanilla with lemon extract.
Almond Cookies
Use almond extract instead of vanilla for a nutty flavor.
Orange Citrus Cookies
Add orange zest and a small splash of orange juice.
Anise Traditional Cookies
Anise extract gives the cookies a classic Italian bakery taste.
How to Store Italian Easter Cookies
Proper storage keeps them soft and fresh.
Room Temperature
Store in an airtight container for 3–4 days.
Refrigerator
They can last up to 1 week refrigerated.
Freezer
Freeze cookies (without glaze) for up to 2 months.
Thaw and glaze before serving.
Make-Ahead Tips
Italian Easter Cookies are perfect for preparing ahead of time.
• Dough can be refrigerated for 24 hours before baking
• Cookies can be baked 2 days before Easter
• Glaze the cookies the day you plan to serve them
Serving Suggestions
These cookies are wonderful with many Easter dishes.
Serve them with:
• Coffee
• Espresso
• Cappuccino
• Milk
• Easter brunch spreads
They also look beautiful arranged on dessert platters alongside cakes, pastries, and chocolate eggs.
Why These Cookies Are Perfect for Easter
Italian Easter Cookies represent family, tradition, and celebration.
The colorful decorations symbolize the joy of spring, and the egg decorations represent new beginnings. Baking these cookies is more than just making dessert — it’s a way to celebrate the holiday and share something homemade with loved ones.
Because they are simple, festive, and delicious, they have remained a beloved Easter treat for generations.
Frequently Asked Questions
Why are my cookies dry?
Too much flour can make cookies dry. Make sure to measure flour correctly.
Can I freeze glazed cookies?
It’s best to freeze them without glaze to maintain texture.
Can I make these gluten-free?
Yes. Use a 1:1 gluten-free baking flour blend.
Do I have to use sprinkles?
Not at all. You can leave them plain or decorate with colored sugar.
Final Thoughts
Italian Easter Cookies are a beautiful blend of simplicity and tradition. Their soft texture, sweet glaze, and festive decorations make them the perfect addition to any Easter celebration.
Whether you’re baking them for a holiday gathering, a family tradition, or just to enjoy with coffee, these cookies bring a touch of classic Italian baking to your kitchen.
Once you try them, they may become a yearly Easter favorite in your home.
Print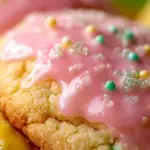
Italian Easter Cookies (Soft, Glazed & Festive)
Ingredients
For the cookies:
- 3½ cups (440g) all-purpose flour
- 1½ tsp baking powder
- ½ tsp salt
- ¾ cup (1½ sticks / 170g) unsalted butter, softened
- 1¼ cups (250g) granulated sugar
- 3 large eggs
- ½ cup whole milk
- 2 tbsp anise seeds (or 1½ tsp anise extract)
- Zest of 1 lemon (optional but recommended)
For the glaze & decoration:
- 2 cups powdered sugar
- 3–4 tbsp milk, orange juice, or water
- ½ tsp vanilla extract
- Pastel-colored sprinkles, nonpareils, or dyed hard-boiled eggs (for traditional presentation)
Instructions
- Prep: Preheat oven to 350°F (175°C). Line baking sheets with parchment paper.
- Mix dry ingredients: Whisk flour, baking powder, and salt.
- Cream wet ingredients: Beat butter and sugar until light and fluffy (~3 min). Add eggs one at a time, then anise seeds (or extract), lemon zest (if using), and milk.
- Combine: Gradually add flour mixture until just combined. Dough will be soft but manageable.
- Shape:
- Roll into 1″-thick ropes, then form into rings, twists, or “S” shapes.
- For traditional look: Place a dyed egg in the center of each ring before baking.
- Bake 12–15 minutes, until edges are lightly golden. Cool on pan 5 minutes, then transfer to rack.
- Glaze: Whisk powdered sugar, liquid, and vanilla until smooth. Dip tops of cooled cookies or drizzle with a spoon. Immediately add sprinkles.
💡 Pro Tips:
– If using anise seeds, lightly crush them to release flavor.
– For egg-free version, skip the decorative egg or use foil-wrapped candy eggs.
– Store in an airtight container up to 5 days—they stay soft and fragrant!
Prep Time & Nutrition (per cookie, makes ~24):
Servings: 24 | Calories: 150 | Net Carbs: 22g | Fats: 6g | Protein: 2g