If you’re craving a cookie that’s soft, buttery, and bursting with fresh citrus flavor, these Lemon Thumbprint Cookies are exactly what you need. With their tender crumb, delicate sweetness, and vibrant lemon filling, they strike the perfect balance between rich and refreshing.
These cookies are simple to make, visually beautiful, and perfect for any occasion—from afternoon tea to holiday trays. Whether you’re a beginner baker or an experienced home cook, this recipe will quickly become a favorite in your kitchen.
Let’s dive into everything you need to know to make the best lemon thumbprint cookies from scratch.
What Are Lemon Thumbprint Cookies?
Thumbprint cookies are classic butter cookies shaped into small balls, then pressed in the center (traditionally with your thumb) to create a well for filling. In this version, that center is filled with a bright and tangy lemon curd or lemon glaze.
The result is a cookie that’s:
- Soft and tender
- Buttery and slightly crumbly
- Sweet with a tangy citrus pop
They’re elegant enough for special occasions but easy enough for everyday baking.
Why You’ll Love This Recipe
Bright, Fresh Flavor
The lemon adds a refreshing twist that keeps these cookies from being overly sweet.
Soft & Buttery Texture
These cookies melt in your mouth with every bite.
Easy to Make
No complicated techniques—just simple ingredients and straightforward steps.
Perfect for Any Occasion
Great for holidays, brunches, parties, or gifting.
Customizable
You can easily switch the filling or add flavors to make them your own.
Ingredients You’ll Need
Here’s everything required to make these delicious cookies:
For the Cookie Dough:
- 1 cup (225g) unsalted butter, softened
- 2/3 cup granulated sugar
- 1 large egg yolk
- 1 teaspoon vanilla extract
- 1 tablespoon fresh lemon zest
- 2 cups all-purpose flour
- 1/4 teaspoon salt
For the Lemon Filling:
- 1/2 cup lemon curd (store-bought or homemade)
Optional Lemon Glaze:
- 1 cup powdered sugar
- 2–3 tablespoons fresh lemon juice
- 1 teaspoon lemon zest
How to Make Lemon Thumbprint Cookies
Follow these step-by-step instructions for perfect results:
Step 1: Cream the Butter and Sugar
In a large mixing bowl, beat the softened butter and sugar until light and fluffy.
This step is key for achieving a soft, tender texture.
Step 2: Add Flavor
Mix in:
- Egg yolk
- Vanilla extract
- Lemon zest
Blend until fully combined.
Step 3: Add Dry Ingredients
Gradually mix in the flour and salt until a soft dough forms.
Be careful not to overmix, as this can make the cookies dense.
Step 4: Chill the Dough
Cover the dough and refrigerate for at least 30–60 minutes.
Chilling helps the cookies hold their shape while baking.
Step 5: Shape the Cookies
Preheat your oven to 350°F (175°C).
- Roll dough into 1-inch balls
- Place on a lined baking sheet
- Use your thumb (or the back of a spoon) to press a small indent in the center
Step 6: Fill the Centers
Spoon a small amount of lemon curd into each indentation.
Step 7: Bake
Bake for 12–15 minutes, or until the edges are lightly golden.
Let the cookies cool completely on a wire rack.
Step 8: Add Glaze (Optional)
Drizzle lemon glaze over cooled cookies for an extra burst of flavor and sweetness.
Tips for Perfect Lemon Thumbprint Cookies
Use Fresh Lemon Zest
Fresh zest gives the best flavor—don’t skip it.
Don’t Overfill
Too much filling can spill over during baking.
Chill the Dough
This step prevents spreading and keeps cookies thick and soft.
Make Even Indents
Uniform shapes help the cookies bake evenly.
Variations to Try
Raspberry Lemon Thumbprint Cookies
Add a layer of raspberry jam under the lemon curd for a fruity twist.
Coconut Lemon Cookies
Roll the dough balls in shredded coconut before baking.
Almond Lemon Cookies
Add almond extract for a subtle nutty flavor.
Gluten-Free Option
Use a 1:1 gluten-free flour blend.
Vegan Version
Swap butter for plant-based butter and use a vegan lemon curd.
Storage Tips
Room Temperature
Store in an airtight container for up to 3 days.
Refrigerator
Keep for up to 1 week for extended freshness.
Freezing
- Freeze unbaked dough balls (without filling) for up to 2 months
- Bake directly from frozen, adding 1–2 minutes to baking time
What to Serve with Lemon Thumbprint Cookies
These cookies pair beautifully with:
- Tea or herbal infusions
- Coffee or cappuccino
- Fresh fruit
- Light desserts like mousse or yogurt parfait
Nutritional Overview
While these cookies are a treat, they offer:
- Moderate sugar content
- Rich buttery flavor
- Bright citrus notes without heavy richness
For a lighter version, reduce sugar slightly or skip the glaze.
Common Mistakes to Avoid
- Skipping chilling time – leads to spreading
- Overbaking – dries out the cookies
- Too much filling – causes overflow
- Using bottled lemon juice only – lacks fresh flavor
Frequently Asked Questions
Can I use store-bought lemon curd?
Yes, it’s a great time-saver and works perfectly.
Can I make these ahead of time?
Absolutely—they store well and can be made in advance.
Why did my cookies spread too much?
The dough may not have been chilled long enough.
Can I use other fillings?
Yes! Try jam, chocolate, or caramel for different flavors.
Final Thoughts
These Lemon Thumbprint Cookies are the perfect blend of buttery richness and bright citrus flavor. They’re easy to make, beautiful to serve, and bursting with fresh lemon goodness in every bite.
Whether you’re baking for a special occasion or just want something sweet and refreshing, this recipe is guaranteed to impress.
Once you try them, they’ll quickly become a staple in your dessert rotation.
Print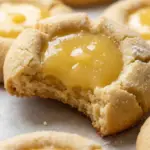
Lemon Thumbprint Cookies (Soft, Buttery & Bright with Citrus Flavor!)
Ingredients
Cookie base:
- 1 cup (2 sticks / 225g) unsalted butter, softened
- ½ cup granulated sugar
- 1 large egg yolk
- 1 tsp vanilla extract
- Zest of 2 lemons (about 2 tbsp—don’t skip!)
- 1 tbsp fresh lemon juice
- 2¼ cups (280g) all-purpose flour
- ¼ tsp salt
Filling:
- ½ cup seedless jam (lemon curd, raspberry, blueberry, or cherry—you love these!)
- Optional: Powdered sugar for dusting
Instructions
1. Make the dough:
- Beat softened butter and sugar until light and fluffy (~2 min).
- Mix in egg yolk, vanilla, lemon zest, and lemon juice until smooth.
- Gradually add flour and salt; mix until just combined (dough will be soft but not sticky).
2. Shape & fill:
- Preheat oven to 350°F (175°C). Line baking sheets with parchment.
- Roll dough into 1″ balls (use a cookie scoop for uniformity). Place 2″ apart on sheets.
- Create thumbprints: Gently press your thumb (or the back of a ½ tsp measuring spoon) into each ball to form a ½” deep well.
- Fill: Spoon ½ tsp jam into each well (don’t overfill—jam expands!).
3. Bake:
Cool on pan 5 minutes, then transfer to wire rack. Dust with powdered sugar if desired.
💡 Pro Tips for Perfection:
✅ Zest first, then juice—zesting whole lemons is easier!
✅ Don’t overbake—14 minutes max for tender centers (they firm as they cool).
✅ Jam choice matters:
→ Lemon curd (you love lemon combos!) = extra citrusy
→ Raspberry (you love chocolate-raspberry!) = sweet-tart contrast
→ Blueberry (you love blueberries!) = floral notes
→ Cherry (you love cherries!) = nostalgic depth
✅ Blood sugar friendly (you love this!):
→ Replace sugar with ½ cup monk fruit blend
→ Use sugar-free jam (or make chia jam: ½ cup berries + 1 tbsp chia seeds + 1 tsp lemon juice, simmered 10 min)
→ Net carbs: ~4g/cookie
✅ Keto version:
→ 1¾ cups almond flour + ¼ cup coconut flour
→ ½ cup monk fruit blend
→ 1 egg yolk + 2 tbsp melted butter
→ Sugar-free jam filling
→ Net carbs: ~2g/cookie
✅ Storage: Keep in airtight container 5 days (jam may soften cookies slightly over time). Freeze dough balls; bake from frozen (+1–2 min).
Prep Time & Nutrition (per cookie):
Calories: 130 | Protein: 2g | Net Carbs: 16g | Fats: 8g | Naturally nut-free • Gluten-Free Option • Keto Adaptable • Blood Sugar Friendly Swaps