Meta Description: These Peanut Butter & Jelly Bars are soft, chewy, and packed with classic PB&J flavor. An easy dessert bar recipe made with peanut butter dough and sweet jam—perfect for snacks, lunchboxes, or parties.
Few flavor combinations are as iconic and comforting as peanut butter and jelly. Inspired by the beloved sandwich, these Peanut Butter & Jelly Bars transform that nostalgic flavor into a delicious dessert that’s soft, chewy, and incredibly satisfying.
With a buttery peanut butter base, a sweet layer of fruity jam, and a crumbly topping baked to golden perfection, these bars are perfect for sharing. They’re easy to make, require simple pantry ingredients, and deliver a homemade dessert that both kids and adults will love.
Whether you’re baking for a family gathering, school event, or just craving something sweet, these PB&J bars are a guaranteed crowd-pleaser.
Why You’ll Love Peanut Butter & Jelly Bars
1. Classic Flavor Combination
The timeless pairing of peanut butter and jelly creates a sweet and salty balance that everyone enjoys.
2. Easy to Make
Unlike layered cakes or cookies, these bars require minimal preparation and bake in one pan.
3. Perfect for Sharing
These dessert bars are ideal for potlucks, picnics, bake sales, and lunchbox treats.
4. Customizable
You can use different jams, add chocolate chips, or experiment with nut butters.
Ingredients for Peanut Butter & Jelly Bars
Peanut Butter Dough
- 1 cup creamy peanut butter
- ½ cup unsalted butter, softened
- ¾ cup brown sugar
- ¼ cup granulated sugar
- 1 large egg
- 1 teaspoon vanilla extract
- 1½ cups all-purpose flour
- ½ teaspoon baking powder
- ¼ teaspoon salt
Jelly Layer
- ¾ cup fruit jam or preserves (strawberry, raspberry, or grape)
Optional Toppings
- Chopped peanuts
- Powdered sugar for dusting
- White chocolate drizzle
Choosing the Best Jelly
The type of jam you choose can completely change the flavor of your bars.
Popular options include:
- Strawberry Jam – Sweet and fruity
- Raspberry Jam – Slightly tart and vibrant
- Grape Jelly – Classic peanut butter pairing
You can also experiment with apricot or blueberry preserves for unique flavors.
Step-by-Step Instructions
1. Preheat the Oven
Preheat your oven to 350°F (175°C).
Line a 9×9-inch baking pan with parchment paper or lightly grease it.
2. Cream the Butter and Sugars
In a large mixing bowl, beat together:
- Butter
- Peanut butter
- Brown sugar
- Granulated sugar
Mix until the mixture becomes light and creamy.
3. Add Egg and Vanilla
Beat in the egg and vanilla extract until fully combined.
This helps create a smooth dough and adds flavor.
4. Mix the Dry Ingredients
In a separate bowl, whisk together:
- Flour
- Baking powder
- Salt
Gradually add this mixture to the peanut butter mixture and stir until a soft dough forms.
5. Press the Base Layer
Press about two-thirds of the dough evenly into the bottom of the prepared pan.
Use a spatula or your hands to create an even layer.
6. Add the Jelly Layer
Spread the jam evenly over the peanut butter base.
Make sure to leave a small border around the edges to prevent spilling during baking.
7. Add the Crumble Topping
Take the remaining dough and crumble it over the jelly layer.
The topping doesn’t need to fully cover the jam—small gaps create a beautiful rustic look.
8. Bake the Bars
Bake for 25–30 minutes, or until the top becomes golden brown and the edges are set.
The jam may bubble slightly, which is normal.
9. Cool Before Cutting
Allow the bars to cool completely in the pan before slicing.
This helps them set properly and prevents crumbling.
Tips for Perfect Peanut Butter & Jelly Bars
Use Creamy Peanut Butter
Natural peanut butter can separate and affect the texture, so regular creamy peanut butter works best.
Don’t Overbake
Overbaking can make the bars dry. Remove them once the edges turn golden.
Chill Before Cutting
If the bars feel soft, refrigerate them for 30 minutes before slicing.
Line the Pan with Parchment
This makes it easy to lift the bars out for clean slicing.
Delicious Variations
1. Chocolate PB&J Bars
Add ½ cup chocolate chips to the dough.
2. Crunchy Peanut Butter Bars
Use crunchy peanut butter for added texture.
3. Mixed Berry Bars
Use mixed berry jam for a colorful flavor blend.
4. Almond Butter & Jelly Bars
Replace peanut butter with almond butter for a slightly different taste.
How to Store Peanut Butter & Jelly Bars
Room Temperature
Store in an airtight container for 3–4 days.
Refrigerator
Refrigerate for up to 1 week.
Freezer
Wrap bars individually and freeze for up to 3 months.
Serving Ideas
These bars are incredibly versatile and can be served in many ways:
- As a lunchbox dessert
- With a glass of cold milk
- Warmed slightly with vanilla ice cream
- Cut into bite-sized squares for parties
They’re also perfect for picnics, bake sales, and potlucks.
Nutritional Benefits of Peanut Butter
Peanut butter adds more than just flavor to these bars.
It provides:
- Protein
- Healthy fats
- Vitamin E
- Magnesium
While still a dessert, the peanut butter adds satisfying richness and energy.
Frequently Asked Questions
Can I use natural peanut butter?
You can, but stir it very well before using to prevent oily dough.
What jam works best?
Thicker jams or preserves work best because they don’t spread too much during baking.
Can I double the recipe?
Yes. Bake it in a 9×13-inch pan and increase baking time slightly.
Can I make these gluten-free?
Simply substitute the flour with a gluten-free baking blend.
Why Peanut Butter & Jelly Bars Are So Popular
Peanut butter and jelly have been a staple flavor combination for generations. Turning that classic pairing into dessert bars creates a treat that feels nostalgic while still being fun and modern.
These bars are easy to make, easy to transport, and loved by both kids and adults, making them perfect for almost any occasion.
Final Thoughts
These Peanut Butter & Jelly Bars bring together the comforting flavors of a classic sandwich in a soft, chewy dessert bar that’s perfect for sharing.
With a rich peanut butter base, sweet jam filling, and crumbly topping, every bite delivers the perfect balance of sweet and salty.
Whether you’re baking for family, friends, or just treating yourself, this recipe is simple, nostalgic, and absolutely delicious.
Once you try them, these bars might become your new favorite easy dessert recipe.
Print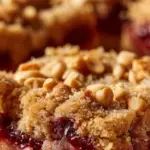
Peanut Butter & Jelly Bars: A Nostalgic Dessert Everyone Loves
Ingredients
For the crust & topping:
- 1 cup (2 sticks / 225g) unsalted butter, softened
- 1 cup creamy peanut butter
- ¾ cup granulated sugar
- 1½ cups all-purpose flour
- Pinch of salt
For the jelly layer:
- ¾ cup fruit preserves or jelly (strawberry, raspberry, or grape)
- Optional: 1 tsp lemon juice (to brighten flavor)
Instructions
Option 1: No-Bake (Chilled Bars)
- Make crust: Beat butter, peanut butter, and sugar until smooth. Stir in flour and salt until crumbly. Press half the mixture firmly into a greased 9×13″ pan.
- Add jelly: Warm jelly slightly (10–15 sec in microwave) for easy spreading. Stir in lemon juice if using. Spread evenly over crust.
- Add topping: Crumble remaining peanut butter mixture over jelly.
- Chill at least 2 hours, or until firm. Cut into squares.
Option 2: Baked (Warm & Crisp Edges)
- Follow crust steps above. Press half into pan.
- Bake at 350°F (175°C) for 10 minutes.
- Spread warm jelly over hot crust. Crumble remaining mixture on top.
- Bake 15–18 minutes more, until golden. Cool completely before slicing.
💡 Pro Tips:
– Use natural peanut butter (well-stirred) or classic brands like Jif or Skippy for best texture.
– For gluten-free: Substitute flour with 1:1 GF baking flour.
– Store in an airtight container at room temp (baked) or fridge (no-bake) up to 5 days.
Prep Time & Nutrition (per bar, makes 24):
Servings: 24 | Calories: 140 | Net Carbs: 14g | Fats: 9g | Protein: 4g