
If you’re craving a dessert that’s rich, creamy, and packed with peanut butter flavor, Irresistible No-Bake Peanut Butter Bars are the perfect solution. These easy dessert bars feature a smooth peanut butter base topped with a luscious layer of chocolate, creating a treat that’s every bit as satisfying as a peanut butter cup—but in sliceable bar form.
Best of all, there’s no oven required. With just a few pantry staples and minimal preparation, these bars come together quickly and chill until firm, making them an ideal make-ahead dessert for parties, potlucks, bake sales, holidays, or an everyday sweet treat.
Whether you’re a lifelong peanut butter lover or simply need a foolproof dessert recipe, these bars are guaranteed to become a favorite.
What Are No-Bake Peanut Butter Bars?
No-Bake Peanut Butter Bars are layered dessert squares made with a rich peanut butter mixture pressed into a pan and topped with melted chocolate. Once chilled, they’re cut into bars that are creamy, fudgy, and wonderfully satisfying.
Each bite offers:
- Smooth peanut butter filling
- Rich chocolate topping
- Soft, melt-in-your-mouth texture
- Sweet and salty flavor
- No baking required
They’re simple enough for beginners yet impressive enough for special occasions.
Why You’ll Love This Recipe
No Oven Needed
Perfect for warm days or quick dessert prep.
Quick and Easy
Simple ingredients and easy assembly.
Rich Peanut Butter Flavor
Every bite is packed with creamy peanut butter goodness.
Great for Make-Ahead
Prepare them in advance for parties or holidays.
Crowd Favorite
Loved by both kids and adults.
Ingredients You’ll Need
Peanut Butter Layer
- Creamy peanut butter
- Unsalted butter, melted
- Powdered sugar
- Graham cracker crumbs
- Vanilla extract
- Pinch of salt
Chocolate Topping
- Semi-sweet chocolate chips
- Milk chocolate chips (optional)
- Peanut butter
- Butter or coconut oil (optional, for a smoother topping)
Optional Garnishes
- Chopped peanuts
- Flaky sea salt
- Chocolate drizzle
- Peanut butter drizzle
- Mini chocolate chips
Why These Bars Are So Popular
Rich Yet Simple
A handful of ingredients creates an indulgent dessert.
Perfect Texture
Creamy filling with a smooth chocolate topping.
Easy to Slice
Once chilled, they cut into neat squares for serving.
Perfect for Every Occasion
Great for holidays, birthdays, lunchboxes, and dessert tables.
How to Make Irresistible No-Bake Peanut Butter Bars
Step 1: Prepare the Pan
Line a square baking pan with parchment paper, leaving enough overhang to lift the bars out easily after chilling.
Step 2: Make the Peanut Butter Base
In a large bowl, combine:
- Melted butter
- Creamy peanut butter
- Vanilla extract
Stir until smooth.
Add:
- Graham cracker crumbs
- Powdered sugar
- Pinch of salt
Mix until a thick, smooth mixture forms.
Step 3: Press Into the Pan
Spread the peanut butter mixture evenly into the prepared pan.
Press firmly with the back of a spoon or an offset spatula to create a smooth, even layer.
Step 4: Prepare the Chocolate Layer
In a microwave-safe bowl or over a double boiler, melt:
- Chocolate chips
- Peanut butter
Stir until smooth and glossy.
Step 5: Spread the Chocolate
Pour the melted chocolate mixture over the peanut butter base.
Spread evenly to the edges.
Step 6: Add Toppings
Before the chocolate sets, sprinkle with:
- Chopped peanuts
- Flaky sea salt
- Chocolate drizzle
- Peanut butter drizzle
Step 7: Chill
Refrigerate for 2–3 hours, or until completely firm.
Step 8: Slice and Serve
Lift the bars out using the parchment paper.
Cut into squares or rectangles using a sharp knife.
Serve chilled or at cool room temperature.
Tips for Perfect Peanut Butter Bars
Use Creamy Peanut Butter
It creates the smoothest texture and blends easily with the other ingredients.
Line the Pan
Parchment paper makes removing and slicing the bars much easier.
Chill Thoroughly
Allow enough time for the chocolate to set before cutting.
Warm the Knife
Dip your knife in warm water and wipe it dry between cuts for cleaner slices.
Don’t Overheat the Chocolate
Melt gently to maintain a smooth, glossy finish.
Delicious Variations
Crunchy Peanut Butter Bars
Use crunchy peanut butter for added texture.
Dark Chocolate Peanut Butter Bars
Swap semi-sweet chocolate for dark chocolate for a richer flavor.
Salted Caramel Peanut Butter Bars
Drizzle caramel sauce over the peanut butter layer before adding the chocolate.
Cookies and Cream Bars
Sprinkle crushed chocolate sandwich cookies over the chocolate layer.
Pretzel Peanut Butter Bars
Mix crushed pretzels into the base for a sweet-and-salty crunch.
Peanut Butter Cup Bars
Fold chopped peanut butter cups into the peanut butter mixture for an extra indulgent treat.
Best Toppings
Customize your bars with:
- Chopped roasted peanuts
- Mini chocolate chips
- White chocolate drizzle
- Caramel drizzle
- Toffee bits
- Toasted coconut
- Colorful sprinkles
- Flaky sea salt
What to Serve With No-Bake Peanut Butter Bars
These rich dessert bars pair wonderfully with:
- Hot coffee
- Espresso
- Cold milk
- Hot chocolate
- Vanilla ice cream
- Chocolate milkshake
- Fresh berries
They also make a delicious addition to dessert platters featuring brownies, cookies, and fudge.
Storage Tips
Refrigerator
Store in an airtight container for up to 1 week.
Freezer
Freeze for up to 3 months.
Separate layers with parchment paper to prevent sticking.
Thaw in the refrigerator before serving.
Common Mistakes to Avoid
Overheating the Chocolate
Heat gently to prevent the chocolate from becoming grainy.
Using Natural Peanut Butter
The separated oils can affect the texture. Traditional creamy peanut butter typically provides the most consistent results.
Not Pressing the Base Firmly
A compact base helps the bars hold together when sliced.
Cutting Too Soon
Allow the bars to chill completely before slicing.
Using Too Much Chocolate
A very thick chocolate layer may crack when cutting. Keep the topping balanced with the peanut butter layer.
Frequently Asked Questions
Can I Make These Ahead of Time?
Yes. They’re an excellent make-ahead dessert and taste even better after chilling overnight.
Do They Need Refrigeration?
Yes. Refrigeration keeps the bars firm and maintains the best texture.
Can I Use Crunchy Peanut Butter?
Absolutely. It adds a delicious crunch to the filling.
Can I Make Them Gluten-Free?
Yes. Simply use gluten-free graham cracker crumbs and verify that all other ingredients are gluten-free.
Can I Freeze Them?
Yes. Freeze them in an airtight container for up to three months.
Healthier Ingredient Swaps
If you’d like a lighter version, try these simple substitutions:
- Use natural-style peanut butter that is well stirred if you don’t mind a slightly softer texture.
- Replace part of the butter with coconut oil.
- Choose dark chocolate with a higher cocoa percentage.
- Reduce the powdered sugar slightly to highlight the peanut butter flavor.
- Add ground flaxseed or chia seeds to the base for extra fiber.
These adjustments can make the bars a little more wholesome while preserving their creamy texture.
Creative Serving Ideas
Make these Peanut Butter Bars even more memorable by serving them:
- On a dessert board with fresh fruit and chocolate truffles.
- Drizzled with melted white chocolate for an elegant finish.
- Cut into bite-sized squares for parties.
- Wrapped individually as homemade gifts.
- Served slightly chilled with a scoop of vanilla ice cream.
- Garnished with chopped peanuts and a light sprinkle of flaky sea salt.
These presentation ideas make an easy dessert feel extra special.
Final Thoughts
Irresistible No-Bake Peanut Butter Bars are proof that simple ingredients can create an unforgettable dessert. With a creamy peanut butter base, a rich chocolate topping, and the perfect balance of sweet and salty flavors, these bars are always a hit.
Whether you’re making them for a holiday celebration, family gathering, bake sale, or simply to satisfy a peanut butter craving, this no-bake recipe delivers delicious results every time. Keep a batch in the refrigerator, and you’ll always have a decadent homemade treat ready to enjoy.
Print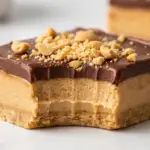
Irresistible No-Bake Peanut Butter Bars: Rich, Creamy, and Incredibly Easy
Ingredients
For the Base:
- 1½ cups rolled oats
- 1 cup natural peanut butter
- ¼ cup maple syrup
- 2 tbsp coconut oil, melted
- 1 tsp vanilla extract
- ¼ tsp sea salt
Chocolate Topping:
- ¾ cup dark chocolate chips
- 1 tsp coconut oil
Instructions
- Line an 8×8-inch baking pan with parchment paper.
- In a large bowl, mix together the rolled oats, peanut butter, maple syrup, melted coconut oil, vanilla extract, and sea salt until well combined.
- Press the mixture firmly into the prepared pan to form an even layer.
- Melt the dark chocolate chips with the coconut oil until smooth.
- Pour the melted chocolate over the peanut butter layer and spread evenly.
- Refrigerate for at least 2 hours, or until firm.
- Lift the bars from the pan using the parchment paper.
- Slice into 16 bars and serve chilled.
PREP TIME & NUTRITION :
- Prep Time: 10 minutes
- Cook Time: 5 minutes
- Total Time: 15 minutes (plus 2 hours chilling)
- Servings: 16 bars
- Calories: 185
- Net Carbs: 13g
- Fats: 13g
- Protein: 6g